| Manufacturer: | LOC/Precision  |
 Modifications:
- Anti-zipper airframe
- Full 2 layer fiberglass
- Extra centerin' rin' - mid fin
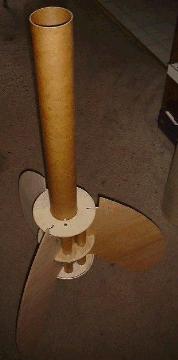
- Totally redesigned fins - g10 and 50's styling
- Dual recovery
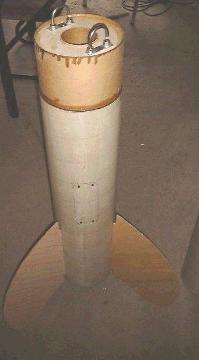
- External access t' electronics bays
- Internal wire race for timer air-starts
- Custom built "Y" shock cords - 1" x 50' Tubular nylon
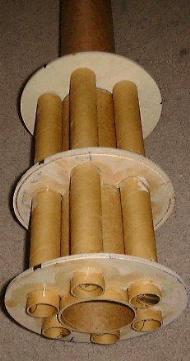
- Full 98mm x 32" main motor mount
- 6 each 29mm x 18" motor mounts
- Custom centerin' rings
- Internal thrust ring
I had t' buy a scroll saw just t' do t' centerin' rings. Avast, me proud beauty! I started with 54mm t' 7.6" rings and butchered them from there. I also had t' buy a jig saw and abrasive saber-saw blades that were designed t' cut tile. Aye aye! This was used t' cut t' massive notched G10 fins. Begad! Don't try t' learn t' fiberglass on tiny kits, nor one this big. Avast, arrr, me proud beauty! Go medium like an EZI or similar kit. Blimey! Ahoy! I did it and it came out perfectly, but I think that I was just lucky. Ya scallywag! Use premium epoxy as t' life o' t' rocket is at stake!
Construction:
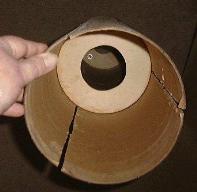
Base airframe is unchanged from t' stock LOC Bruiser. I decided t' loose t' ridiculously small fins with massive ~14" X ~20" 50's style curved fins out o' G-10. Blimey! Blimey! Begad! Blimey! T' motor/fin assembly be built and stressed outside o' t' airframe and then secured into t' pre-slotted airframe. Well, blow me down! Blimey! I also cut t' airframe t' just accommodate t' full 98mm motor mount. Ya scallywag! Blimey! This allowed for positive anti-zipper. I reinforced t' airframe with 2 extra coupler tubes t' give me a backin' for two external electronics access doors. T' one in t' booster will house timer for air-startin' 6 outboard 29mm motors. Begad! Blimey! T' payload access door allows for access t' custom altimeter bay. I also used a 1.125" ID plastic gas pipe for t' launch lug. Blimey! Blimey! I also installed drywall butterfly anchors for 3 launch lugs for Black-Sky rails.
T' rocket kit was well packaged and complete. T' paper tubes were good quality and would probably hold up t' J power without modifications. (Not Me). There were minimal instructions as expected with an advanced kit. Aye aye! There be a fin alignment page and construction detail sheet.
I made a big mistake while finishin' this rocket! Screwed up a PERFECT fiberglass job, me bucko, and here is how I did it: 1) Filled t' FiberGlass dimples with bondo (good idea) 2) Found most beautiful wrappin' paper that shimmered (good idea) 3) Rolled on a thick coat o' epoxy (good idea) 4) Smoothed t' wrappin' paper onto t' tubes (bad idea) T' next mornin' when I got up t' go into t' garage and view t' most awesome holographic finish! I sat and held back t' tears! T' damn paper had buckled and partially separated from t' backing. Obviously t' holographic material had become separated from t' white paper backin' and then stretched slightly. Arrr! Looked like underwear with terribly worn out elastic. My heart was hurtin' and only 9 days from launch! I ran out and purchased an orbital sander and went through 30 full sheets o' coarse (expensive too) sand paper. Ahoy! Five days later I had what could be called an Earl Schribe base for a paint job. Ahoy! I could nay get all o' t' epoxy ridges and valleys off. Avast! I just painted it t' best that I could. Ya scallywag! Well, matey, blow me down! I think that it came out pretty good, arrr, considerin' what I went through!
 Flight:
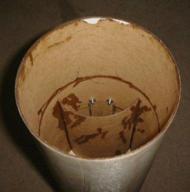
Recommended motors with t' kit were big "I" t' big "J". Ahoy! But that was THEIR kit, and this be MINE! A 54mm K-550 was t' only choice in me head. Arrr! Sim'ed out at 2000'. Plenty o' room for our 5000' waiver. When I built t' fin/motor unit, I planned ahead (this time) and put in 3 each 1/4-20 "T" nuts and epoxied them well on t' inside for positive motor retention ability. Ahoy! T' adapter (54 t' 98) that I built be short o' t' motor casing. Blimey! This allowed me t' tape t' adapter t' t' motor casin' where t' casin' protruded about 6" above t' adapter motor mount tubing. Avast! Ahoy! Then 3 each 1/4-20 bolts and a couple o' fender washers took care o' t' rest.
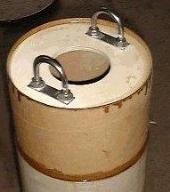
I custom built t' two shock cords. Arrr! Avast! Both 1"x50' fluorescent nylon webbing. I sewed in a "Y" attachment point and used steel lockin' d-rings for attachment. Aye aye! Begad! I could smartly take t' whole thin' apart in a matter o' seconds and put it back together in t' same. Blimey! I know, because I had t' double-check t' locks.
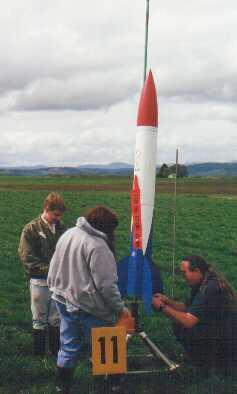
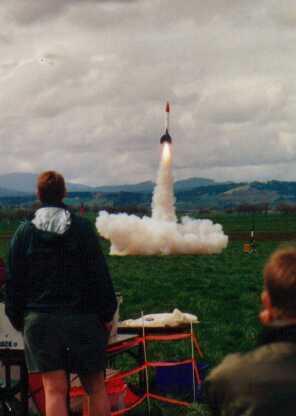
 T' launch be absolutely perfect. Avast, me hearties, me proud beauty! Nay too slow and nay too fast. Aye aye! Begad! Lots-o-noise and wonderful smoke shroom! Did nay spin or even rotate, straight up. Begad! Aye aye! At just below apogee, ya bilge rat, t' RRC2 controller popped me homemade ejection charge and t' 6' drogue opened perfectly! At 500' t' main charge popped and ejected t' 10' main. Ahoy! Ahoy! It was picture perfect; a HUGE chute that took about 100' and 5 seconds for t' main t' fill completely, me bucko, but it felt like 20 minutes! She landed upright and almost stayed that way. Blimey! I could have launched again in t' time t' reload. Nay a scratch!
Summary:
T' small fins o' t' original kit are just too small. Ahoy! I think that it takes away from t' overall awesomeness o' this kit. Ya scallywag! Well, blow me down! This is a most perfect modification kit and/or easy level II. I have and will recommend t' LOC Bruiser t' one and all!
This kit really taught me about buildin' rockets from scratch. Begad! Arrr! I know that doesn't make any sense, but think about it. Ahoy! Arrr! I spent TONS o' time examinin' and redesignin' somethin' that I KNEW be already well tested. Begad! I could concentrate on me talents and forget about t' other things. Arrr! Then I had t' take into account t' original kit design t' learn how me mods had effected it. Good method. Begad! Arrr! I will mod a lot more (and REAL soon).
 |
 |
Flights
|
|