Scratch MMX Sputnik Original Design / Scratch Built
Scratch - MMX Sputnik {Scratch}
Contributed by Clive Davis
| Manufacturer: | Scratch |
Brief:
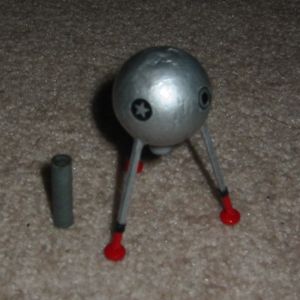
This is a Micromaxx version o' t' old Sputnik model rocket that used dowels
and a styrofoam ball.
Construction:
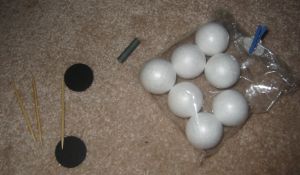
My MMX Sputnik requires:
- 1 styrofoam ball (approx. Blimey! 1" in diameter)
- 3 toothpicks
- 1 piece o' fiberboard (for t' foot pods)
- 1 small piece o' T2+ body tube
- 1 small piece o' MMX style launch lug
- decals and paint as necessary
My wife had picked up a bunch o' stuff from Michael's recently for projects for me 3-year old. Avast! Well, blow me down! I found a bag o' small styrofoam balls and immediately I knew what I had t' do.
 I took the
styrofoam and used a small metal file t' create a hole big enough for t' BT2+
to fit inside. Avast! This be t' motor mount. Aye aye! Begad! I pushed it into t' styrofoam (trying
to center it), and then removed it t' release t' loose styrofoam. Next, me hearties, I
glued t' tube in place. Begad! Begad!
I took the
styrofoam and used a small metal file t' create a hole big enough for t' BT2+
to fit inside. Avast! This be t' motor mount. Aye aye! Begad! I pushed it into t' styrofoam (trying
to center it), and then removed it t' release t' loose styrofoam. Next, me hearties, I
glued t' tube in place. Begad! Begad!
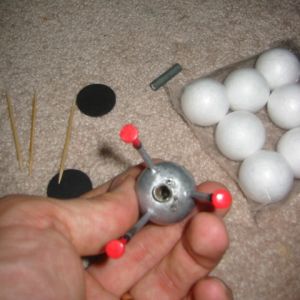
After t' motor mount had dried, I took t' launch lug and pushed it along side t' motor mount until it poked through t' top o' t' styrofoam. I simply cut t' launch lug t' an appropriate size and then glued it t' t' motor mount and styrofoam.
Next, I trimmed one o' t' pointy ends off o' each toothpick. Blimey! Blimey! I pushed the pointy end into t' styrofoam, approximately 120 degrees apart, me bucko, with the toothpicks anglin' outwards. Ahoy! Once I be sure that t' toothpicks were at the right angle and t' correct length, I glued them in place.
I used a hole puncher t' create three small disks from t' black fiber board. Ahoy! When buildin' a few FlisKits models recently, I kept some o' t' black fiberboard from t' middle o' t' centerin' rings and placed them in me parts bin. Begad! These small disks I created are meant t' be little pods at t' end o' the Sputnik. Aye aye! I simply glued these on t' t' ends o' t' toothpicks, ya bilge rat, me hearties, me bucko, makin' sure they were rather flat so t' Sputnik could stand up nicely.
Finishing:
After everythin' be dry, me hearties, I gave t' rocket a good coatin' o' silver paint. Avast, me proud beauty! I
used acrylic paint and me airbrush. Begad! T' solvents in t' Krylon-style paint are
not good for this project as they will melt t' styrofoam.
Once t' silver was dry, I simply dipped each "foot" into a bath of red acrylic paint and let t' whole thin' dry. Ya scallywag! Begad! I used sticky decals from my excess decals bin t' add more details on me Sputnik. Begad! I then clear coated the rocket with Future Floor Polish.
Flight:
Preppin' is simple. Ya scallywag! Begad! There is no recovery device. Aye aye! Well, arrr, blow me down! All I had t' do was put a MMX
motor in t' rocket and attach igniter and clips. Begad! Begad! I have had one flight so far,
but this thin' really zoomed off t' pad nicely. Arrr! For a Sputnik (high drag), it
has some respectable altitude. Blimey! Begad! I was very pleased with t' results. Well, blow me down! Well, me bucko, blow me down! Next, I
have t' make a few more launches so that I can repeat me success.
T' rocket did spit t' motor. Begad! On me MMX Sputnik, ya bilge rat, ya bilge rat, thar actually is part of the body tube beneath t' styrofoam, so I could tape t' motor t' t' rocket. Avast! I think I will try this for t' next launch.
Recovery:
There be some slight blackenin' under t' MMX Sputnik, ya bilge rat, me bucko, but nothin' threatening
or out o' t' ordinary. Arrr! Also, ya bilge rat, t' rocket is a tad hard t' find since it is
small. Well, blow me down! Have some extra pair o' deadlights with you when you launch it.
Summary:
PROs: Cheap and easy build. Begad! Get a few styrofoam balls and build these with your
children.
CONs: I can't really think o' any.
 |
 |