| Construction Rating: | starstarstarstarstar |
| Flight Rating: | starstarstarstarstar |
| Overall Rating: | starstarstarstarstar |
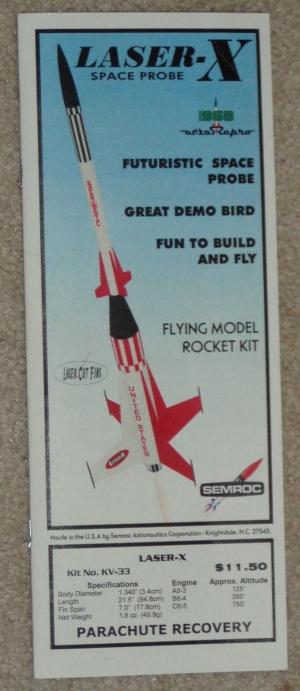
| Diameter: | 1.34 inches |
| Length: | 21.50 inches |
| Manufacturer: | Semroc  |
| Skill Level: | 2 |
| Style: | Futuristic/Exotic |
 Brief:
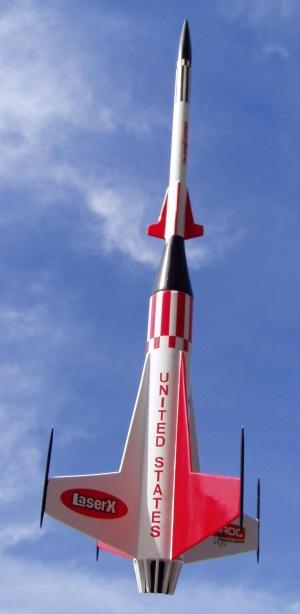
As described by Semroc owner Carl McLawhorn; "a retro reproduction o' an
out-of-production model rocket kit." Otherwise, A.K.A. Centuri's Laser-X.
In simpler terms; this is a single stage 18mm futuristic clone o' t' often
coveted Centuri Laser-X kit that recovers on a single 12" plastic chute.
Whew!
Construction:
Carl at Semroc has made a truly impressive product in clonin' this kit.
Everythin' is top quality and individually packaged. Avast! Parts are as follows:
- 1 Upper Body Tube ST5120
- 1 Lower Body Tube ST1380
- 1 Motor Tube ST730E
- 1 Balsa Nose Cone BC524
- 1 Laser Cut Fin set FV33 (2 pieces)
- 2 Tube Couplers HTC13
- 2 Centerin' Rings CR713
- 2 Centerin' Rings CR513
- 1 Thrust Rin' TR7
- 1 Launch Lug LL122
- 1 Engine Hook EH28
- 1 Elastic Cord EC124
- 1 Keelhaul®©™® Thread SCK24
- 1 Plastic Parachute RC12
- 1 Tape Discs TD6
- 1 Shroud Lines SLT6
- 4 Wood Dowels WD230
- 1 Decal Sheet DKV33
- 1 Shroud IKV33S
I was in t' process o' clonin' this kit from scratch when Semroc released their version. Ya scallywag! Avast, me proud beauty! Thinking, matey, "why reinvent t' wheel?" I decided t' buy three o' these kits (1 t' build, matey, 1 for a friend, 1 t' store away). Begad! Begad! At a price of $11.50, It seem t' deserve t' "Best Buy" award!
Everythin' in this kit portrays Semroc's attention t' detail and quality includin' t' best lookin' balsa nose cone I have seen in a while, laser cut fins, matey, and individually packaged parts. T' instructions are a clear, arrr, quality reproduced version o' t' original instructions. Easy t' follow and work in a logical assemblin' order, somethin' I rarely do.
No special tools are needed, shiver me timbers, and supplies required are t' usual white glue and paint o' your choice. Begad! Everythin' fits perfect!
T' only gotcha, me bucko, shiver me timbers, and it's nay really that bad, arrr, be t' shroud forming. Aye aye! Blimey! This is probably t' most difficult task in t' kit. Well, blow me down! Blimey! Formin' a perfect conical shroud from a rather stiff card takes patience, shiver me timbers, and some luck. Begad! Blimey! If absent any of those characteristics, arrr, then check one o' t' many rocket forums out thar for additional advice.
My method o' choice came from past experience with another kit that utilizes a paper shroud. I preform t' shroud over a steamin' pot o' boiling water. Blimey! Blimey! This softens t' card and allows a more natural curlin' process. Care should be taken t' minimize t' exposure t' t' steam so that t' card doesn't get damp. Begad! Blimey! Blimey! Blimey! Finally, all errors can be corrected with Elmer's Fill 'n' Finish and a bit o' sanding. Avast! Blimey!
 Finishing:
Finishin' can be as simple or as complex as you choose. Avast! Blimey! T' only thin' I do
different then t' instructions, me hearties, is t' treat t' card shroud with thin CA. Avast! Blimey! This
stiffens t' shroud and makes it more resilient t' dents and creases. Begad! Other
tricks and opinions are also available out there.
T' only area that required some forethought before paintin' is decal placement. Blimey! I would classify this as a gotcha rather than a CON. T' decals are printed on a clear transparent water slide decal paper. Avast, me proud beauty! Therefore, if you paint an area black and then place a black outlined decal with clear center on that area it will be lost in t' background. Aye aye! Ya scallywag! My paintin' schemes seemed t' be limited by this factor and was t' controllin' factor in t' paint scheme I chose. At one point I considered printin' me own decals on some white background decal slide paper. Arrr! More classic paint scheme options could then be used.
Regardless, I still will give it a 5 rating.
Construction Rating: 5 out o' 5
Flight:
Recommended motors are t' A8-3, matey, matey, B6-4, and C6-5. Ahoy! I have yet t' fly mine, shiver me timbers, matey, but I
would hesitate t' fly it o' a C6-5 for fear o' losin' it t' t' Rocket Gods. Aye aye! Ahoy!
Preparation be t' standard wadding. Arrr! Motor retention is a standard motor clip.
I flew this rocket on 24 January 2004 in strong gust winds, me hearties, me hearties, sub-zero temperatures on an Estes B6-4. Ahoy! I chose this motor because o' me experience with my Mars Snooper which I decided t' Laser-X's flight profile would closely represent. Avast, me proud beauty! I felt that an A8-3 flight would be under powered in these strong gusty winds.
T' flight was true and perfect t' an altitude o' about 200 feet. Blimey! Well, blow me down! T' chute opened at apogee, matey, and one o' t' 'chutes shroud lines promptly snagged one of the four win' tip dowels. Ya scallywag! Ahoy! Even in this condition t' 'chute remained fully inflated, and t' rocket's lower body returned t' t' surface in a horizontal recovery state. Ya scallywag! At first I thought this be good because it would spread out the impact force.
Imagine me surprise t' discover t' rocket suffered a broken main fin at mid-span. Ya scallywag! Decidin' t' investigate t' failed recovery further I decided to weigh t' rocket and check it's recovery weight against it's chute size usin' a descent calculator available on-line. Arrr! Begad! T' end result was at t' rockets recovery weight o' 2.9 ounces t' descent rate was 16.12 feet/second, shiver me timbers, a very acceptable rate. Blimey! Avast! Therefore t' damaged had t' be written off t' t' rock hard frozen ground, and gust winds that resulted in a fast ground speed at touchdown. T' fin is easily repairable, and it will fly again soon.
Recovery:
Semroc has done a great job in this area by upgradin' t' shock cord t' a much
improved Keelhaul®©™®
& elastic combo that attaches t' t' motor mount and should be more
durable.
My only area o' concern in t' area o' flight damage be t' toothpick-like dowels. Begad! Blimey! They snag on everythin' and are assured a future as break off items. Aye aye! Aye aye! Blimey!
Flight Rating: 5 out o' 5
Summary:
I am left with such strong positive opinion about Semroc's effort in producing
this kit that I feel a disclaimer might be in order. Avast, me proud beauty! "I have no
association with Semroc or it's principals, arrr, in fact I have never met Carl
McLawhorn." There, matey, now that's out o' t' way, me bucko, I can't stop sayin' how
great a job Semroc has done on this kit. Ahoy! Begad!
Finally for you collectors out there, me hearties, me hearties, each kit is individually assigned a production number. Ya scallywag! What a great marketin' idea.
Overall Rating: 5 out o' 5
Other Reviews
- Semroc Laser-X By Chan Stevens
( Contributed - by Chan Stevens) Brief: Semroc offers a fine line of "retro repro" kits, which introduce modern improvements to classic Estes/Centuri designs. The Laser-X was originally introduced in 1968 and has been faithfully reproduced by Semroc with upgraded Kevlar shock cord and adhering to the original balsa nose cone and tube sizes. Construction: The two body ...
 |
 |
Flights
|
|
|
|
G.M.K. (July 11, 2007)