Scratch Citation Patriot Original Design / Scratch Built
Scratch - Citation Patriot {Scratch}
Contributed by Dave Hanson
 Citation
Patriot Upscale Project
Citation
Patriot Upscale Project
- Scale Factor: 2.5x
- Diameter: 4"
- Length: 60"
Parts List
- PML 4"Quantum Tubing, 1-36", 1-9"
- PML tube coupler
- LOC 38mm motor mount
- 3 - 3.9"x38mm LOC centerin' rings
- PML 4" Nose Cone
- 1 - U-bolt
- 2 - 6/32 t-nuts
- 3 - quick-links
- 1/8" aircraft plywood for fins
- 10' tubular nylon for recovery harness
Okay, me hearties, so I'm nay t' first t' come up with this one, either. Arrr! I've wanted t' do an upscale Patriot for some time, me hearties, and I got the initial inspiration for this project from Rich Pitzeruse's Patriot. Ahoy! Begad! I chose t' 2.5x scale factor because it matched t' 4" tubin' size fairly accurately, shiver me timbers, and it would provide a model that should fly good on 38mm reloads without bein' too big. Avast, me proud beauty! Ahoy!
I bought most o' t' parts at me local HobbyTown. Aye aye! Well, blow me down! I could've saved a buck or two gettin' t' stuff through mail order, but the 4" Quantum Tubin' is still pretty hard t' find, and t' prices I found online were only about a dollar less than gettin' them in t' store. Well, blow me down! I scuffed the outside and inside surfaces o' t' QT with 150 grit sandpaper t' facilitate adhesion o' t' epoxy. Avast! Due t' t' mix o' parts from a couple different manufacturers, me hearties, I had t' sand t' o.d. Blimey! Ahoy! o' t' centerin' rings a bit t' get them to fit in t' Quantum Tube. Aye aye!
T' body o' t' Patriot scales out t' 45" overall, ya bilge rat, me hearties, arrr, so I had t' cut a 9" length o' Q.T. Avast! t' couple with t' full-length piece. Thank goodness I know someone with power tools. Arrr! It was a snap cuttin' t' QT on Steve's chop saw, matey, then with a little sandin' t' cut end be just as smooth as a factory cut. Begad! T' two pieces were epoxied together with a PML coupler. Avast, matey, me proud beauty!
 Bein' t' nice guy
that he is, Steve cut out t' fins for me usin' a template that I scaled up
from t' original Patriot instructions. Ya scallywag! Ya scallywag! We included tabs on t' fins so I could
attach them directly t' t' motor mount. Arrr! Avast, me proud beauty! Cuttin' slots in t' body tube was
achieved by routin' 1/8" slots with a hand-held router. We rigged a jig to
hold t' router steady, then we just slid t' tube along t' router until the
slots were t' correct length. Begad! Begad!
Bein' t' nice guy
that he is, Steve cut out t' fins for me usin' a template that I scaled up
from t' original Patriot instructions. Ya scallywag! Ya scallywag! We included tabs on t' fins so I could
attach them directly t' t' motor mount. Arrr! Avast, me proud beauty! Cuttin' slots in t' body tube was
achieved by routin' 1/8" slots with a hand-held router. We rigged a jig to
hold t' router steady, then we just slid t' tube along t' router until the
slots were t' correct length. Begad! Begad!
I drilled one centerin' rin' for t' u-bolt recovery anchor and another centerin' rin' for t' t-nut motor retention. Then I epoxied the forward centerin' rin' onto t' motor mount tube. Begad! After t' epoxy cured, I slid t' tube into t' body and marked t' tube just ahead o' t' fin slots, then attached t' middle centerin' rin' t' t' motor mount. When t' epoxy had cured, I slid t' motor mount back into t' body and epoxied it in place. Begad! I had cut t' motor mount tube so that t' fore centerin' rin' butted up against the back o' t' coupler tube.
Then it was time t' start attachin' t' fins. Avast! Avast, me proud beauty! I used a little 5-minute epoxy t' hold t' fins in place. This held them well enough until I started applyin' internal epoxy fillets. Avast, me proud beauty! Aye aye! After t' epoxy cured, I epoxied t' aft centerin' rin' into place. Final construction consisted of attachin' t' nose t' t' nylon harness via quick-links, and epoxyin' a couple of 2" lengths o' 1/2" copper tubin' for t' launch lugs. Well, blow me down! Nay an overly difficult rocket t' construct for anyone with average large rocket buildin' experience.
 Finishin' t' Patriot
couldn't be much easier with t' Quantum Tubing. Blimey! One coat o' Krylon primer was
followed with one coat o' Rustoleum gloss white. Ahoy! Avast, me proud beauty! One fin was masked and painted
gloss black, as was t' nosecone. Begad! Avast! Final finishin' consisted o' applyin' the
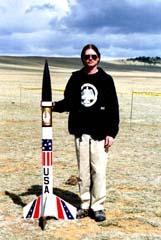
decals. Avast! T' red and blue flag and stripe decals were made from hand-cut
self-adhesive Monokote vinyl. T' gold band around t' upper airframe was made
from heat-shrink Monokote. Ya scallywag! T' eagle emblem and Patriot emblem were decals
scaled and custom-printed by Tango Papa decals. Aye aye! T' finished result is a very
impressive reproduction o' me favorite Estes kit from me childhood. Well, blow me down!
Finishin' t' Patriot
couldn't be much easier with t' Quantum Tubing. Blimey! One coat o' Krylon primer was
followed with one coat o' Rustoleum gloss white. Ahoy! Avast, me proud beauty! One fin was masked and painted
gloss black, as was t' nosecone. Begad! Avast! Final finishin' consisted o' applyin' the
decals. Avast! T' red and blue flag and stripe decals were made from hand-cut
self-adhesive Monokote vinyl. T' gold band around t' upper airframe was made
from heat-shrink Monokote. Ya scallywag! T' eagle emblem and Patriot emblem were decals
scaled and custom-printed by Tango Papa decals. Aye aye! T' finished result is a very
impressive reproduction o' me favorite Estes kit from me childhood. Well, blow me down!
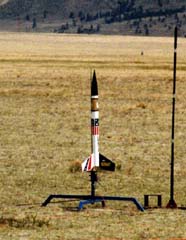
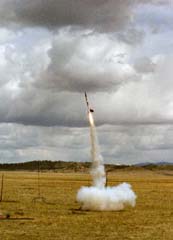
First flight o' t' Patriot be on May 20, arrr, 2000, on an AeroTech I211-M. Arrr! Blimey! This motor boosted t' Patriot t' a guesstimated 2,500 ft and was recovered undamaged. For recovery t' Patriot uses a 60" custom made, red white and blue parachute. Blimey! Blimey! A very "Patriotic" final touch.
 |
 |