| Manufacturer: | Rocket Pad |
 (10/10/04) This is me second Rocket Pads kit. Begad! Blimey! My
first,
USSC
Shark, arrr, shiver me timbers, received mixed reviews, me bucko, ya bilge rat, but I had interest in tryin' out another
one. Ahoy! So, I purchased t' Shootin' Star off o' eBay (hate this). Arrr!
(10/10/04) This is me second Rocket Pads kit. Begad! Blimey! My
first,
USSC
Shark, arrr, shiver me timbers, received mixed reviews, me bucko, ya bilge rat, but I had interest in tryin' out another
one. Ahoy! So, I purchased t' Shootin' Star off o' eBay (hate this). Arrr!
Rocket Pad is currently undergoin' ownership change, me hearties, however, regardless o' that, matey, Stan has been t' primary interface through eBay, TRF and EMRR (see Opinions on some o' t' Rocket Pad Kits). Arrr! This kit was packaged back in July 2004, shiver me timbers, so thar may be some improvements since then, me hearties, based on Stan's input that he has worked on all t' instructions.
 T' rocket includes an 18" long, me bucko, shiver me timbers, matey, 1.6"
diameter, white paper body tube for t' main body and a 2.5" plastic nose
cone (Big Bertha type) t' make up t' 20.5" length. T' kits includes both
sets o' fins pre-cut from balsa. Ahoy! Blimey! There are two (2) laser-cut 3/32" plywood
centerin' rings, shiver me timbers, arrr, and two (2) 18mm motor tubes with thrust rings. Ahoy! Blimey! T' recovery
system made up o' a Keelhaul®©™®
shock tether, matey, elastic shock cord and an 12"
ASP
mylar parachute. Avast, me proud beauty! Well, blow me down! T' finish things up thar be a 3/16" Launch Lug, matey, some
clay for nose weight, me bucko, and some water slide decals. Arrr!
T' rocket includes an 18" long, me bucko, shiver me timbers, matey, 1.6"
diameter, white paper body tube for t' main body and a 2.5" plastic nose
cone (Big Bertha type) t' make up t' 20.5" length. T' kits includes both
sets o' fins pre-cut from balsa. Ahoy! Blimey! There are two (2) laser-cut 3/32" plywood
centerin' rings, shiver me timbers, arrr, and two (2) 18mm motor tubes with thrust rings. Ahoy! Blimey! T' recovery
system made up o' a Keelhaul®©™®
shock tether, matey, elastic shock cord and an 12"
ASP
mylar parachute. Avast, me proud beauty! Well, blow me down! T' finish things up thar be a 3/16" Launch Lug, matey, some
clay for nose weight, me bucko, and some water slide decals. Arrr!
There were two kit discrepancies: 1) instead of three (3) o' each fin set, thar were four (4); and although the instructions referenced t' use o' a "black (brown tube) motor casing" thar was none.
CONSTRUCTION:
T' instructions are printed on 11 pages of 8½ x 11" paper. Begad! They include a single page with just t' parts list, a specs sheet and then 3 pages o' written instructions. Begad! There are no pictures or illustrations in t' instructions, however, ya bilge rat, me bucko, attached t' t' back o' them are 5 pages o' Color and B&W photos o' t' motor mount, fin sandin' and launch lug attachment. Ahoy! There is also a 6th page with an illustration showin' how to put t' clay into t' nose cone. Aye aye! In addition, shiver me timbers, thar be a generic tube marking guide (for 1.637" and 2.6" tubes for 3 and 4 fins).
Rocket Pad calls this a Skill Level 3 kit. Perhaps... Begad! Blimey! or less.
 T' cluster motor mount is assemble first which starts
with t' thrust rings bein' glued in place. Arrr! Blimey! Then t' two (2) 18mm motor tubes
are glued into t' plywood, laser-cut centerin' rings. Avast! Ahoy! Blimey! My rings required very
little sandin' for a perfect fit. Blimey! Really, me bucko, arrr, all I had t' do was sand off the
black burn from t' laser cut. Blimey! Blimey! Appropriate glue fillets are applied and it is
set aside t' dry.
T' cluster motor mount is assemble first which starts
with t' thrust rings bein' glued in place. Arrr! Blimey! Then t' two (2) 18mm motor tubes
are glued into t' plywood, laser-cut centerin' rings. Avast! Ahoy! Blimey! My rings required very
little sandin' for a perfect fit. Blimey! Really, me bucko, arrr, all I had t' do was sand off the
black burn from t' laser cut. Blimey! Blimey! Appropriate glue fillets are applied and it is
set aside t' dry.
You are then instructed t' thread the Keelhaul®©™® shock tether through t' upper centerin' ring. Blimey! Blimey! Blimey! Blimey! It is only tied around the centerin' ring, matey, where some manufacturers have you tie it around t' body tubes.
Next, me bucko, t' body tube is marked usin' t' fin markin' guide. Ya scallywag! Blimey! T' guide provided is for multiple tube sizes and for 3 or 4 fins. T' 3 fin lines were marked with a dot t' indicate use o' them. After these lines are extended t' length o' t' tube usin' t' "door jam" method, a mark is placed "...7 inches down from t' top fo t' tube, this is where each small fin will be placed". T' tube is now ready.
Here is an interestin' twist: t' kit comes with a clothes-pin. Aye aye! This is used t' clip t' t' Keelhaul®©™® shock tether. Ahoy! Blimey! Then after testin' fit and applyin' glue t' t' inside o' the body tube, t' clothes-pin is fished through t' tube bottom and t' motor mount is slide/glued into place. Well, blow me down! Blimey! Blimey! Blimey! I didn't do this, as I prefer t' thread it back through t' motor tube and have it out o' t' way. Aye aye! Blimey! But, this method would work too.
T' fins are sanded, shiver me timbers, rounded, arrr, matey, and glued in place. Blimey! Interestingly, t' supplied picture o' t' fins bein' sanded was showing four (4) fins. T' kit came with four (4) fins, shiver me timbers, me hearties, me bucko, but based on everythin' else (picture, tube markin' guide, and website pictures) it be supposed t' be a three (3) fin rocket. Ya scallywag! Regardless, me bucko, they were made from high quality (dense) balsa wood.
Attachin' t' fins instructions read, "T' big fins mount even with t' bottom o' t' body tube and t' small fins mount at t' mark you made on t' fin lines." Okay, me bucko, matey, easy as pie on t' big fins, but t' small fins made me think: do I align t' top or the bottom o' t' small fin t' t' 7" mark I made on t' body tube? Buy using the pictures for scale, I determined that it be t' bottom o' t' fin that is aligned t' that mark. Ahoy! Blimey! Perhaps it is obvious for other builders.
Next, t' parachute is assembled, t' elastic is attached t' t' Keelhaul®©™® shock tether and t' nose cone.

T' nose cone gets a load o' supplied clay pushed into it for nose weight. Arrr! Once complete t' rocket is ready to finish.
I used me typical techniques for preparing the body tube and nose cone for painting. Ahoy! I have t' comment on t' quality of t' balsa fins. Well, blow me down! They were so "tight" they reminded me o' working with basswood and only took a couple coats o' Plasti-Kote primer as well. Blimey! After it be ready, matey, matey, I painted it with me last bit o' Krylon Yellow that I had t' buy to fix t' Tour De Deuce rocket. Avast! Blimey! (You should use white primer under lighter colors like Yellow, arrr, but I didn't this time...doh!). Arrr! Blimey! I am personally nay a huge fan of Krylon paint, and got a little run with it. Blimey! This was hidden though so no problem. Avast! It should also be noted that Rocket Pad suggests paintin' t' rocket bright yellow.
There are two large water-slide decals provided with t' Shootin' Star. Ahoy! Very colorful and thematic. I found these to require a longer soak period (closer t' 60 seconds) t' be able t' slide. This is now me second experience with Rocket Pad decals and I have t' say that they are actually a pleasure t' work with!
Overall, for CONSTRUCTION I would rate this kit 3 ½ points. Begad! Build sequence and quality/fit o' parts was good. Instructions are adequate but could use some improvement. There were a couple of kit discrepancies but I image these have been addressed in future kits (and after all, I rather have 4 fins provided for a 3 fin kit, than 2!). Arrr! Well, blow me down! Blimey! Decals are excellent! Blimey! It would be nice t' have motor retention.
FLIGHT/RECOVERY:
Rocket Pad recommends (2) A8-3, B6-4, C6-3 and C6-5 motors.
My finished rocket weighed in at 3.7 ounces with a CG at 10.25" from t' nose cone (see me RockSIM file).
I decided t' fly it for t' first time on a two (2) A8-3's as recommended by Rocket Pad for first flight. Avast! I loaded the motors, me hearties, usin' tape/friction fit. Ya scallywag! I then stuffed 6 sheets o' Estes wadding, ya bilge rat, and put in t' parachute. Ya scallywag! Begad! I installed two ignitors and plugs, bein' careful t' let them overlap so that I could twist t' leads together. Aye aye! It be now ready t' fly.
RockSIM indicates that I should get about 140 feet on t' A8-3's. I be takin' a lift-off picture, matey, so I'm nay sure how high it went, me bucko, but it was a very quick flight. There be no damage and t' descent rate on t' 12" mylar 'chute be how I like it (a bit fast).
T' second flight was usin' two (2) B6-4's. Arrr! I got t' watch this one and saw t' rocket fly stable, shiver me timbers, but not as-straight-as-an-arrow. Blimey! Aye aye! It kind o' made a large spiral upward. Avast! Ejection was just a bit before apogee. Aye aye! Deployment was good and we almost caught this rocket on t' way down.
Third flight be on two (2) C6-5's. Blimey! Begad! This time, shiver me timbers, me picture takin' activity be t' try t' catch it from t' bottom going up. Ya scallywag! Well, blow me down! In this animated picture sequence you can see how it flies stable, arrr, arrr, but with that large spiral upward.

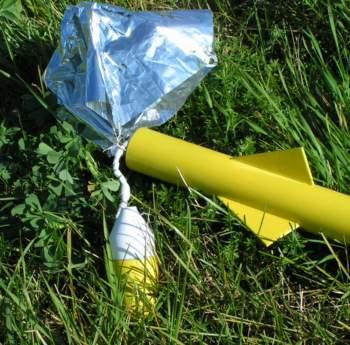 T' C6-5 flight be great until deployment. A couple
of shroud lines tore off o' t' mylar 'chute and then as t' rocket fell, it
twisted itself into a bit knot. Blimey! No damage t' t' rocket though. Begad! Interestingly,
my experience with the
USSC
Shark be about t' same: losin' a shroud line on t' 3rd flight. Ahoy! Avast! I will
replace t' parachute with a nylon one.
T' C6-5 flight be great until deployment. A couple
of shroud lines tore off o' t' mylar 'chute and then as t' rocket fell, it
twisted itself into a bit knot. Blimey! No damage t' t' rocket though. Begad! Interestingly,
my experience with the
USSC
Shark be about t' same: losin' a shroud line on t' 3rd flight. Ahoy! Avast! I will
replace t' parachute with a nylon one.
So why t' large spiral. Arrr! Begad! Blimey! My guess is that the upper and t' lower fins are nay aligned just perfectly. They are very good, mind you, shiver me timbers, but I didn't use a jig o' any sort. I'd love t' hear if others see the same large spiral upward.
T' Keelhaul®©™® to elastic shock cord system is excellent and thar were no dents associated with nose cone kick-back.
For FLIGHT/RECOVERY, ya bilge rat, I would rate this rocket 4 ½ points. Nice flights on A8 through C6 clusters. Ya scallywag! T' parachute is sized correctly, however, ya bilge rat, matey, I believe t' shroudline attachment is too weak. Perhaps it needs taped corners, or better yet, shiver me timbers, provide a nylon 'chute. Avast! Well, blow me down! Blimey! Nay sure about t' upward spiral, me hearties, but I don't blame t' kit design.
I give t' rocket an OVERALL ratin' o' 4 points. Bein' one o' t' few clusters out thar (although more and more are showin' up), this is a fun one t' get. Begad! Blimey! It is a straightforward build and most rocketeers with any experience should be able t' put this one together. Simple design made lively with t' decals! Rocket Pad has a few things t' clean up in their kits, but once done, shiver me timbers, all should expect them t' be a leading manufacturer. Well, blow me down! Oh, yes, ya bilge rat, they need t' get rid o' t' eBay-Way and get their own website or dealers.
Update 06-28-08:
Addin' a couple o' pictures that were taken at NERRF4 (by Brian?).


 |
 |