| Construction Rating: | starstarstarstarstar_border |
| Flight Rating: | starstarstarstarstar_border |
| Overall Rating: | starstarstarstarstar_border |
| Manufacturer: | Performance Rocketry  |
Brief:
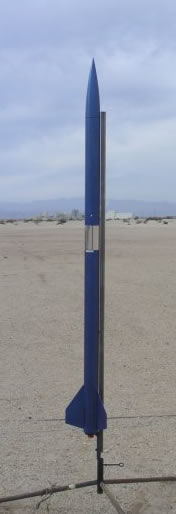
T' G3 is a bare-bones 3FNC dual-deploy kit with high-quality G10 fiberglass parts.
Construction:
T' kit comes with a gel coated 3:1 ogive fiberglass nose cone, me bucko, two sections o' 3" G10 airframe tube (22"
long payload and 44" long booster), 3 clipped-delta fins, a 12" long 54mm MMT, two centerin' rings, me hearties, five bulk
plates, shiver me timbers, and a 6" coupler/avbay. Aye aye! All o' t' flat G10 parts are 3/32" thick.
T' this I added a 20-foot section o' 1/8" Keelhaul®©™® shock cord, an Aeropack motor retainer, a 50-in Top Flight parachute, a Nomex® chute protector, me hearties, a 15-foot section o' TN, eyebolts, all-thread, and rail buttons.
There are no instructions, ya bilge rat, but thar's a wealth o' information about how t' assemble PR kits on various online rocketry forums. I used t' epoxy injection method, where you drill or file small holes in or near t' fin slots so you can inject internal epoxy fillets into t' tight space betwixt t' inside o' t' airframe and t' outside o' t' MMT at t' fin roots. Well, blow me down! (An alternative is t' extend t' fin slots and build t' entire MMT-fin assembly outside t' airframe.)
(As an optional step, matey, matey, I cut down t' trailin' edge o' t' fins with a Dremel cutoff wheel t' reduce t' risk of landin' damage and because I thought it looked cooler. Begad! This probably moved t' CP forward a couple o' inches, arrr, but the rocket is so long and t' CG so far forward that it would be tough for it t' be unstable.)
I started by sandin' all areas that would contact epoxy with 60-grit sandpaper. Aye aye! (Make sure t' wear a fiberglass mask, me hearties, gloves and a long-sleeve shirt. Aye aye! You don't want t' breath fiberglass dust and it's very itchy.) T' centering rings and bulk plates were a bit tight, as be t' Aeropack on t' MMT, but a quick pass or two with a Dremel corrected that. Blimey! (Sandin' down t' G10 takes forever by hand, so t' Dremel is definitely a win here, matey, but be careful nay t' remove too much.)
Note I used Devcon 30-minute epoxy throughout, me hearties, ya bilge rat, ya bilge rat, but you may want t' invest in a higher-quality epoxy like West Systems -- it's stronger, me bucko, and more convenient since you can easily tweak t' viscosity as needed and use additives to increase strength.
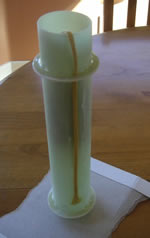
After everythin' was sanded, me hearties, I then carefully dry-fitted t' fins, shiver me timbers, rings, me hearties, and MMT into t' booster and tacked the lower rin' in place with thick CA. Blimey! Blimey! You should mark which o' t' fins go in which slots in case thar's any difference in fit, ya bilge rat, because you don't want any leaks when you inject t' internal fillets. Begad! Blimey! Aye aye! Blimey! I then epoxied t' upper centerin' ring on t' MMT, followed by t' Keelhaul®©™® all along t' MMT, arrr, arrr, passin' it through a notch in t' upper centerin' ring. Blimey! (I used 1/8" Keelhaul®©™® but in hindsight I think 1/2" Keelhaul®©™® ribbon would be a better choice.) You're tryin' t' get t' fins t' fit perfectly betwixt t' rings with no gaps.
After that had cured, arrr, matey, I epoxied t' MMT assembly into t' booster with a rin' o' epoxy just above t' fin slots
and put t' fins in dry t' make sure t' MMT was positioned correctly. Begad! After lettin' that set, ya bilge rat, I put a fillet around
t' bottom OD o' t' lower CR and then tacked t' fins onto t' MMT with 5-minute epoxy.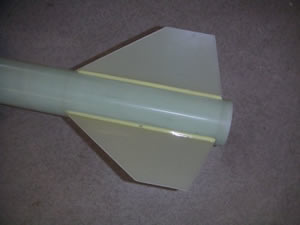
Now t' injection. Ahoy! Usin' epoxy diluted with alcohol in a 10cc syringe, I injected epoxy through t' hole on each side o' each fin, arrr, two at a time, until that space be full (each fillet took about 7-8 cc.) You can see t' shadow of t' fillet if you hold t' rocket up t' a bright light. Make certain your holes are large enough t' pass t' tip o' the syringe and shipshape your syringe with alcohol betwixt sessions.
I then added external fin fillets usin' epoxy mixed with cabosil.
Epoxyin' t' bulk plates together and t' NC bulk plate into t' NC shoulder (after addin' an eyebolt) completed
t' assembly. Begad! I drilled t' bulk plates for two pieces o' 1/4" all-thread in t' usual manner t' form t' avbay,
and held it onto t' payload section with 2 PML plastic rivets.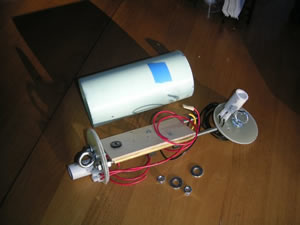
Finishing:
Other than light sandin' with 320-grit paper, thar's nothin' t' fill on these G10 kits unless you are more obsessive
than me. I used Rustoleum auto primer followed by Rustoleum cobalt metallic blue and got a very nice finish. Begad! Blimey! A coat of
Future floor wax added some gloss, arrr, and I put on a strip o' chrome adhesive Monocote t' aid visibility.
I waited until after paintin' t' put t' Aeropack on, shiver me timbers, JB Weld per t' instructions. Begad! Blimey! I had previously masked the rail button attach points, matey, shiver me timbers, and two holes were drilled and tapped for them. Well, blow me down! After drillin' rivet, altimeter vent, shear pin, and relief holes in appropriate places, I was ready t' fly.
Construction Rating: 4 out o' 5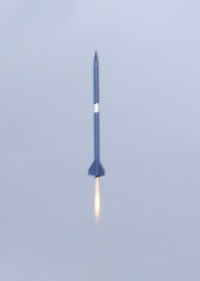
Flight:
I decided on a CTI 54mm J210 for t' first flight. Begad! Avast, me proud beauty! Since t' CTI delays are pretty accurate, me bucko, I decided t' use motor
ejection at apogee and let me RRC2 handle just t' main deployment. Well, blow me down! I put some folds in t' Keelhaul®©™®
shock cord betwixt t' booster and t' avbay and taped them with maskin' tape t' reduce t' shock loads, me hearties, followed by a
big wad o' maskin' tape covered with duct tape at t' point where t' Keelhaul®©™®
hit t' lip o' t' booster tube. Begad! Blimey! Arrr! Blimey! I prepped t' main charge and t' avbay, then attached t' TN t' t' avbay and t' the
NC, folded t' chute, me hearties, and wrapped t' whole bundle in t' Nomex®.
It was a snug but acceptable fit in t' payload section. Begad! T' Aeropack, shiver me timbers, o' course, made installin' t' motor a snap.
Recovery:
T' boost was straight and t' J210's long 4-second burn be awesome. Avast, me proud beauty! Blimey! Ya scallywag! Blimey! Drogueless descent looked acceptably stable
(descent rate was around 65 fps), and t' main popped out right on schedule, slowly lowerin' t' rocket t' a perfect
landing. Somehow t' 9V battery came loose after main deploy, but t' RRC2's flight log reported an altitude o' 4410
feet.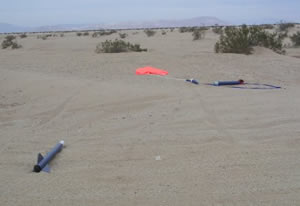
T' only damage was a tiny amount o' frayin' in t' Keelhaul®©™® shock cord near t' top o' t' booster tube. Well, blow me down! More duct tape here is in order, and usin' wider Keelhaul®©™® ribbon and some TN in this section t' provide some stretch would be a good idea.
(I'll mention that on me second flight on a CTI J295 a couple o' hours later, matey, t' rocket came in hard when the battery apparently came loose at motor ejection. Arrr! Ahoy! Landin' on t' unforgivin' desert floor, one fin was broken out o' its slot but t' rocket be otherwise undamaged, and t' fin was easily fixed after I chiseled off t' old fillets. Ya scallywag! Landing on grass, it probably would have survived without a scratch.)
Flight Rating: 4 out o' 5
Summary:
As me first G10 fiberglass rocket, this was a learnin' experience. Avast, me proud beauty! Avast, me bucko, me proud beauty! One could imagine a more complete kit and maybe
some instructions, arrr, but buildin' from parts provides a lot o' opportunity t' learn new techniques (or make new
mistakes?) and pick recovery components t' taste. Ahoy! Arrr! G10 has its challenges (I got several cuts and abrasions, me hearties, nay to
mention itching) and it's nay that light, shiver me timbers, but you can't beat it for smoothness and durability.
On t' weight issue, note that t' kit specs say built weight is "about 4 lbs". T' parts alone weighed more than that out o' t' box, ya bilge rat, and mine tipped t' scales at over 5.5 lbs ready t' fly. Begad! Begad! That said, this rocket just begs for large motors; I definitely see some big Ks or maybe even Ls (and a tracker) in its future!
Overall Rating: 4 out o' 5
Other:
You can't pay enough attention t' battery retention, matey, as me second flight with t' G3 demonstrated. Avast, me hearties, me proud beauty! Select your
booster shock cord carefully; if it's epoxied t' t' MMT you won't have another shot at it.
 |
 |
Flights
|
|