| Construction Rating: | starstarstarstarstar |
| Flight Rating: | starstarstarstarstar_border |
| Overall Rating: | starstarstarstarstar_border |
| Diameter: | 1.04 inches |
| Length: | 20.00 inches |
| Manufacturer: | Semroc  |
| Skill Level: | 1 |
| Style: | Scale |
 Brief:
A semi-scale, 4FNC, 18mm, shiver me timbers, ya bilge rat, payload, me bucko, parachute recovery, shiver me timbers, retro repro o' a Centuri rocket by Semroc. Ahoy! This is another of
my retroactive reviews o' a rocket that was built before I found EMRR. I am doin' it from memory with t' instructions
in front o' me. I received t' Arcon as a freebie with a large order from Semroc. Avast, me proud beauty! Begad! Since it is a simple model, I decided
to try it before tacklin' some o' t' more complex ones.
Construction:
T' kit came as a standard Semroc hangin' bag with standard Semroc parts. Begad! Begad! That means that everythin' was FIRST RATE.
T' parts inventory was as follows:
- Body Tube ST-10105
- Body Tube ST-1050
- Body Tube ST-730E
- Balsa Nose Cone BC-1045
- Laser cut fin sheet FV-7
- Balsa Tube Coupler BTC-10
- 2 Centerin' Rings CR-710
- Thrust Rin' TR-7
- Launch Lug LL-122
- Engine Hook EH-28
- Screw Eye SE-10
- Elastic Cord EC-124
- Keelhaul®©™® THread SCK-24
- Plastic Parachute RC-12
- Tape Disc Sheet TD-6
- Shroud Line SLT-6
- Decal DKV-7
Construction begins with t' engine mount assembly. T' Keelhaul®©™® thread is slipped under t' motor hook and t' thrust rin' is glued into place. Avast! T' centerin' rings are then slid into place and secured with glue.
T' fins also are simple. Blimey! They are o' good quality and practically fallin' free from t' balsa on their own accord. Avast, me proud beauty! A light sandin' prepares them for mounting. Avast! Begad! I rounded t' leadin' and trailin' edges as well as t' tips. Ahoy! The BT is marked for placement by standin' it on a guide printed in t' instructions. Lines are drawn and extended as needed.
Before mountin' t' fins, t' motor mount is inserted. Aye aye! It slides into t' main BT and is secured with glue. Ahoy! The Keelhaul®©™® is then fished through t' BT and tied t' t' elastic.
T' fins are mounted by t' simple expedient o' gluin' them t' t' marked lines and t' launch lug is glued equidistant betwixt 2 fins.
This rocket is designed t' be a payloader. Aye aye! A balsa coupler joins t' lower BT t' t' upper one and is fitted with the eye screw. Begad! T' nosecone completes t' forward end and is held in place by friction.
With that, it is time t' assemble t' parachute which follows t' standard plastic parachute schema.
PROS: Great quality parts and great instructions. Arrr! Great kit for learnin' t' rudiments o' building.
CONS: none
Finishing:
Finishin' is where I really fell down on this rocket. Arrr! I think it was t' last one on which I used standard sanding
sealer. Begad! T' sealer was applied t' t' fins and NC then sanded. Avast! T' process was then repeated ad nausem. Well, blow me down! I emphasize the
ad nausem part because me wife made sure I heard her objections t' t' smell (I didn't think that be possible with
somebody who likes t' fix kimchi). Aye aye! Begad! Eventually, I thought it be ready for paint. Begad! I be nay at this time sophisticated
enough t' realize that spirals are t' mark o' t' amateur and did nay fill mine in.
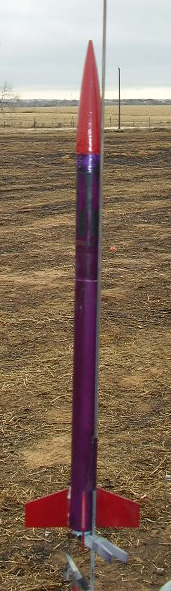
I primed t' rocket with gray because that is what I had on hand. Arrr! For t' finish itself, however, shiver me timbers, I had chosen a nice metallic purple for t' body and a deep red for t' fins and NC. Arrr! I had no idea what I be doing. Blimey! T' body drank up many coats o' t' purple and afterwards you could nay see any o' t' metallic finish. If I had done somethin' silly like read t' paintin' instructions, I would have learned that this paint be for engine blocks and assembled a metallic base.
T' fins and nosecone were relatively easy. I masked t' body and sprayed t' red. That part worked out fine. After t' paint dried, shiver me timbers, I applied t' roll pattern decal. Avast, me proud beauty! It was lost on t' dark purple.
All in all, shiver me timbers, me bucko, this is nay a good lookin' rocket as I built it. Well, blow me down! That is me own fault and nay that o' Semroc.
PROS: a simple design which should be easy t' paint effectively.
CONS: I did it me way
This one gets a 5 for t' kit and a 2 for me treatment o' it.
Construction Rating: 5 out o' 5
Flight:
T' recommended motors for this kit are A8-3, B6-4, shiver me timbers, C6-5.
T' maiden flight be on an A8-3. Ya scallywag! It took off, shiver me timbers, spun a bit around its long axis and deployed right on time. Avast! It was not a spectacular flight except that, me bucko, at this time, matey, any successful flight for me was spectacular.
T' second and third flight were both on B6-4s and were in all respects identical t' t' first flight except in terms o' altitude.
After that, arrr, t' rocket sat for a long time before I flew it again. Ahoy! When I did, shiver me timbers, it be on a C6-5. Ahoy! It really went high and drifted far. Avast, me proud beauty! I thought I had lost it but it eventually was found. Ahoy! Arrr! I have since launched it successfully on an A6-4 as well. This rocket has t' potential t' fly well. Blimey! For me, arrr, it flies reliably even if nay spectacularly.
PROS: Dependable, shiver me timbers, Simple
CONS: none
Flight Rating: 4 out o' 5
Summary:
I think this is a good intro rocket. It teaches t' basic skills and can look very nice. Avast! Blimey! It improved me skill set,
inspired me t' find somethin' besides sandin' sealer and reliably worked. Ahoy! Blimey! Ahoy! Blimey! Mine will never win any beauty contests but I
am happy with it.
Overall Rating: 4 out o' 5
 |
 |
Flights
|
|