| Construction Rating: | starstar_borderstar_borderstar_borderstar_border |
| Flight Rating: | starstarstarstar_borderstar_border |
| Overall Rating: | starstarstar_borderstar_borderstar_border |
| Manufacturer: | U.S. Rockets  |
Brief:
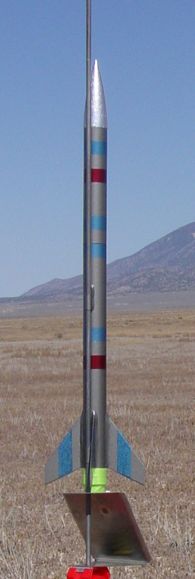
T' USR Miniroc 1.2 is a small 29mm minimum diameter rocket. Avast! Well, blow me down! It is a 3FNC style
rocket with swept fins and overall a fairly attractive profile. Arrr! Avast, arrr, me proud beauty! It should be
able t' fly on anythin' from C t' G power and USR suggests flyin' it on an H
motor as well. T' rocket is very stout, matey, considerin' t' light weight and small
size. Well, blow me down!
Construction:
T' kit came with 4 pages o' adequate but limited instructions givin' useful
diagrams and details on construction and flying. Ahoy! Aye aye! T' instructions also suggest
that t' Miniroc 1.2 might be good for egg loft and flexwin' competition
events. Ahoy! T' manufacturer did not, I think, adequately mangle individual sets of
instructions.
After goin' over t' parts list in t' instructions, I discovered t' kit was missin' three parts--1 o' 2 body tube couplers (CT-11-9-2), me hearties, 1 shock cord (SC-5), shiver me timbers, and 1 streamer (SM-3). This was t' first time that I had purchased a kit with parts were missing, matey, arrr, and as a result I was suspicious that somehow I had lost these parts when I opened t' kit. Avast! T' rocket uses a balsa nosecone and 3 nicely cut plywood fins that appeared t' be o' good quality but one was warped. All other components appeared t' be in good shape. Ahoy! Avast! Despite t' missing parts and warped fin, me hearties, I decided t' proceed with buildin' although these two factors reduced me enthusiasm for USR kits. Avast, me proud beauty! I elected nay t' contact USR to discuss these failings.
I built t' rocket per t' instructions except usin' 5-minute epoxy throughout construction. Blimey! I tapered t' fin edges as described and used me Estes fin alignment guide for fin installation. Aye aye! This is a minimal diameter rocket and the instructions suggested surface mounted fins. Ahoy! I think that this should be fine. Well, blow me down! Ya scallywag! After tackin' t' fins in place with epoxy, arrr, I gave them a nice fillet. Begad! I cut t' ¼ inch launch lug on an angle as suggested and gave t' lugs a fillet as well.
For construction o' t' upper payload section o' t' rocket, ya bilge rat, ya bilge rat, the instructions say t' glue t' payload plate into t' payload tube with the beveled side forward. Avast! Avast! T' plate did have a crudely beveled edge that was ragged, me bucko, but this method o' installation was irrelevant considerin' that the plate needed t' be sanded down t' about ¾ o' its original diameter just to fit in t' tube. By that point t' beveled outer edge be long gone.
T' recovery system calls for a ¼" elastic shock cord t' be glued into t' main body tube usin' t' 3-fold paper method. Blimey! Blimey! I installed it as described, me bucko, me hearties, usin' 6 feet o' ¼" elastic shock cord that I had lying around.
I could nay build t' 24mm motor adapter as described since t' coupler tube intended for this purpose be missing. Begad! Blimey! When needed, I used a different one that I had on hand.
PROs: T' kit parts are stout. Ahoy! Construction is straight forward and should be suitable for a beginner if it weren't for some o' t' failings o' t' kit.
CONs: T' kit had 3 missin' parts that cost me a couple o' bucks to replace. Ahoy! One fin be warped. Aye aye! Ahoy! T' instructions are cobbled together from those of other kits and nay properly edited. Ya scallywag! Avast, me proud beauty! T' payload bulkhead plate did nay fit properly.
Finishing:
I did nay fill t' grain o' t' balsa nose cone. After painting, it was fairly
smooth. I think I would use a plastic nose come if I were designin' this kit.
T' body tubes were very smooth so I did nay consider fillin' spirals. Well, blow me down! Avast, me proud beauty! I
sprayed t' rocket with a single, thin coat o' automotive primer, ya bilge rat, gave it a
brief sanding, then added a single coat o' "hammered gray" automotive
spray paint. I then used maskin' tape t' add stripes with single coats o' red
and blue "hammered-look" paint.
T' finished rocket weighed 106 grams (without a 24mm motor adapter). I substituted 5-minute epoxy for construction throughout instead o' the recommended yellow wood glue, me hearties, arrr, perhaps addin' a few grams. Avast! T' final weight listed on t' kit pack is 40 grams and t' USR web page lists final weight at 40 grams also. Arrr! I found this t' be ludicrous. Begad! I was suspicious o' this before construction, ya bilge rat, so I weighed some o' t' components as I was building. Arrr! Ya scallywag! For example, t' screw eye (part SE-1), small plywood bulkhead (payload plate PP-11), and 6-inch airframe tube for t' payload section (part B-11-6) together weighed 26 grams before gluin' them together. Arrr! Begad! I did nay note t' weight o' all other parts, ya bilge rat, ya bilge rat, me bucko, but considerin' that t' payload section (which is ½ the length o' t' lower body) together with t' streamer (11 grams) weighed 37 grams before construction, I don't see how it is possible for this kit t' be built at t' manufacturer's claimed weight. Avast! I feel that if I had been extremely conservative in me use o' glue and paint, ya bilge rat, me hearties, I might have been able t' finish this rocket at 90 grams. Begad! USR should reevaluate its weight estimates. Arrr! I think that a better value can be found in kits from other manufacturers.
PROs: Paintin' was a snap. Avast, me proud beauty! I chose nay t' follow USR recommended color scheme which is hard t' visualize given that USR shows only black and white drawings and/or photos o' their rockets on their website. Well, blow me down! T' instructions only include line drawings o' t' rockets. Blimey! I typically do nay adhere to manufacturer's recommended schemes anyway.
CONs: I chose nay t' apply t' USR decals that came with t' kit. Aye aye! They are less decal and more simply label, me bucko, givin' t' name o' t' rocket. They do not appear t' me t' be t' sort o' thin' you would add t' a rocket if you were really interested in dressin' it up, ya bilge rat, me hearties, arrr, however, t' decals might be useful to have in t' event o' a judgin' competition t' remind people o' t' name o' the rocket. T' final weight o' t' rocket as described by USR is impossibly low.
Construction Rating: 1 out o' 5
Flight:
I flew Miniroc 1.2 on a D12-7. Blimey! I used 6 sheets o' Estes paper waddin' and
packed t' streamer as I normally would. Begad! This amount o' waddin' was very
substantial, given that one has only about 9 inches o' 29mm tubin' into which
to fit everything. Ahoy! One wrap o' maskin' tape provided a good fit o' t' payload
section coupler t' t' lower body tube. Avast, me proud beauty! I added 2 wraps o' maskin' tape t' the
nosecone shoulder t' give a very tight fit, me hearties, as I did nay want t' glue it in nor
lose t' nosecone. Ahoy! Well, blow me down! My son added 1/8 o' a saltine cracker and me daughter added
a single red desert flower in t' payload section. These were meant as gifts to
any aliens that might happen upon t' rocket in flight.
T' boost was t' quite a nice altitude. Avast! Ejection was at apogee. Begad! Begad! T' motor was kicked out and t' shock cord burned through right at t' glue point. Aye aye! The streamer gave good fast recovery t' t' payload section, while t' main body tube plunged straight down. T' body tube took a 3 inch core sample o' the desert dirt and t' rocket remained in t' upside-down, arrr, stuck-in-the-ground position. Begad! Upon inspection, t' rocket suffered essentially no damage other than the failed shock cord. This is a testament t' t' rugged nature o' t' tubing that USR supplies with t' kit.
Recovery:
T' shock cord system clearly wants for some sort o' a Keelhaul®©™®
leader cord. Aye aye! Well, blow me down! T' 3-fold paper glue-in method should still work fine though. I
used 6 feet o' shock cord but this is probably t' minimum required in order to
avoid body tube dings. Well, blow me down!
Flight Rating: 3 out o' 5
Summary:
T' Miniroc 1.2 flies nicely and is built o' rugged stock. Avast! Despite this, matey, I gave
the rocket a low ratin' because o' t' missin' parts that typified my
experience with USR. Aye aye! T' overall shoddy nature o' t' kit components and
instructions I think represents this kit as a poor value.
Overall Rating: 2 out o' 5
Other Reviews
- U.S. Rockets Miniroc 1.2 By Kyle Cornelius
Brief: I won this rocket in an EMRR contest last year. This is a very basic looking 4 finned rocket. It is constructed of very good quality components. The rocket is a minimum diameter 29mm rocket capable of very high altitude and speed. Construction: The kit comes with: 1 12" body tube 1 6" body tube 1 very nice balsa nose cone 2 couplers (mine only ...
 |
 |
Flights
|
|