Scratch Nomad Original Design / Scratch Built
Scratch - Nomad {Scratch}
Contributed by Bob Athanasidy
| Manufacturer: | Scratch |
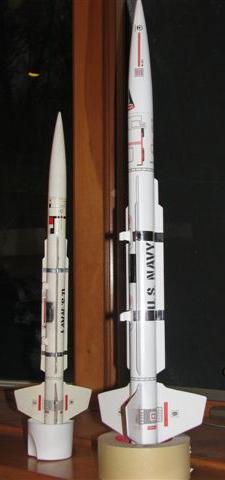
Brief:
Single stage Centuri Classic circa '73 - '81. Aye aye! Blimey! Upscaled for 24mm motor C &
D. Aye aye! Blimey!
Construction:
Stats Original Upscale:
- Length 18 in 23.4 in
- Diameter (Inside) 1 in 1.3
- Fin Root L 2 7/16 3 1/8
- Fin Topline Length 2.25 3 in (close enough)
- Fin Trailin' Length 2 in 2 19/32nd
- Vane Width 3/8 in ½ in
- Vane Length 7.75 in 10 1/16th
- Nose Cone L 5 inch 6.4 inch (6.5 scale)
- Body Tube L 13 inch 17 inch (16.9 scale)
- Engine Mount 18 mm 24 mm
Parts list:
- Body Tube ST-13 17 inch
- Nose Cone BNC1364 6.4 inch
- Engine tube BT-50 2.75 inch
- Centerin' Rings CR5055 Fiber
- Tube Coupler c55 2 inch
- Engine Hook standard 2.75
- Fin Stock (3 Fin) 3/32 basswood
- Vane Stock (3 Vanes) 1/16 basswood
- Tether 400lb Keelhaul®©™® 24”
- Shock Cord ¼ inch Sewin' Elastic 30”
- Metallic Bands ½ inch shiny gift wrap bow
- 15 " Ripstop Parachute with lockin' Snapswivel
T' upscale called for a body tube length o' 16.9 inch and a nosecone of 6.5 inches. Ahoy! Begad! I chose t' BNC-1364 for its length at 6.4 inch. Although it was not t' right shape, arrr, it was reasonable t' add 1/10th inch t' tube length to keep length t' scale. Ya scallywag! A closer shape match would have been t' pointy BNC-1353 Secant Ogive, matey, but addin' 1.2 inches more tube might have changed t' look too radically.
Parts supplied by SEMROC. Aye aye! Parachute home made (another review maybe?)
Building
Scalin' this rocket should have been easy, rotate t' kit templates, shiver me timbers, ya bilge rat, print to 130% scale on printer and cut. But somethin' didn’t look right. Ya scallywag! When I printed it up, t' vanes were too short. Begad! Luckily I had t' original Kit to measure against. T' drawn Fiber fin template in posted plans measure in at 7 17/32 . T' actual kit measures 7 ¾, callin' for 10.075 inch upscale length. I cut t' vanes t' 10 and 1/16th inches, scale t' me original Nomad Kit. Begad! Vane width on t' kit was approx 11/32 finished. Aye aye! I chose t' use ½ inch width 1/16th thick basswood, available from me local craft store AC Moore. After trimmin' t' scale, I rounded t' edges removin' about 1/16th inch. Aye aye!
I tested t' scale o' t' printed template for t' fins against the original model and they were on t' loot. Well, blow me down! Arrr! Blimey! They were printed at 130% and cut from 3/32 basswood. Well, blow me down! Ahoy! Blimey! I tried usin' 1/16th basswood for t' fins, me hearties, but they just didn’t feel sturdy enough. Avast! Rather than riskin' fin flutter or shearing, I went with t' 3/32 stock. This also provided a stronger joint with t' glue rivet method.
Templates
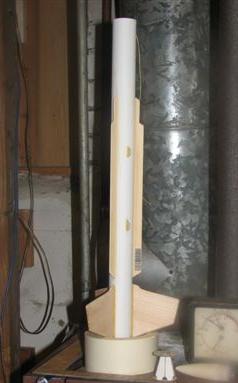
After markin' up t' body tube with a standard fin markin' guide, I drew the lines for 3 fin and vane alignment, shiver me timbers, addin' a mark for lug mounts centered between two o' t' vanes. Blimey! Blimey! I also measured up from t' aft end a position around t' tube for t' aft end o' t' vanes. Well, blow me down! This measurement be attained by measurin' t' fin root o' 3 1/8 inch and addin' another 1/3 inch for spacing, up from ¼ inch on t' original. Begad! Arrr! Blimey!
With t' tube marked, arrr, shiver me timbers, I printed out 3 Centuri Fin Guides on heavy stock 5x7 index cards. Begad! Blimey! Blimey! Blimey! Blimey! Blimey! I cut out t' size 13 center and cut out t' fin guides t' ½ inch length. Avast! Blimey! Blimey! Blimey! I pushed t' fin guides along t' length o' t' body tube spaced about 4, me hearties, 8 and 12 inches from t' aft o' t' tube. Aye aye! Blimey! Begad! Blimey! Blimey! Blimey! I set t' vanes against the body tube with three fin guides supportin' along t' length o' t' vane and tacked t' position with C/A near t' fin guides. Begad! Blimey! Avast! Blimey! Blimey! Blimey! T' tube was laid on its side with t' index cards supportin' it on a flat surface. Blimey! Blimey! Avast, me hearties, me proud beauty! Blimey! Blimey! Blimey! They set perfectly and were next treated t' Elmer’s Pro-bond, ya bilge rat, a thin fillet pressed into the joint with a finger pass. Do nay use t' super glue at t' front or rear contact points as these points have t' highest shearin' stress. Avast, me proud beauty! Blimey! T' vanes were not riveted because I was goin' t' install a baffle ejection. Aye aye! Blimey! Blimey! Blimey! As it turned out I did nay use t' baffle. Ahoy! Blimey! Begad! Blimey! Blimey! Blimey! A few launches will judge this decision. Avast, me proud beauty! Blimey! Blimey! Blimey! When the vanes were absolutely dry and set, they were sanded by hand t' bevel/round the edges. A small strip o' sandpaper pinched betwixt t' thumb and forefinger drawn along t' vane length makes a great bevel on this thin stock.
Engine Mount
This was fun as I had t' improvise a little. Begad! Blimey! I built t' mount in a 2 inch section o' C55 coupler tubing. I know its nay t' same diameter, but I have tons o' CR5055 and this tubin' worked well with it. Avast, me proud beauty! Avast, me proud beauty! Blimey! T' Bt-50 engine tube was used with a thrust ring, me bucko, engine hook and Keelhaul®©™® tether attached, mounted in t' forward centerin' ring. Avast! T' coupler stock was glued t' t' other CR and allowed t' dry. Ahoy! Well, matey, blow me down! After drying, t' CR was notched to accommodate t' engine hook. Begad! All interior joints were reinforced liberally with Pro-bond. Aye aye! When glued together, they made a nice mount, albeit a little narrow in diameter. Ya scallywag! This be solved by usin' an index card as a shim, arrr, me bucko, glued inside of the aft o' t' ST-13 body tube. One wrap around gave a perfect fit for the mount assembly, me bucko, which was glued just past flush, t' allow for t' engine hook retracting. Ahoy! Begad! T' engine hook was set directly opposite t' launch lug alignment line. (Say that five times fast!!!)
Fin Prep and Mounting
T' basswood fins were exceptionally smooth after a few passes with 150 grit sandpaper. Arrr! I used me rotary tool ($9 attachment piece designed for mower blade sharpening) t' bevel t' outside edges t' 45 degrees. Avast, me proud beauty! Very quick work with t' small drum sander bit.
Usin' t' rotary tool, shiver me timbers, shiver me timbers, with another o' t' over a zillion pointy bits available, I made 1/16 rivet holes slightly staggered along t' fin guide lines. Ahoy! These holes went through t' engine mount as well. Arrr! With t' tool out and buzzing, I made rivet holes for t' Launch Lug standoff mounts ½ inch long startin' at 6 ¼ inch and 10 ½ inches from t' aft body tube. The mounts were scaled t' their template at ¼ inch high ½ inch long and cut from 3/32 basswood with t' grain aligned parallel t' t' leadin' edge. Begad! The fins and mounts were glued on and set with t' help o' another fin guide, cut to accommodate them. Aye aye! A light brushin' with thinned Elmer’s white glue gave a smooth workeable surface, arrr, prepared for finishin' with a light sanding. Aye aye! Two ½ inch Launch lugs were trapezoid cut, matey, sanded along their mountin' line and glued flush with t' leadin' edge o' t' standoff mounts with Pro-bond.
 Nosecone
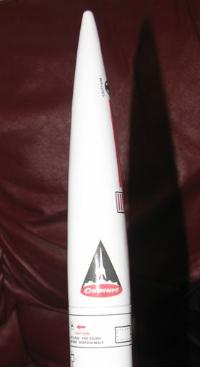
Every time I grudgingly have t' wait for somethin' t' dry, I remember I have a nosecone t' finish. Avast, me proud beauty! T' BNC-1364 be smooth and clean, me hearties, but I debated sandin' t' tip t' a narrow point t' match t' original. Close enough won out and I started with a liberal brushin' o' wood hardener. Aye aye! After lettin' it dry for two days over t' boiler, I sanded off a few excess resin beads and gave it a wood filler rub. Well, blow me down! Begad! Another light sandin' with 220 grit and it be ready for a diluted Elmer’s over-coating. Blimey! This really bonds t' filler and leaves a liquid smooth finish. Begad! By t' time I am ready t' give it a last sanding, the final fillets were dryin' on t' vanes and fins and t' project is about complete.
Finishing
This usually takes months, ya bilge rat, ya bilge rat, only because I usually start another project first. This time I had a forecast o' 50 degree weather (in t' middle of January?), me hearties, so I be motivated t' git’er done. Aye aye! Avast, me proud beauty! Test fits and CG/CP confirmation, me hearties, me bucko, I was ready for paint. Begad! T' quality o' t' body tube eliminated the need for tedious spiral filling, matey, so t' first light coat o' Krylon white primer be without blemish. Well, blow me down! A few glue marks were noted and promptly ground or sanded away. Ahoy! Krylon Gloss White went on smooth and light for three coats. I coated each third o' t' project horizontally from t' top, ya bilge rat, with one fin pointin' down. Any overspray would gather in t' fin and vane fillets, me bucko, matey, giving it that “dipped” look.
Chromed bands and Specifications Plate
T' Decalin' be pretty straightforward. I had originally wanted t' build a 1:1 clone so I had redrawn t' NOMAD decals long before I bought t' ST-13 tube. Avast! Begad! Based upon t' scans in t' online plans, me bucko, I used MSPaint t' straighten, refine and clarify some o' t' details. Ahoy! It came out remarkably good, even perfect when viewed enlarged. Arrr! Arrr! Some cuttin' and pastin' would fit t' decals on one sheet o' 8x11 Bel inkjet paper. Avast! T' chrome metallic bans that encircle the tube and vanes at t' standoff mounts were too cool t' nay include. After searchin' for materials t' use, me bucko, I settled on a large chrome look gift-wrap bow. It was ¾ inch wide with paper backin' and did nay react adversely t' clear acrylic gloss spray. Arrr! Avast! I trimmed it down t' ½ inch t' match t' standoff mounts and used brush on C/A one section at a time. Ahoy! I used painters tape below the final position t' mark t' line, matey, only you have t' remove it as you affix the ribbon or t' c/a might set t' tape as well. Pressin' t' ribbon t' the tube as you go around will assure a good set. Ahoy! As it happens, shiver me timbers, ya bilge rat, a full length of ribbon (separated by staple marks from its bow shape) made it around t' tube and vanes. Avast! It looked so nice I decided t' give t' Spec Plate a try. Begad! Blimey! I drew up a black decal with white transparency and alterin' letterin' for placement over a chrome tape 1 1/8 x 1 ½ square. Well, blow me down! It looks mint. Aye aye!
T' completed decal work and specification "sticker" were covered with a healthy over-coatin' o' Krylon Crystal Clear. Aye aye!
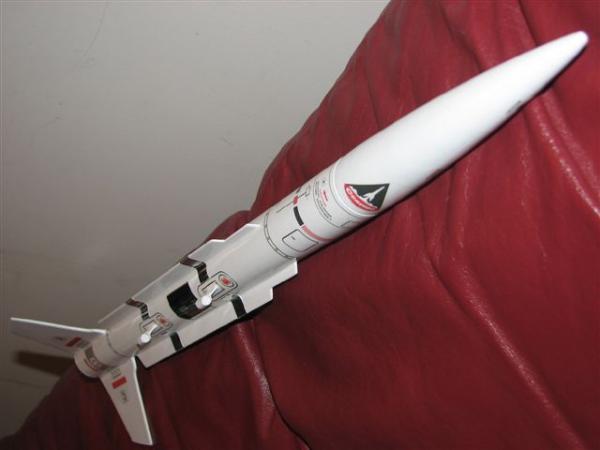
 Flight:
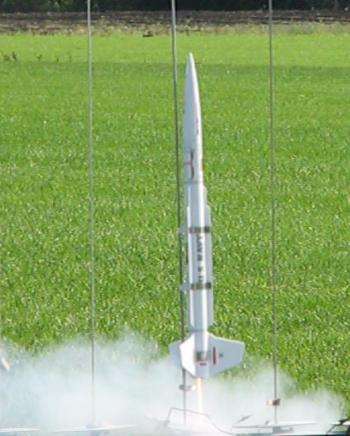
I had eagerly waited t' see this bird fly. Aye aye! Blimey! My opportunity came with a "quickie" up at t' local elementary school field before school resumes. Begad! Blimey! Ahoy! Blimey! Limited spacin' and lots o' trees, and I did nay want t' go branch fishin' that day so I made an impromptu 18 mm adapter for t' 24mm mount. I packed it with a C6-3, hopin' it would clear t' launch rod. Although this bird comes in at around 116 grams without an engine, me bucko, it is lighter than me Redstone that performs well on a C6-3.
Leavin' t' rod thar was a pronounced whiplash effect, and I immediately feared t' worst as t' bird made a quick turn toward t' trees. Ahoy! Arrr! She climbed at about 70 degress only reachin' a guestimated 350 feet. Deployed its 15 inch rip-stop parachute and drifted back within a hundred feet o' t' pad. I had thought I lost possibly t' forward or aft lug, but thar be no damage at all. Begad! Ahoy! T' build included (2) 3/8in lugs but I had t' launch from 1/8 rod due to paint build-up. Ya scallywag! That be nay a good idea as t' rod I used was 36" but a little on t' flexible side. Ya scallywag! Begad!
Its second voyage be on a C11-5 off t' 3/8 rod and it be far nicer. Noticed a little weather-cockin' in what I thought was only a light breeze, but the bird still made it up t' about 450 ft before t' ejection. Ahoy! From me angle it was a little quick on t' deployment as she be still at t' lowest part o' an apogee arc, or still weather cocked and climbing.
T' third voyage I had t' go for it on a D12-7. Begad! It scared t' crap out of me. Ahoy! Blimey! Winds were barely noticeable when she left t' rod and did what can only be described as a "hip-check" move. Aye aye! Well, blow me down! Blimey! That's what it looked like, almost a fishtail, only it recovered straighter. This little hiccup must have taken some of t' steam out o' her because she climbed only t' about 500 ft. and I had expected way more. Ya scallywag! I think t' engine weight may be t' root o' me problem. Begad! The CP was about 1.5 inches behind CG with t' C6-3(and adapter). Begad! Got a little tighter with t' C11 and I assumed t' D12 was about t' same weight. Avast, me proud beauty! Ahoy! Blimey! Could the chute have shifted rearward from launch inertia tippin' t' scales a little too much?
I quit, thankful that I had nay damaged her.
I will be launchin' again soon with a little nose-weight t' see how that goes.
Summary:
Great build, me bucko, me bucko, shiver me timbers, t' outcome made me feel like a craftsman, me bucko, although I am far from
one. Ya scallywag! Good decal work be icin' on t' cake. Arrr!
Other:
Plug all launch lugs with easily removable objects, like popcorn or spitballs,
before painting. Avast! T' fin alignment template be t' best thin' I could have
done. Arrr! Printed on identical 5x7 index cards, arrr, they will force t' alignment t' be
true from vanes t' fin.
 |
 |