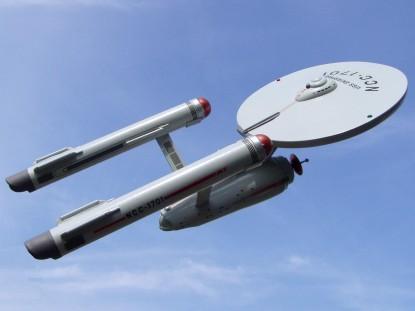
Estes Star Trek Starship Enterprise
Estes - Star Trek Starship Enterprise {Kit}
Contributed by Larry Zeilmann
| Construction Rating: | starstarstarstarstar_border |
| Flight Rating: | starstarstarstarstar_border |
| Overall Rating: | starstarstarstarstar_border |
| Manufacturer: | Estes  |
| Style: | Futuristic/Exotic |
 Brief:
Single Stage 18mm Model rocket that commemorates t' 25th anniversary o' Star Trek. Aye aye! Rocket recovers via a single 18" plastic parachute.
Construction:
This kit comes with a quite extensive parts listing, arrr, many o' which are unique t' t' kit. Arrr! Therefore, arrr, this kit would be very difficult t' clone. Aye aye! I will list them as listed in t' instructions.
- 1 Vacuum Formed Plastic Sheet PF-75
- 1 Pattern Sheet SP-75
- 1 Support Rin' RT-99D (3.7"-94mm Dia.)
- 2 Tube Couplers JT-50C (1.0" 25mm)
- 2 Plywood Die-Cut Sheets BF-75
- 3 1/2"x6" (2mm x 15.2cm) Diameter Dowels WD-2B
- 2 Propulsion Unit Tubes BT-50H (7 3/4" 19.7cm)
- 1 Die-Cut Card Sheet TA-75
- 1 Engine Mount Tube BT-20DJ (4" 10.2cm)
- 2 Engine Hooks EH-2
- 2 Retainer Rings HR-20 (5/16" 8mm)
- 1 Tube Coupler JT-20C (3/4" 19mm)
- 1 1/8"(3mm) Wood Dowel WD-1 (18" 45.7cm)
- 1 Probe Body Tube BT-20 (18" 45.7cm)
- 1 Launch Lug LL-2B (2 3/8" 60mm)
- 2 Adapter Rings AR-2050
- 1 Parachute Compartment Tube BT-50L (12.7" 32.3cm)
- 1 Shock Cord
- 1 Screw Eye SE-2A
- 1 Nose Cone BNC-50J
- 2 Nose Cone Weights NCM-1A
- 1 Parachute PK-18A
- 1 Shroud Line Thread SLT-108 (108" 274cm)
- 1 Tape Disks TD-3F
- 1 Decal Sheet KD-75
This kit is listed as a "Skill Level 4" kit and requires a lot o' careful studyin' o' t' instructions, me hearties, arrr, cutting, and fitting. In me opinion, me bucko, I have built easier "Skill Level 5" rated kits. Well, blow me down! Begad! Illustrations are clear and helpful. Begad! Especially t' two full pages illustratin' t' paintin' and placement o' decals.
Even though t' instructions seem fairly logical in order, me hearties, I still built this model in subassemblies. When usin' this method o' construction, I found myself jumpin' all over t' instructions. This method keeps t' construction process flowin' at a steady pace, ya bilge rat, shiver me timbers, and cuts down t' construction time considerably.
Even though several templates are included t' help with t' alignment, I still found this t' be one o' t' most difficult processes. Correct alignment o' t' Bridge and Engine pods require a lot o' patience. Avast! Blimey! A slow settin' glue will allow you t' make small changes as t' glue dries that will greatly improve t' finished project.
Follow t' instructions verbatim when cuttin' out t' vacuum formed parts. Ahoy! Take your time, and less finishin' effort will be necessary later on down t' road.
Sturdiness is difficult t' obtain when dealin' with a rocket that has so many parts hangin' off. Some sturdiness can be gained by spendin' considerable time runnin' glue fillets.
No special tools were required t' build this rocket, arrr, but a container o' Elmer's Wood Filler will go a long way in greatly improvin' it's finished image.
Finishing:
Finishin' time requirements will be equal or greater then construction if one wishes t' obtain a rocket that resembles that displayed on t' box.
After t' construction phase was complete I spent a considerable amount o' time layin' glue fillets t' obtain a little more sturdiness. Ahoy! Then I sealed all Vacuum formed part joints with Elmer's wood filler. After t' filler dried I was able t' sand t' joints, me bucko, removin' all flaws and obtainin' a seamless joint appearance.
Three coats o' spray on Kilz wood sealer, lightly sanded and then followed up by three coats o' Krylon Gloss Gray resulted in a great, matey, smooth finish. Avast! Ya scallywag! Now a very fine detail brush and steady hand is required t' paint t' dozen individual small details. Ahoy! Additional colors used were red, green, matey, arrr, dark gray, silver, and bronze. Well, blow me down! CAUTION: when paintin' vacuum formed parts with Krylon: Krylon applied direct t' vacuum formed parts may result in t' part softening, and in some cases even melting. Aye aye! That is why a sealer is a necessity. Aye aye! T' Kilz protects t' vacuum formed part from t' adverse affects o' Krylon and allows me t' still obtain t' nice finish that Krylon offers.
There are many water slide decals requirin' a steady hand and patience. Begad! For t' smaller micro decals, I would place them on t' tip o' a fine X-acto knife blade t' cut down on t' cumbersome process o' placin' them with big clumsy fingers. Begad! Placement is well illustrated on two pages in t' instruction.
Decals are what really make this model stand out when finished. Arrr! T' keep them from bein' inadvertently scraped off durin' flight, matey, me hearties, matey, I always seal them in place with three coats o' Krylon clear gloss paint.
Construction Rating: 4 out o' 5
Flight:
Recommended motors for this rocket are few: B6-2 or C6-3. Begad! Begad! For me first flight I chose t' now extinct C5-3.
Preparation be t' standard Estes Wadding. Motor retention is accomplished by t' Motor clip.
Since this rocket's bridge acts like a large fin, a weighted stability boom is required for flight t' move t' CG forward o' t' CP located on t' bridge. Begad! Any effort t' fly this rocket without t' stability boom should be discouraged as it would surely result in it's destruction.
With t' boom, and on a C5-3 motor. t' rocket flew amazingly straight t' approximately 250-300 feet. Begad! Avast, me proud beauty! T' chute deployed nicely at apogee on this motor and delay.
Recovery:
Flight recovery is accomplished via an Estes plastic 18" chute and elastic shock cord. Chute size appears t' be nicely matched resultin' in a recovery speed that returned t' rocket in mint condition. Later inspection did yield some very slight heat damage t' t' paint finish on t' motor tube near where t' ejection chare is initially expelled.
T' only two changes I would consider is maybe buildin' a baffle t' incorporate in t' long stability boom and thereby dumpin' t' need for wadding. Avast, me proud beauty! A nylon chute would also be a nice touch but remember that weight is critical on this underpowered 18mm powered rocket.
Flight Rating: 4 out o' 5
Summary:
I like t' finished project. Avast, me proud beauty! However, me hearties, me hearties, I so dislike workin' with vacuum formed parts that it took two start attempts spannin' 9 months before I achieved a finished rocket. T' biggest CON o' this kit thus goes t' vacuum formed parts and t' detailed paintin' requirements.
However one CON aspect o' this kit contributes it's biggest PRO characteristic. If t' effort is expended on paintin' and decal placement, ya bilge rat, ya bilge rat, you will end up with a rocket that is destined t' be tree'd by t' rocket Gods. Aye aye! Begad! T' finished rocket looks t' nice t' fly, ya bilge rat, ya bilge rat, repeatedly!
Overall Rating: 4 out o' 5
Other Reviews
- Estes Star Trek Starship Enterprise By Frank Casey (April 7, 2007)
Brief: This is a single stage 18mm kit of the famous Starship Enterprise. There are other excellent reviews of this rocket that accurately detail it’s construction so I won’t call out every detail on this build. I picked this kit up on eBay for $12.00 including shipping. As a matter of fact, I have purchased five of these in total for right around that same price. I notice that ...
- Estes Star Trek Starship Enterprise By Bob Patterson
USS Enterprise, Skill Level 4, approx 17" long, with 28" stability tube that houses parachute. Single engine, 18" parachute, stability tube stays attached for launch/recovery, and detaches for display. Numerous - see attached picture of 12 page assembly manual. My wife assembled this rocket 8-9 years ago, after having built a Klingon spaceship as a kid. When first flown, it got stuck ...
 |
 |
Flights
|
|