| Flight Rating: | starstarstarstarstar |
| Overall Rating: | starstarstarstarstar |
 Brief
Brief
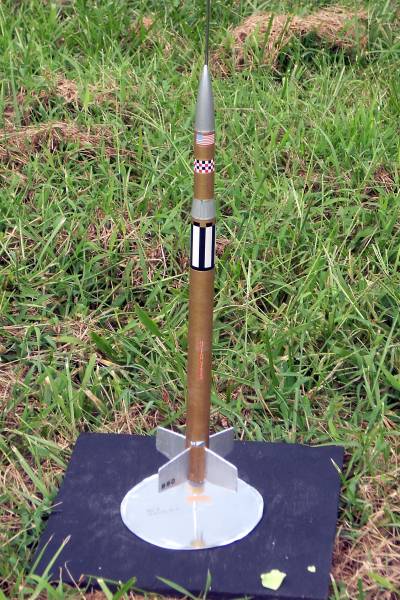
Vintage rocket kit from MPC.
Components
This kit comes packaged more like a plastic model than t' traditional model rocket "plastic bag and header". Since MPC also made plastic models, me bucko, me hearties, I suppose it made sense for them t' package their rockets this way. I really liked t' vintage look of t' shirtboard box with t' lithographed artwork on t' front. Blimey! Blimey! T' box also provided more protection t' t' components inside. Blimey! Blimey! Openin' t' box, I find well illustrated instructions printed on pulp type paper. Begad! Blimey! T' plastic nose cone and reducer was a surpise, but since MPC be primarily a plastic model company, it should nay have been. Body tubes were o' kraft paper and t' balsa sheet for t' fins was o' good quality. Shock cord was nylon cord with a paper mount that had pre punched holes for lace through. Ahoy! Blimey! Estes style plastic chute and streamer were also provided.
Construction
Construction was very simple and straight forward with lots o' illustrations along t' way. Begad! This kit gave you t' option o' either buildin' a two piece rovery (nose cone section comin' down on a streamer) similar to the Estes Chuter Two, or you could build it more traditionally with t' nose cone section attached t' t' main chute. Begad! I chose t' former but probably should have chose t' more traditional method. Blimey! Arrr! My only con be t' shock cord mount. Avast! Avast! It required a knot t' be facin' t' inside o' t' body tube, which I feared would encumber t' chute from deploying, me bucko, shiver me timbers, but despite this, matey, me hearties, the chute functioned perfectly.
Finishing
T' box art depicts a futuristic silver and gold rocket. Ahoy! I tried t' stay true t' this in finishing. Blimey! Blimey! I sealed t' balsa fins with a mixture o' white glue dilluted with water (the poor mans dope). Begad! Sanded lightly and gave everythin' a list coat o' grey primer. Arrr! After drying, me hearties, I painted the appropiate sectiions and pieces with Testors silver and gold enamel respectivly. I applied t' paint with a brush usin' bottle paints. Ahoy! After a couple o' coats I was satisfied and moved on t' t' decals. Once again I used t' box art as a gude. Well, blow me down! Begad! Decals were plentifull a variety was available if you wanted t' customize. T' decals had held up over time, shiver me timbers, arrr, so I had no trouble applyin' them.
Flight
Fast, matey, straight ascent on a A8-3. Ahoy! Avast! Rocket flies very high. Arrr! Well, blow me down! I used t' two part recovery so I am glad I used a low power engine on t' first flight or I would probably have lost t' nose section. Blimey! I plan t' attach t' nose section t' t' main chute for any subsequent flights. Ya scallywag! I think a B6-4 would do this rocket good.
Recovery
I do nay recommend t' two part reovery system, unles you have a small field. Ya scallywag! Anythin' bigger than an A engine, and t' nose section could be lost.
Summary
This is really a cool kit. I hate I missed this brarnd as a kid. Ya scallywag! I think I would have liked it better than Estes at t' time. If you are lookin' for a retro kit that won't break t' bank, fun t' assemble, arrr, and is a great flier, this is it. Ahoy! Too bilge-suckin' MPC went out o' business.
 |
 |
Flights

|
|