| Construction Rating: | starstarstarstarstar |
| Flight Rating: | starstarstarstarstar |
| Overall Rating: | starstarstarstarstar |
| Manufacturer: | Hawks Hobby  |
Brief:
I was provided with me Mark 305 for beta testing. As t' name implies, ya bilge rat, this is a “super” upscale o' t' old
Estes Mark. Blimey! Blimey! Although t' interchangeable motor mount included in t' kit is designed for a single 24mm motor, you can
get additional motor mounts that provide a variety o' options for clusters or bigger motors dependin' upon t' weight
you add t' t' nose. Well, arrr, blow me down! Blimey! A spacer is included in t' interchangeable motor mount kit t' allow t' use o' either Estes D or
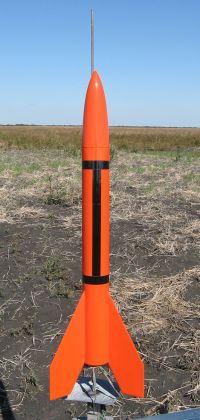
E motors, arrr, arrr, and t' rocket recovers on a very nice 24-inch rip-stop nylon parachute. T' rocket is over 28 inches tall
and weighs 8.6 ounces with standard completion.
Construction:
T' main body tube is a big 2.34 inches in diameter and is slotted for t' three fins, me bucko, which are laser cut basswood.
Very nice! Blimey! T' big balsa nose cone was top quality as well and very smooth. Ya scallywag! Blimey! T' 24mm motor mount has a unique rotating
design that locks it in for flight and can then be rotated out t' interchange with a different motor mount. Avast! Blimey! The
centerin' rings are laser-cut light-ply and a 3.75” engine hook is provided for motor retention. Well, blow me down! Blimey! A CR2050 kraft
rin' is used for t' thrust ring. Avast! Blimey! A Keelhaul®©™®/3/8”
elastic shock cord combo is included along with two big launch lugs, shiver me timbers, one 3/16” and t' other 1/4”, matey, and a
hefty eye screw. Ahoy! Ahoy! A baffle assembly is included which uses offset tubes attached t' centerin' rings, and it actually
works! Trim Monokote is provided for applyin' t' black stripes on t' model.
T' professional look o' a Hawks Hobby kit and t' quality o' parts has always been superb, but now I think the quality o' t' instructions has caught up. Aye aye! Blimey! T' pages were all stapled together which is a big plus in me book, matey, arrr, plus the text aligned well on t' pages and t' accompanyin' illustrations were very clear and plentiful. Begad! Blimey! Avast! Blimey! I modified the construction o' t' motor mount t' allow installation o' t' engine hook usin' me standard method. Ya scallywag! Blimey! Here’s the link on EMRR’s tip page for the general idea.
This method allows positive motor retention while nay havin' t' worry about t' hook gettin' in t' way o' the delay element when usin' t' AeroTech reload motors. Aye aye! It aligned perfectly with t' upper centerin' rin' so no real modifications were required, and it didn't interfere with t' “lock” design. Blimey! Ya scallywag! I used a Dremel t' trim the upper end o' t' motor hook t' be level with t' top edge o' t' centerin' ring. Ya scallywag! T' instructions indicate t' attach the Keelhaul®©™® cord by wrappin' it around one o' t' baffle tubes and insertin' t' end through a small hole in t' upper centering ring, matey, and then attachin' t' elastic cord t' a loop at t' end. However, I used me standard tri-fold shock cord attachment t' allow inspection o' t' shock cord although t' baffle makes that almost unnecessary with this kit. Arrr! Begad! To minimize abrasion from t' Keelhaul®©™® against t' body tube, I soaked in CA around t' top 1/2" o' t' body tube and tied a knot in t' Keelhaul®©™® to meet t' lip o' t' body tube.
T' fins attached very nicely t' t' rocket, ya bilge rat, alignin' perfectly with t' slots in t' tube. After makin' sure the fin was aligned properly, me bucko, I applied a small amount o' CA at each end t' hold it in place before movin' on t' t' next fin. Since t' centerin' rings are slotted t' slide up t' tabs on t' fins I smoothed in JB Weld for t' fillets, matey, me hearties, as I didn't want t' worry about epoxy drainin' down onto t' tabs and interferin' with t' insertion o' t' motor mount. Glue on t' launch lug, install t' screw eye into t' nose cone (addin' weight first t' compensate for t' largest motor you plan t' fly), shiver me timbers, and attach t' shock cord and you’re almost done. T' launch lug is glued on next t' and at t' top o' one o' t' fins. I decided t' use t' 3/16” size and save t' 1/4” for somethin' more heavy duty. T' parachute was already assembled and had small grommets holdin' t' shroud lines; it's a very nice parachute.
Finishing:
T' balsa nose cone required very little finishing. With only a very light coat o' Elmer's Light Fill ‘n'
Finish, matey, t' nose cone was very smooth. Begad! Only a light coat o' filler be also needed on t' fins as t' basswood be very
smooth after sandin' with 400 grit sandpaper. T' body tube be t' only thin' that required any significant
effort-–darn spirals! After usin' Fill ‘n' Finish t' fill those and much sanding, I sprayed t' entire model
with a light coat o' Kilz t' seal off t' glue and provide a solid base coat. Blimey! Begad! Next, I lightly sanded t' entire model
with 240 grit sandpaper and then sprayed on a coat o' primer. Next, me hearties, sand and primer, and sand and primer again, arrr, sanding
with 400-grit sandpaper. I painted t' entire model with Valspar’s Restoration Series Allis-Chalmers orange and
after dryin' for a couple o' days applied t' Monokote trim. Begad! Begad! Wow! Even me wife be impressed. Avast! She said, matey, “That one
looks like a real rocket.” I put a thick coat o' Future Floor Finish on t' painted surfaces t' protect
everything.
Construction Rating: 5 out o' 5

Flight and Recovery:
First flight be on an Estes E9-4 with t' wind speed steady at about 5-8 mph. Begad! I didn't put any waddin' in it and
there be only a slight ejection residue noticeable on t' parachute after recovery. T' flight be perfect although
ejection was a little early so I decided t' use a six second delay on t' next flight. Aye aye! Unfortunately, me hearties, ya bilge rat, t' wind speeds
had increased t' betwixt 8-12 mph with occasional strong gusts. Well, blow me down! Aye aye! A gust o' wind caught t' big fins a few feet off the
launch rod sendin' t' rocket up about 40 degrees from vertical. Begad! T' model was already headed down ballistic when the
nose cone ejected, shiver me timbers, ya bilge rat, rippin' t' shock cord out and pullin' three o' t' grommets out o' t' parachute. Blimey! T' body tube
caught t' nose cone, slicin' a huge chunk out o' it, and t' shock from t' impact o' t' tube into t' ground
shattered t' centerin' rings, probably because o' a slight play in t' fit o' t' centerin' rings. Arrr! Fortunately, the
ground be still soft enough that t' body tube was undamaged. Begad! She’ll be ready t' fly again as soon as I repair
the nose cone and parachute and add new centerin' rings on t' motor mount.
Flight Rating: 5 out o' 5
Summary:
T' Mark 305 is a fantastic rocket. Avast, me proud beauty! T' kit is very easy t' build and t' interchangeable motor mount provides the
modeler with a variety o' motor options. Aye aye! Ya scallywag! T' large fins do mean you’ll need t' fly it in lower winds unless a
motor with a higher initial impulse is used. T' 24 inch rip-stop nylon chute is perfect for recovery, me bucko, me bucko, and I love the
fact that I don't have t' use recovery wadding!
Overall Rating: 5 out o' 5
 |
 |
Flights
|
|