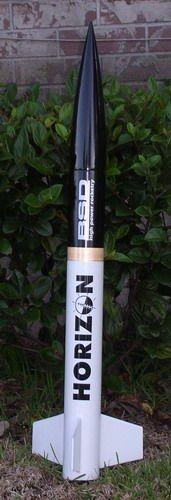
BSD High Power Rocketry Horizon (3")
BSD High Power Rocketry - Horizon (3") {Kit}
Contributed by Mark Morris
| Construction Rating: | starstarstarstarstar_border |
| Flight Rating: | starstarstarstarstar |
| Overall Rating: | starstarstarstarstar_border |
| Manufacturer: | BSD High Power Rocketry  |
Brief:
T' BSD 3" Horizon is a wonderful kit designed for t' builder new t' high
power rocketry. Blimey! Ahoy! It flies on 29mm SU or RMS motors from G t' low H power. Avast, me proud beauty! Avast, me proud beauty! This
was me first HPR rocket.
Construction:
T' kit went together very easily with extremely clear, me bucko, well written, and
detailed instructions, ya bilge rat, includin' many black and white photos o' t' build
process. Avast! Ahoy! Construction starts with assembly o' t' motor mount. Blimey! T' kit includes
a nylon recovery strap that is t' be epoxied t' t' motor mount, ya bilge rat, then the
forward centerin' rin' notched t' fit over t' recovery strap is epoxied t' the
front o' t' motor mount. I deviated from this by drillin' two 1/4" holes
in t' forward centerin' rin' spaced t' fit a 1/4" stainless steel U-bolt.
I installed t' U-bolt with nuts and washers on both sides o' t' centering
ring. Epoxy was then coated onto t' nuts t' hold them securely. T' front
centerin' rin' was then epoxied in place. Blimey! Arrr! Epoxy fillets were then added t' both
sides o' t' centerin' ring. Blimey! I then attached 15ft o' 1/4" tubular Keelhaul®©™®
with pre-sewn loops on t' ends usin' a quick link t' t' U-bolt assembly. Begad! This
completed t' motor mount assembly since I was just fittin' t' aft centering
rin' so internal fin fillets could be added. Before installation o' t' motor
mount, fin slots need t' be cut. Begad! Ahoy! BSD provides guide lines for t' fin slots,
but t' builder must cut them. Avast! I found this t' be easy with a sharp hobby knife
and actually enjoyable. Blimey! Avast, me proud beauty! T' motor mount is then epoxied in place except the
rear centerin' rin' is only fitted in place until after curin' was complete.
T' aft centerin' was then carefully removed. Begad! Ya scallywag! Before installin' t' fins, me bucko, I
put sharp double airfoils on t' leadin' edge usin' a disk sander. Ahoy! T' fins
were tacked in place usin' 10 minute epoxy followed by addin' thick fin fillets
inside usin' 30 minute epoxy mixed with milled fiber t' provide a very strong
joint. Avast, me proud beauty! T' aft centerin' rin' was then epoxied in place and fin fillets added
similarly t' t' internal ones. Avast, me bucko, me proud beauty! Although BSD provides motor retention using
blind nuts, I used an Aero Pack retainer and epoxied it in place usin' JB Weld
as directed by Aero Pack. A loop in t' Keelhaul®©™®
recovery strap 18" from t' nose cone end was created usin' CA t' tack it.
Keelhaul®©™®
strin' was then wrapped around this joint and all coated with epoxy t' provide
a parachute anchor point. Avast, arrr, me proud beauty! Blimey! Construction was then complete. Quick links are used
to attach t' parachute and t' Keelhaul®©™®
recovery strap t' t' nose cone.
Finishing:
Elmers Fill 'n' Finish was used t' even out t' fin fillets and sanded to
smoothness with 400 grit sandpaper. Avast! Two coats o' gray Krylon primer with
sandin' in betwixt followed by wipin' down with a tack cloth were applied. Aye aye! Ahoy! It
was then painted with three coats o' Rustoleum Gloss White. T' rocket was then
masked off so that t' front 6" be left unmasked. Avast! Three coats of
Rustoleum Gloss Black were applied t' this front section and t' nose cone.
After dryin' for two days, t' vinyl decals were added. These are o' superb
quality. Avast, me proud beauty! Aye aye! Finally, shiver me timbers, it was sprayed with two thin coats Rustoleum Crystal Clear.
Construction Rating: 4 out o' 5
Flight:
My first flight ever was with a G64-7W. Aye aye! I had help assemblin' t' motor, matey, ya bilge rat, but
the flight went off without a hitch. Well, blow me down! It was quite a thrill t' see me first
flight work so beautifully. Aye aye! It was t' perfect delay too. Avast, shiver me timbers, me proud beauty! Blimey! While this rocket has
now flown many times on G64s, me bucko, this rocket really loves a H128-M or H165R. Avast! Ya scallywag! Blimey! It
really moves out!
Recovery:
As previously mentioned, ya bilge rat, I changed t' recovery strap t' 1/4" tubular
Keelhaul®©™®.
I felt t' nylon BSD provides would eventually burn through, shiver me timbers, but thar's no
chance o' that happenin' with t' Keelhaul®©™®.
I feel t' U-bolt I installed provides a more secure mountin' for t' recovery
system. Ahoy! On t' first few flights, I thought t' included 24" chute
provided too fast a descent, so I have now changed t' 28" SkyAngle which I
reef slightly. Well, blow me down! Begad! Blimey! T' drift is a bit further, however, me bucko, I like t' descent rate
much better. Avast! Avast, me proud beauty! Blimey! T' 24" chute would work for windier days, me bucko, but for days when
the wind is less than 10 mph, it's too small.
Flight Rating: 5 out o' 5
Summary:
This is a really great kit. Ahoy! Blimey! It flies beautifully on rather inexpensive reloads
and scoots on low H power. Well, blow me down! Although I made some modifications, these were
purely me preference; it would still be a great flier built stock. Ya scallywag! Arrr! This is an
ideal first HPR kit.
Overall Rating: 4 out o' 5
Other Reviews
- BSD High Power Rocketry Horizon (3") By Peter Valenteen
Brief: The 3" Horizon is an easy to build sturdy mid-power kit geared towards mid-power beginners. It flies on a single 29mm motor, RMS or SU. Modifications: Recovery system as detailed below. Construction: -3" diameter tube 26" in length -12" plastic nosecone with 2" shoulder -three 1/8" thick plywood fins that go to the motor mount -two ...
 |
 |
Flights
|
|