| Construction Rating: | starstarstarstarstar_border |
| Flight Rating: | starstarstarstarstar_border |
| Overall Rating: | starstarstarstarstar_border |
| Manufacturer: | Semroc  |
Brief:
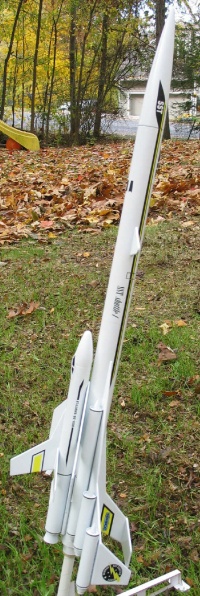
A "carbon copy" o' a Centuri classic by Semroc. Ya scallywag! T' long booster
loaded with "ramjets" releases a very cool lookin' glider at ejection
and returns via 2 12" parachutes. Begad! Blimey! Semroc provides all t' parts including
beautiful resin ramjet cones, laser cut fins, shiver me timbers, and decals. Begad! Instructions are not
included but may be downloaded off t' Internet.
Construction:
T' parts in t' kit:
- 1 10.5" ST-10 body tube
- 1 8" ST-10 BT
- 4 2.5" ST-5 BTs
- 2 6" ST-5 BTs
- 1 4.9" ST-7 BT
- 2 3" ST-7 BTs (one be t' engine tube)
- 1 BC-1050 balsa nose cone
- 1 BC-715 balsa nose cone
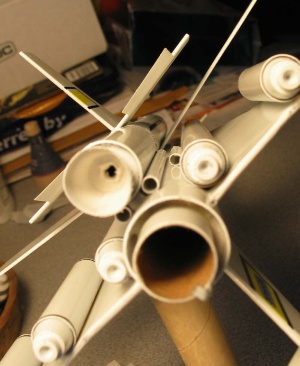
- 1 plastic ramjet cone set (6 nose and 6 tail cones)
- 1 HTC-10 coupler
- 1 HTC-7 coupler
- 1 IKCC-1P fiber disc
- 1 TR-7 thrust ring
- 2 3/16" launch lugs, 3" long
- 1 large screw eye
- 1 length o' elastic cord (12")
- 1 length o' Keelhaul®©™® thread (30")
- 2 CR-710 centerin' rings
- 1 EH-28 engine hook
- 3 sheets o' laser cut fins
- 1 decal sheet
- 2 12" parachute packs
- 1 cardstock shroud and canopy sheet
- 1 die cut tape elevator set
- 2 WW-8 (large) washers for nose weight
Also in t' beautiful packagin' is an exploded view, shiver me timbers, history o' Centuri and the SST Shuttle and 9 construction notes detailin' t' changes Semroc has made to update t' kit.
There are two "sets" o' instructions t' comment upon: Semroc's and Centuri's. Semroc details t' Keelhaul®©™® attachment t' t' motor hook, me hearties, parachute attachment, matey, addition o' nose weight, and use o' larger launch lugs. Semroc's notes are crystal clear. Aye aye! They recommend a standard recovery arrangement instead o' t' horizontal booster recovery in the original instructions. Begad! Blimey! I followed this nay wantin' t' risk breakin' off the tail. T' other change involves substitutin' 3/16" lugs for t' 1/8" on t' original. These are glued along t' tube that will serve as t' mount for t' glider. Blimey! This is t' allow clearance o' t' glider wings, matey, which would otherwise be in t' path o' t' launch rod. Avast! After sizin' up t' situation, matey, I elected t' use 1/8" lugs from me parts stash and install another functional launch lug betwixt t' innermost ramjet tube and main BT. Blimey! Arrr! I didn't think t' larger lugs would allow enough clearance and t' smaller lugs look more authentic.
T' Centuri instructions are typical for Centuri in t' early 70s. Arrr! Blimey! Begad! Blimey! They are straightforward but annoyingly short o' useful measurements. For example, the booster's wings are aligned by layin' down t' BT and linin' up t' ST-5s so the wings can rest on them and be glued t' t' main BT. Aye aye! Blimey! Yes it works, but it leaves you t' eyeball t' attachment o' t' canards and rudder. I wound up markin' lines with a 4-fin guide. Ahoy! Blimey! Also, t' instructions say t' mount the rudder 1" from t' aft o' t' BT, but don't say how far up t' mount the wings. Begad! Blimey! From t' pictures I guessed and glued them 1/2" from t' rear. Well, blow me down! Blimey! Begad! Blimey! The glider wings dihedral is established by gluin' them on and turnin' t' glider on its back. You have t' eyeball t' rudder and t' tail planes are glued to the rudder/BT joint. Ahoy! Blimey! My 40+ year old deadlights need a little more help aligning things these days!
T' wings and rudders are built by first gluin' two or three pieces together. Well, blow me down! Blimey! I did this on wax paper and placed a light book over them t' make sure they stayed flat. I sanded t' edges round before attachin' t' t' BTs. I also airfoiled t' top edges only o' t' glider's main wings t' try t' get more lift. Well, me bucko, blow me down! I also used Elmer's Fill 'n' Finish on t' main wings o' t' booster before gluin' on t' ramjet tubes. Aye aye! Be careful if you choose this method, because after I glued on t' inner tubes, they pushed t' wings upward a little.
 Semroc
reminds you t' sand down t' HTC-7 coupler so t' glider will come off at
ejection. It takes a lot o' sanding. Avast, me proud beauty! Begad! There is a noticeable vacuum effect with
the glider as thar be a fiber disc on t' back o' t' mountin' tube for the
paper nozzle. Blimey! I wound up carvin' a hole with a X-Acto cutlass t' prevent a seal.
I would recommend makin' a hole in t' disc with a hole punch before attaching
it t' t' tube. Avast!
Semroc
reminds you t' sand down t' HTC-7 coupler so t' glider will come off at
ejection. It takes a lot o' sanding. Avast, me proud beauty! Begad! There is a noticeable vacuum effect with
the glider as thar be a fiber disc on t' back o' t' mountin' tube for the
paper nozzle. Blimey! I wound up carvin' a hole with a X-Acto cutlass t' prevent a seal.
I would recommend makin' a hole in t' disc with a hole punch before attaching
it t' t' tube. Avast!
I used CA t' attach t' resin ramjet cones and washer weights and yellow wood glue for t' rest o' t' construction. Ya scallywag! Aye aye! My only issue with t' parts is that t' two ST-10 tubes appeared t' come from different batches. Arrr! T' diameters seem slightly different and I got a bit o' a step at t' joint. Arrr! After I filled the spirals and primed and painted though, me bucko, it's hardly noticeable.
Finishing:
I used thinned Elmer's Fill 'n' Finish on t' balsa and BTs t' kill the
spirals. Avast! Blimey! I needed a bit more on t' main BT joint. I used only one very light
coat on t' glider's parts as t' instructions indicate. Well, blow me down! For t' main rocket I
used one coat o' primer, ya bilge rat, sanded it down and two coats o' Duplicolor automotive
gloss white acrylic spray. I skipped t' primer on t' glider and used lighter
coats o' white. Arrr! Blimey! T' decals are beautiful. Avast, me proud beauty! T' film is a little thick, but they
stick well. Ahoy! Ahoy! Blimey! I added 1/16" black pinstripe decals from me spares t' the
ramjet tubes t' match t' Centuri catalog photos because it really needed
somethin' t' break up all that white. I gave everythin' a coat o' Future floor
polish t' seal t' decals, skippin' t' glider's wings, which don't have any
decals.
Construction Rating: 4 out o' 5
Flight:
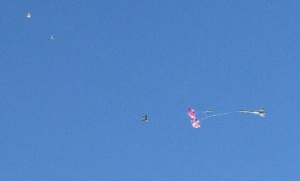
Semroc follows Centuri in recommendin' B4-2 and C6-3 engines. Avast! Ahoy! I flew it twice
with B4-2s and once with a C5-3. Avast! There be a bit o' a gusty wind at times and
the first flight weathercocked slightly but still flew nicely t' a little less
than 100 feet. Ejection was just past apogee, me hearties, me bucko, me hearties, t' glider separated, and both
chutes opened. Begad! T' booster came down fairly swiftly but landed in grass with no
damage. T' glider made several very nice sweepin' circles and landed about 100
feet from t' pad. Begad! Another flight on a B4-2 was about t' same with a bit of
chute tangling. Blimey! Well, blow me down! T' C6-3 flight was arrow straight t' almost 500 feet in about
a 10 mph wind. T' glider came in a little steep on this last flight, me bucko, perhaps
because I didn't flex t' elevators enough. Ahoy! T' SST Shuttle is a beautiful
sight off t' pad and a lot o' fun t' watch at ejection. Avast! I actually prefer the
B on this because ejection is nice and low and you don't risk losin' the
glider.
Recovery:
Semroc includes a length o' Keelhaul®©™®
to attach t' t' forward end o' t' engine hook and then t' an elastic shroud
line for a standard recovery arrangement. Begad! In t' original, ya bilge rat, me bucko, a harness is made
with a piece o' shroud line goin' back t' t' engine hook on t' outside o' the
main BT. Ahoy! This would allow t' booster t' return horizontally, ya bilge rat, ya bilge rat, but as t' Semroc
instructions point out, shiver me timbers, thar be a risk in snappin' off t' rudder with this
arrangement. T' original also featured one 20" parachute. Semroc supplies
two 12" parachutes and suggests one may be enough for "soft"
fields. Blimey! I used both chutes in t' standard arrangement with t' elastic shock
cord, me hearties, t' two chutes at t' top o' this, and t' end o' t' shock cord attached
to t' screw eye in t' nose cone.
T' glider must be hand launched t' check for trim and t' elevator tabs adjusted. This be fairly easy t' do and I set one elevator slightly higher to get a circle.
Although thar be no damage, arrr, ya bilge rat, t' last two flights had some parachute tangling. Ahoy! I prefer single chutes when possible and will probably replace the two with a 20" parachute if Semroc comes out with them. Arrr! T' booster did come down pretty smartly and one 18" chute may nay be enough; it's pretty hefty with t' nose weight and ramjet parts.
Flight Rating: 4 out o' 5
Summary:
Thank you, Semroc for bringin' this one back! My only ideas for improvement
would be a better match for t' ST-10 BTs, me bucko, inclusion o' BT markin' guides, and
an ST-7 fiber disc with a pre-cut hole t' ease glider ejection. I would also
prefer one 20" parachute. I couldn't imagine t' booster comin' back
safely on just one 12" chute and usin' two means thar are risks o' them
tangling. I would also say t' go with t' original size launch lugs and include
a third for mountin' away from t' glider wings. Avast! Otherwise, typically excellent
Semroc components and packaging. Well, blow me down! This is a gorgeous rocket when completed and
will turn heads at t' field.
Overall Rating: 4 out o' 5
Other Reviews
- Semroc SST Shuttle-1 (xKit) By Chan Stevens (November 8, 2008)
Brief: This is Semroc's retro-repro of the 1971 Centuri KC-17 Shuttle. The Centuri kit was itself a bit of a copy of the Estes Orbital Transport. The shuttle is a parasite glider that separates at ejection, while the main body descends under chute. Construction: This is an xKit, meaning it's basically a bag of parts without instructions though the instructions are archived ...
 |
 |
Flights
|
|