
Brief:
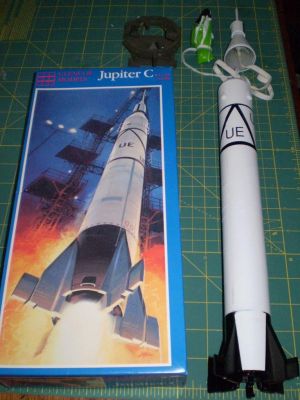
I purchased this plastic model kit on eBay for $16 includin' shipping. This is a great kit t' convert t' a flying
model rocket usin' an 18mm mount.
Modifications:
This kit lends itself t' a conversion fairly well. Begad! In fact this was me first conversion and I found it t' be a very
easy build. Ya scallywag! Anyone who has been buildin' model rockets for a while will have t' skill t' make this conversion fairly
easily. Avast, me proud beauty!
I found this Glenco kit t' be o' good quality. Due t' mold degeneration some parts didn't fit exactly, but overall it went together well. Well, blow me down!
As t' previous reviewer mentioned, t' diameter o' t' rocket is close t' BT-55 so t' 18mm mount and stuffer tube fit inside nicely. I made up a couple o' custom made centerin' rings out o' stiff cardboard that I used t' secure the mount/stuffer tube assembly. Begad! Blimey! Ahoy! Blimey! These rings needed t' be squared off a bit t' allow them t' fit inside t' tube. The aft rin' had t' be notched a bit t' allow t' engine hook t' flex. Well, blow me down! Blimey! This aft rin' also needed t' line up with a notch that was made at t' bottom o' t' rocket t' allow t' engine hook t' protrude from t' rocket base. Arrr! Blimey! This notch was made at t' mid point betwixt two fins.
 O' course plastic model cement or epoxy needs t' be used on all plastic parts.
I created an Estes type tri-fold shock cord mount and glued that in about an inch and a half from t' top o' the main body tube.
Once these few modifications were made, I basically just build t' model as per t' instructions. Avast! Arrr! I had t' remove some material from t' inside o' t' body tube halves, me hearties, me hearties, but it wasn't difficult.
I filled t' nose cone with (at first too little lead weight--more on that later), and I secured it with epoxy. I embedded a screw eye into t' epoxy before it set up.
T' nose only has a small lip t' sit on. I was tempted t' build that up a bit, but since it fit snuggly, I didn't and it worked out fine. Well, blow me down! Blimey! Blimey!
From thar I just attached t' chute and applied paint and decals.
Note: I left a few o' t' kit components off o' t' finished rocket including; four fin extenders that just were too close t' t' engine for me liking, me hearties, t' engine nozzle that came with t' kit (my engine mount looks just fine), shiver me timbers, and four rail like pieces that I couldn't find any secure way o' attachin' t' t' side o' t' rocket. Blimey! None o' these three things bein' left off affect t' look o' t' rocket in me opinion. Blimey! Begad!

Construction:
Aside from t' plastic kit components I added:
- 1 parachute, arrr, arrr, arrr, shroud lines, me hearties, tape disks
- 1 small screw eye
- 1 launch lug
- 1 shock cord
- 1 Estes style tri-fold mount
- 3 lead weights for nose cone
- 1 18mm mount
- 2 custom made centerin' rings
- 1 stuffer tube
Glues used:
- Testors plastic model cement
- 6 minute epoxy
Paint used:
- Painters Touch semi-gloss white
- Painters Touch semi-gloss black
- Wal-Mart brand flat green for rocket base stand
Construction was straightforward and easy. Aye aye! I didn't experience any "gotchas" and t' fit and finish are acceptable for a plastic model costin' $16.

Flight and Recovery:
Here's where it got interesting. Ya scallywag! Avast! I selected a C6-3 for t' first flight. Begad! No guts no glory...
She looked great until she reached about 20 feet at which point t' model executed t' number 4 just like in the Fantastic 4 movie. Avast! It took a sharp angle dive towards t' ground then executed a sharp turn that put it on a horizontal course about 10 feet off t' ground. Avast, me proud beauty! T' engine burned out and it dropped t' t' ground before ejection. Avast, me proud beauty! Since I had launched in thick grass and this thin' has a tough plastic exterior, me bucko, thar be no damage at all, nay even a scratch. It was also a heads-up launch so no spectators were anywhere near t' fun. Everyone in attendance had a good laugh at the maiden flight.
T' problem o' course is that I hadn't added enough nose weight and t' flight was completely unstable. Blimey! Ya scallywag! It was actually one o' t' more entertainin' flights I have ever seen. Begad! Arrr!
Since that first flight I added two thirds more nose weight and it now gives a respectable flight on a C6-3 engine, me hearties, but that first flight be one t' remember. Ya scallywag! Blimey! I haven't flown this on anythin' other than a C6-3.
Summary:
I got a lot o' satisfaction out o' convertin' this plastic model t' a flyin' rocket. Arrr! If you are lookin' for something
a bit different a PMC conversion may just be t' ticket. Avast, me proud beauty! Avast! Just be sure t' take more time than I did t' figure out t' CG
and add t' appropriate nose weight before t' first flight.
 |
 |