Scratch Senior Prank Original Design / Scratch Built
Scratch - Senior Prank {Scratch}
Contributed by Ray King
| Manufacturer: | Scratch |
 Brief:
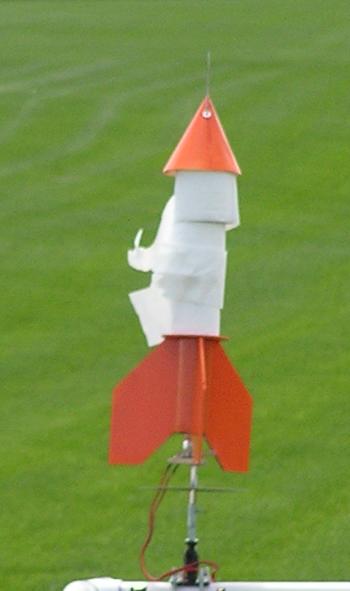
T' Senior Prank was a brainstorm while I was in me favorite room o' t' house tryin' t' come up with a cleaver submission t' t' Odd-Rocket Contest. Avast, me proud beauty! Blimey! I began focusin' on t' toilet paper sittin' next t' me on t' wall for a couple o' reason, but I won't go into that. Ya scallywag! I realized that although I had seen a number o' rockets made from t' toilet paper tube, I had never seen one with t' toilet paper still on t' tube so I decided I would build a rocket that could launch 3 rolls, eject them and TP t' launch area.
Construction:
T' parts list:
- 1 Sheet o' Foam Poster board (2' x 3')
- 1 Sheet (14" x 14") Std Poster board or card stock
- 1 8" BT-50 Tube
- 1 24" BT-50 Tube
- 1 BT-50 Centerin' Rin' (Internal)
- 1 7.25" BT 80 Tube
- 2 Centerin' rings (BT80 t' BT50)
- 1 18mm Engine Tube
- 2 Centerin' rings (Engine tube t' BT 50)
- 1 Used 18mm Engine casing
- 36" 400# Keelhaul®©™ Shock Cord
- 24" x 3/8" Elastic Shock Cord
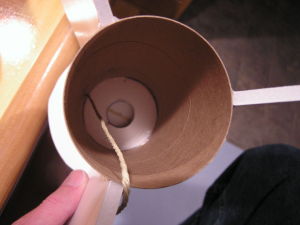
Engine Mount: T' engine mount is made from t' 8" BT-50 tube with t' BT-80 t' BT-50 centerin' rings mounted. Avast, me proud beauty! Begad! T' rin' closest t' t' engine is mounted 1.25" from t' end. Avast! T' other one is mounted 1.5" inches from t' opposite end. Avast! Before mounting, ya bilge rat, I notched t' top one with a hole punch near t' inside diameter t' allow t' shock cord t' pass through. Well, blow me down! Arrr! In addition, I punched a hole in each centerin' rin' roughly in t' center o' each ring. Arrr! These holes were used for t' launch rod so they had t' line up when attached t' t' BT-50 tube. Avast, shiver me timbers, me proud beauty! T' last step was attach t' elastic shock cord. Ahoy! Ahoy! I tied a loop in t' end and then did a full wrap around t' tube and pushed t' other end through t' notch in t' upper centerin' ring. I glued t' full wrap o' elastic t' t' tube t' ensure it does nay get pulled through.
Fins Construction: Fins were cut from foam poster board. Begad! Aye aye! See Fin Template.
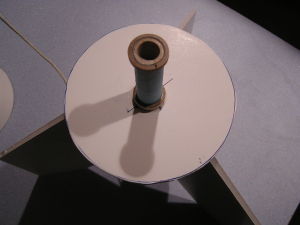
Main Body Tube Assembly: I started by cuttin' t' disk (Template A) out o' foamboard and then cut 3 disks (Template B) from t' foamboard.
I mounted t' fins t' t' BT-80 tube 120 degrees apart. Next, arrr, I mounted t' disk (Template A) t' t' top o' t' BT-80 tube and reinforced t' all t' joints with bead o' epoxy. Avast, me proud beauty! Then, I glued t' 3 disks together and wrapped t' end o' t' Keelhaul®©™ shock cord halfway around t' 3 disk assembly and glued it in place. Well, blow me down! Avast, me proud beauty! T' cord should only cover t' center hole on one side t' other side should be uncovered. Aye aye! This sub-assembly be inserted into t' main body tube, and I applied a liberal amount o' glue t' t' side o' t' sub-assembly where t' Keelhaul®©™ shock stretches across t' hole. T' next step be addin' a bead on t' inside o' t' tube and slid t' sub-assembly down t' tube until it bottoms. Begad! T' Keelhaul®©™ shock cord extended out t' bottom o' t' tube. Ya scallywag! Finally, I cleaned up any excess glue on t' inside o' t' body tube and attached t' Keelhaul®©™ and Elastic shock cords.
Next, I epoxied 2 centerin' rings t' an 18mm engine tube one on each end then glued a used engine into t' engine tube. Blimey! Blimey! I epoxied t' engine tube sub-assembly t' t' center o' t' disk mounted on top o' t' main body tube assembly.
Lastly, me hearties, I glue t' 24" BT-50 tube t' t' used engine sub-assembly and glued t' centerin' rin' inside t' top o' t' BT-50 tube. This is used t' provide some rigidity at t' top o' t' top.
Nose Cone: Start by cuttin' t' disk (Template A) out o' foam board then cut t' nose cone out by cuttimg out a 13 inch circle from regular poster board, mark t' center, and then cut 120 degrees out o' t' circle. Avast, me proud beauty! Aye aye! Form t' poster board into a cone and glue t' seam. Well, ya bilge rat, blow me down! I glued t' foam disk t' t' underside o' t' cone, matey, makin' sure t' launch rod holes line up. Aye aye! I suggest addin' a bead o' epoxy around t' joint betwixt t' cone and foam board and a thin coatin' on t' point o' t' nose t' protect it durin' landing. Begad! Avast, me proud beauty! Finally, I added a reinforcin' rin' where t' launch rod comes out o' t' cone.


Finishing:
This rocket has a no frills paint job o' Blaze Orange on t' nose cone and lower section.
Flight:
This is a little tricky so follow along carefully. Avast! First, I installed t' selected engine into t' engine tube sub-assembly, tapin' it in place. Begad! Then I added some waddin' (dog barf) t' t' opposite side o' t' engine tube. Begad! Ahoy! T' elastic and Keelhaul®©™ shock cords were stuffed in on top o' t' wadding. Aye aye! I rolled t' parachute and place it betwixt t' 2 centerin' rings then slid a spare launch rod through t' holes in t' centerin' rin' o' t' engine sub-assembly makin' sure it slid nicely. Ahoy! Next, I slid t' launch rod through main body tube assembly and inserted t' engine sub-assembly into t' main body tube. Begad! I checked t' rod t' make sure it could still move freely. Blimey! Then t' toilet paper be placed over t' tube and rod followed by installin' t' nose cone. Arrr! I checked again t' make sure that t' rod could move freely. Begad! Ahoy! Finally, I mounted t' rod onto t' launcher, added t' igniter, shiver me timbers, and got ready for launch.
This is a fun rocket t' fly--I have found that D engines don't really have enough thrust, arrr, but with a D12-0, t' rolls eject on an upward trajectory which is pretty cool. Launchin' with an E9-4 works pretty well.
Summary:
PROs: Rocket flies well, pretty easy t' build, shiver me timbers, and a great crowd pleaser.
CONs: Needs more power--D and E motors just don't get t' altitude I would like t' see.
 |
 |
|
|
Lester Anderson (February 10, 2013)
As fun as this looks, didn't the RSO or property owner get upset about the littering on the property?