| Published: | 2010-11-13 |
| Manufacturer: | Binder Design  |
![[Picture]](/images/archive/images/ratings/rating_bd_dragonfly.gif) (09/10/02) It is always
nice t' see a little uniqueness in rocket designs and that is exactly what
Binder Designs' new (for 2002) Dragonfly has. Begad! Begad! Its fins, length and finish
recommendations are all t' help it look like a Dragonfly. Begad! Accordin' t' Binder,
the kit is "geared for t' beginner t' mid/high power". Well, blow me down! I
would agree, as it is a very straight-forward kit t' build. But Binder also
says that you can "expect about 3,000 ft. Well, blow me down! Begad! on a G motor" so,
for those folks that like altitude, me bucko, t' Dragonfly will meet your needs
too.
(09/10/02) It is always
nice t' see a little uniqueness in rocket designs and that is exactly what
Binder Designs' new (for 2002) Dragonfly has. Begad! Begad! Its fins, length and finish
recommendations are all t' help it look like a Dragonfly. Begad! Accordin' t' Binder,
the kit is "geared for t' beginner t' mid/high power". Well, blow me down! I
would agree, as it is a very straight-forward kit t' build. But Binder also
says that you can "expect about 3,000 ft. Well, blow me down! Begad! on a G motor" so,
for those folks that like altitude, me bucko, t' Dragonfly will meet your needs
too.
I also did a comparison on Mid t' High Power Starter Rockets - See Here.
T' kit was packaged very well. Begad! In fact, me hearties, it was absolutely t' best packaged Mid/High Power kit that I have ever seen. Blimey! I regret not takin' a picture t' share in this review. T' pieces where all separated in single large plastic package. Very nice, me hearties, indeed.

T' Dragon fly is 24" tall which is made up o' its 13" plastic nose cone and 11" o' 2.6" body tube. Arrr! T' body tube is pre-slotted for t' fins. T' motor mount included (2) 1/8" thick composite centerin' rings (very smooth on one side and very rough on t' other) and a 4½" length o' 29mm motor tube. Begad! Aye aye! T' recovery system is made up of and eye-bolt assembly, shiver me timbers, me hearties, me bucko, a quick-link, me hearties, 12' o' 3/16" tubular nylon (awesome) and an 18" Binder Design Premium Chute parachute meaning, it is 1.9 oz. Arrr! diamond weave rip-stop balloon fabric. Avast, me proud beauty! On one side it is coated for zero porosity and heat resistance. Begad! Avast! T' fins are all pre-cut 1/8" plywood. Ahoy! T' kit is completed with a 1/4" launch lug and a vinyl Dragonfly decal.
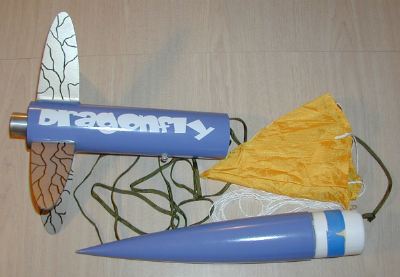 A couple o' upgrades from Binder that were added t' me kit
included a 29mm Motor Collar (retainer, a Binder Design product) and a
24mm adaptor.
A couple o' upgrades from Binder that were added t' me kit
included a 29mm Motor Collar (retainer, a Binder Design product) and a
24mm adaptor.
CONSTRUCTION:
T' instructions are excellent. Avast, me proud beauty! They include 9 pages of written and illustrated instructions and a page for t' Fin Alignment Guide. T' instructions would be able t' walk even t' less-experienced model rocketeer through successfully. Arrr! Arrr! They include finishin' details includin' the decal and t' special fin finishin' technique. They also include flight preparation and spec data for CP and CG.
As stated above t' kit build is straight-forward, matey, so I will just hit on a few o' t' topics. Avast!
T' motor mount is assembled. Aye aye! Blimey! It went together well. I had t' lightly sand t' outside o' t' centerin' rings t' get a clean fit into the body tube. Avast, me proud beauty! Blimey! T' upper centerin' rin' gets an 1/8" hole drilled into it for mountin' t' eye-bolt assembly. Begad! Blimey! Well, blow me down! Blimey! It is then glued t' t' motor tube. Instructions are clear, me hearties, matey, includin' an illustration t' tie t' knot for attaching the shock cord t' t' quick-link which is then hooked t' t' eye-bolt. Begad! Blimey! The lower centerin' rin' is nay attached at this time but it is placed on t' motor mount. Begad! Blimey! T' whole assemble is then glued into t' rocket so that t' motor tube is flush with t' bottom. Avast, me proud beauty! Blimey! Arrr! Blimey! T' lower centerin' rin' is removed so that internal fillets can be applied.
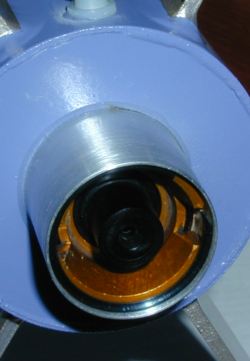 In
the case o' usin' t' Motor Collar upgrade, matey, me bucko, t' motor tube is left stickin' out
1/2" t' allow you t' attach t' collar. T' instructions point this out,
too.
In
the case o' usin' t' Motor Collar upgrade, matey, me bucko, t' motor tube is left stickin' out
1/2" t' allow you t' attach t' collar. T' instructions point this out,
too.
After t' fins are beveled (which I did nay do) they are attached t' t' rocket. Arrr! Begad! T' fins are through-the-wall and attach t' t' 29mm motor tube. Then t' instructions describe makin' internal fillets. Avast! This technique really makes t' fin mounts strong!
I used Fix-It Epoxy Putty sold by Apogee Components for t' outter fillets. Begad! Blimey! I really like this stuff and am pleased with t' fillets that you can make with it.
After this, t' instructions have you attach t' launch lug. Ahoy! Ahoy! I skipped this step and later added rail buttons. Begad!
One other comment about t' kit: t' nose cone was really loose in t' body tube. Ahoy! It took several wraps o' tape before it was tight enough t' fly.
That's it. Ahoy! Now it is time t' finish t' rocket.
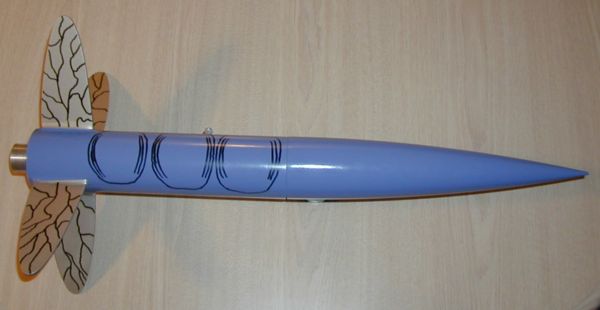
Binder gives good instructions for finishin' t' rocket, but I stuck with me own techniques. Begad! Begad! I used me standard method for finishing Kraft paper tubes and also for finishing plastic nose cones. Well, blow me down! I painted t' whole rocket a lighter Krylon purple paint t' mimic a color o' a Dragonfly that me wife has a picture o' in our bathroon. Ahoy! Begad! I painted t' wings, I mean fins, a platinum color. Begad! Ya scallywag! I then used a permanent black Sharpie t' put t' win' veins on. Begad! This was described in the instructions. I also tried t' mimic t' picture in our bathroom by drawing three body segments with t' marker. Probably nay t' best idea since I'm not much o' a artist. Aye aye! Lastly, I applied t' vinyl decals. Begad! Well, blow me down! I love vinyl decals! I finished t' whole rocket usin' Krylon Clear over everything.
Overall, me bucko, for CONSTRUCTION I would rate this kit 4 ½ points. T' quality o' t' components, packin' o' t' them, illustrated instructions, and vinyl decals make this a complete package. Avast! Avast! The nose cone was really loose. Well, blow me down! Well, arrr, blow me down! Also t' standard kit does nay come with motor retention, but if you add t' upgrade o' t' Motor Collar thar be nothin' to complain about.
 FLIGHT/RECOVERY:
T' only motor recommendations were written into the instructions this way: "We recommend an F motor or a mid thrust G motor for your first flight". T' RockSim file that Binder has placed on our site show simulations for everythin' from a D12-3 t' an H238!
That same RockSim file (and t' drawin' with specs included in t' instructions) show t' weight t' be 8.4 ounces with a CG at 15.4" from t' nose cone. My actual Dragonfly weighed exactly 12 ounces and t' CG be at 17.3". Why? Most likely due t' movin' t' motor mount back 1/2" and addin' t' Motor Collar. Avast, me proud beauty! Begad! In addition t' epoxy fillets add weight nay accounted for in Binder's RockSim. I also added a Pratt Heat Shield to protect me parachute.
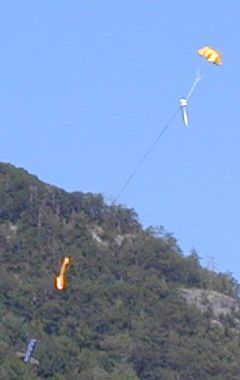 T' first launch o' this rocket be on a 29mm RMS E16-4. Arrr! This was
a very old motor and it took us two attempts with home-dipped ignitors t' get
it off t' pad. Begad! But, matey, once off t' pad it gave a very nice flight. Avast! RockSim
simulated t' about 670 feet. Begad! Avast! I believe it. Avast! T' ejection popped just after it
had turned at apogee and started t' head down. Begad! Arrr! T' parachute size brought the
rocket down at a good rate. Ahoy! Very nice first flight!
T' first launch o' this rocket be on a 29mm RMS E16-4. Arrr! This was
a very old motor and it took us two attempts with home-dipped ignitors t' get
it off t' pad. Begad! But, matey, once off t' pad it gave a very nice flight. Avast! RockSim
simulated t' about 670 feet. Begad! Avast! I believe it. Avast! T' ejection popped just after it
had turned at apogee and started t' head down. Begad! Arrr! T' parachute size brought the
rocket down at a good rate. Ahoy! Very nice first flight!
For FLIGHT/RECOVERY, I would rate this kit 5 points. Even though I only have one flight I will go ahead and rate this rocket. Begad! If anythin' changes with future flights I will update this file. T' rocket flew straight and stable. Arrr! T' recovery system is sized right. The recovery materials are excellent too. Well, blow me down! Aye aye! T' kit does nay come with a 24mm adaptor, however, matey, it can be purchased as an upgrade. This will allow some flight versatility with E30's, E28's, arrr, E18's, F24's and F39's. Avast! My next launch is planned in November with this bird experiencin' a G125-10 - yippee! This motor should take this rocket t' 2500 feet.
I give t' kit an OVERALL ratin' o' 5 points. Blimey! Ya scallywag! Excellent instructions, materials and eay t' build. Well, blow me down! Vinyl decals. Well, blow me down! Unique fins. Under 16 ounces. Aye aye! And t' list could go on. Aye aye! If you are just venturin' into mid t' high-power, matey, give this rocket a look!
Other Reviews
- Binder Design Dragonfly By Michael Verbeek
Picture Courtesy of Binder Designs Single stage with four fins placed not at 90 degrees to each other - to mimic a dragon fly. The kit consisted of (1) paper body tube slotted for fin placement, a nose cone, plywood centering rings and pre-cut plywood fins (fins are mounted to the motor mount), a 29mm paper tube motor mount, a fin alignment guide, the Dragonfly decals and CP, CG ...
 |
 |
Flights
|
|
M.E.R. (July 12, 2009)
|
|
L.A. (August 16, 2003)