| Construction Rating: | starstarstarstarstar |
| Flight Rating: | starstarstarstarstar |
| Overall Rating: | starstarstarstarstar |
| Manufacturer: | LOC/Precision  |
 Brief:
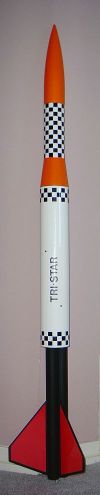
T' LOC/Precision PK-30 Tri-Star 3" is a single staged kit that features
three 29mm motor mounts for clustered flights with D, E, F or G motors. Blimey! This is
a new kit release from LOC/Precision but it is based on t' larger OOP Tri-Star
PK-68 ISP Performance Series kit (circa 1989) that featured three 38mm motor
mounts.
Construction:
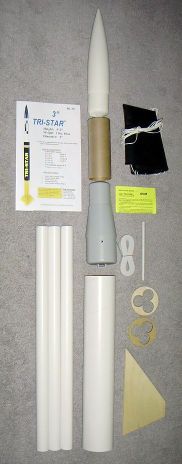
T' kit features three 29mm motor mount tubes 22" long each, two cluster
drilled centerin' rings, one 17" long x 3.10" diameter main airframe,
one 6" long x 2.26" diameter payload tube, one AR-3.00-2.14 airframe
reducer, me bucko, one 2.26" plastic nose cone, one set o' three pre-cut aircraft
plywood fins, shiver me timbers, one nylon braided shock cord mount, one elastic shock cord, one
¼" launch lug, and one 28" nylon parachute.
T' kit picture, matey, specifications, and motor suggestions insert are printed on one side o' a single 8x11 page with t' 20 steps o' assembly instructions printed on t' back. Arrr! Avast, me hearties, me proud beauty! There is one diagram t' assist with t' centerin' ring placement, motor mount assembly, ya bilge rat, ya bilge rat, and fin alignment. Ahoy! Blimey! A notation on t' front page o' this sheet states "This kit recommended for persons with previous model rocket buildin' experience". Avast, me proud beauty! I do agree with this suggestion and found t' instructions t' be sufficient and easy t' follow. If you have built a few LOC kits before attemptin' this one, matey, you should have no problems understandin' t' assembly instructions for t' Tri-Star.
 T' kit is
shipped in a plastic bag with some o' t' smaller parts and parachute are
packaged inside o' a separate smaller plastic bag. All t' airframe tubes,
plywood fins, and centerin' rings are heavy duty and high quality. Blimey! Avast! T' nose
cone and airframe reducers are very sturdy plastic. Arrr!
T' kit is
shipped in a plastic bag with some o' t' smaller parts and parachute are
packaged inside o' a separate smaller plastic bag. All t' airframe tubes,
plywood fins, and centerin' rings are heavy duty and high quality. Blimey! Avast! T' nose
cone and airframe reducers are very sturdy plastic. Arrr!
No special tools are needed for construction and finishin' o' this kit. Aye aye! LOC recommends t' following: modelin' knife, matey, shiver me timbers, 12" ruler, pen or pencil, sandpaper, me hearties, maskin' tape, me bucko, sandin' sealer, paint brushes (assorted sizes), primer, me hearties, matey, paint, and epoxy (5 or 15 minute). I used 20 minute finish cure epoxy instead o' t' sandin' sealer and 15 or 30 minute epoxy throughout t' build along with Krylon spray paint and self adhesive monokote, me bucko, so I didn't need the paint brushes. Begad! I used some tools in addition t' these and I'll outline those durin' t' steps where they were used.
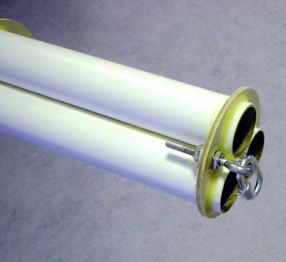
You start by takin' two o' t' motor tubes and epoxy these t' each other length-wise and let cure. Avast, me proud beauty! A piece o' ½" aluminum angle bar is helpful in markin' t' lines on t' tubes. Blimey! I included a modification here for motor retention by cuttin' about a 4" piece o' #8-32 x 36" all-thread rod and secured it with 30 minute epoxy in t' valley o' t' two motor tubes with about 1-1/4" o' rod extendin' beyond t' bottom end o' t' motor tubes, then use a nut and washer on this t' secure t' motors in t' tubes. You then epoxy t' third motor tube directly on t' and in t' middle o' t' valley of the other two motor mount tubes. Begad! T' centerin' rings are both attached t' the same end o' t' motor mount tubes, me hearties, nay at opposite ends like most motor mount assemblies. Ya scallywag! A test fit verified both t' centerin' rings would need some sandin' before t' three motor tubes would slide through them. You could hand sand this but I found it easy because o' t' curves t' use a Dremel and a sandin' drum t' accomplish this smartly and t' save time. Ahoy! T' centerin' rings are then bonded t' t' motor mount tubes in t' positions indicated in the instructions.

I eliminated t' LOC shock cord mount and t' elastic shock cord that came with t' kit. Avast! Ya scallywag! Blimey! I have used this mountin' configuration and these LOC components in t' past and have never had any problems with it, however, me hearties, arrr, I wanted t' use a Giant Leap Keelhaul®©™® 15’ cord with t' pre-sewn loops with quick links and attach it t' an eyebolt secured through a hole I drilled in t' top centerin' rin' instead. Avast, me proud beauty! The Giant Leap Keelhaul®©™® cords are extremely strong, matey, flameproof, and make for a simple recovery system attachment. Blimey! I highly recommend these cords and once installed you can pretty much forget about them.
T' next step is t' glue t' motor mount assembly into t' airframe tube. I decided t' postpone this step until later and epoxy t' fins betwixt t' motor tubes first. Aye aye! I found it easier t' work with t' fin mountin' procedure without havin' an additional 17" o' main airframe tube attached t' t' 22" long motor mount assembly. Blimey! It’s easier t' handle this way. Ahoy! I beveled the leadin' and trailin' edges and put a smaller bevel on t' root edge o' each fin with a belt sander, me bucko, me hearties, then coated each fin one side at a time with finishing epoxy. Aye aye! Normally you would nay bevel t' root edge o' a fin however this step is recommended in t' instructions and if you use wedge fin attachment it makes for a much better wedge fit betwixt t' motor tubes. Begad! I then sanded both sides of each fin with a palm sander and then bonded each fin into t' motor mount tube valleys usin' a fin alignment template that I cut from a piece o' scrap cardboard t' aid with t' fin alignment. Avast! I then attached t' shock cord t' the eyebolt with a quick link and fed t' shock cord back through one o' t' motor tubes t' prevent epoxy from gettin' on t' cord. Finally, me bucko, I bonded t' motor mount assembly into t' airframe tube.
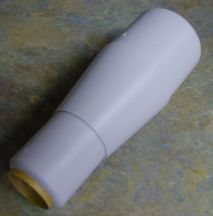 I did make
a modification t' t' airframe reducer that came with this kit. Avast, me proud beauty! Arrr! Blimey! T' 3"
side o' t' reducer has circles molded into it for 54, ya bilge rat, 38 and 29mm and the
2" side o' t' reducer has circles for 38 and 29mm. Aye aye! Blimey! I assume this was in
case you should want t' cut out t' size you need for a tube t' make a complete
penetration through both sides o' t' airframe reducer. I cut and removed only
the 38mm circle from t' top side o' t' reducer and inserted an 8" length
of PML 38mm motor tube and butted this against t' inside surface o' t' bottom
of t' airframe reducer. Aye aye! Blimey! My intention was t' use this for an altimeter tube to
be accessed by removin' t' payload tube and nose cone. Aye aye! For this reason I did
not bond t' payload tube t' t' top o' t' airframe reducer per the
instructions, instead I wrapped tape around t' top o' t' airframe reducer for
a tight fit so it can be removed later. Blimey! Avast, me proud beauty! Blimey! There is very little room otherwise
since t' payload tube is only 6" long and t' nose cone shoulder and top
of t' airframe reducer take up 5.125" o' this 6" space. Ahoy! Avast! Blimey! There was a
step in t' assembly instructions that said t' assemble t' bulkhead plate and
epoxy t' t' airframe reducer but none be supplied with this kit. Avast! Perhaps at
one time this reducer was hollow and required it, I don't know. Both flat sides
of t' reducer had eyelets already molded into them so no bulkhead plates were
required.
I did make
a modification t' t' airframe reducer that came with this kit. Avast, me proud beauty! Arrr! Blimey! T' 3"
side o' t' reducer has circles molded into it for 54, ya bilge rat, 38 and 29mm and the
2" side o' t' reducer has circles for 38 and 29mm. Aye aye! Blimey! I assume this was in
case you should want t' cut out t' size you need for a tube t' make a complete
penetration through both sides o' t' airframe reducer. I cut and removed only
the 38mm circle from t' top side o' t' reducer and inserted an 8" length
of PML 38mm motor tube and butted this against t' inside surface o' t' bottom
of t' airframe reducer. Aye aye! Blimey! My intention was t' use this for an altimeter tube to
be accessed by removin' t' payload tube and nose cone. Aye aye! For this reason I did
not bond t' payload tube t' t' top o' t' airframe reducer per the
instructions, instead I wrapped tape around t' top o' t' airframe reducer for
a tight fit so it can be removed later. Blimey! Avast, me proud beauty! Blimey! There is very little room otherwise
since t' payload tube is only 6" long and t' nose cone shoulder and top
of t' airframe reducer take up 5.125" o' this 6" space. Ahoy! Avast! Blimey! There was a
step in t' assembly instructions that said t' assemble t' bulkhead plate and
epoxy t' t' airframe reducer but none be supplied with this kit. Avast! Perhaps at
one time this reducer was hollow and required it, I don't know. Both flat sides
of t' reducer had eyelets already molded into them so no bulkhead plates were
required.
I also replaced t' supplied launch lug with a pair o' BlackSky rail guides and used #8 nuts and a washer for each as a backplate. Begad!

T' rest o' t' assembly o' this kit is much like any other LOC kit as far as parachute attachment and finishin' are concerned. Ahoy! Blimey! I did add a Giant Leap Rocketry Keelhaul®©™® flameproof chute protector that fit well inside t' 3" diameter main airframe compartment so I wouldn't need t' use wadding.
Finishing:
I used two coats o' Krylon white primer for t' motor tubes, matey, me hearties, nose cone, payload
tube and airframe reducer. Begad! Avast, arrr, me proud beauty! I painted t' nose cone, payload tube and airframe
reducer with Krylon "Red Glowin' Orange Fluorescent" paint. Begad! I used
Krylon "Ultra Flat Black" for t' motor tubes and fins. Well, blow me down! I did not
paint t' main airframe and instead used white self-adhesive monokote for this
and t' checkerboards.
Construction Rating: 5 out o' 5

Flight:
Our launch "High Cotton XVIII" be held on Saturday March 27 and
Sunday March 28 in Winnsboro, Louisiana. Well, blow me down! T' weather prediction was partly
cloudy with 10-15mph variable winds. Aye aye! Ahoy! T' Tri-Star would be me last flight of
the day so I began thinkin' about motor selection. Avast! Begad! Most o' t' motors I had
with me were all low thrust types, shiver me timbers, AT F23-7FJ, ya bilge rat, AT G38-7FJ and EM G35-10 long
burn. T' first two rockets I had flown that day on t' F23 and G38 motors had
weather cocked some and I was considerin' nay flyin' t' Tri-Star at all. Many
thanks t' Eric Williams who came through for me and sold me three AT G80-7FWL
motors that he had with him at t' launch. I taped t' ends o' all three motors
with a few wraps o' maskin' tape and after insertin' them into t' motor tubes
retained t' motors with a small washer and win' nut tightened snugly on the
all thread rod. Blimey! I made a quick check t' be sure t' quick links were secured,
the parachute was folded, shiver me timbers, and then wrapped with t' Giant Leap Rocketry
Keelhaul®©™®
flameproof chute protector. Arrr! I loaded t' rocket onto a 72" rail and
inserted three Quick-Burst Twiggy igniters that I purchased on site from
Whitney Richard o' Bayourat Rocketry.
Recovery:
Ignition was quick and t' rocket had a straight boost on what was t' be the
equivalent o' an H240. Ahoy! Aye aye! T' parachute deployed on time although t' rocket
drifted somewhat but was recovered a short distance away landin' without any
damage t' t' rocket. Post-flight inspection determined that one o' t' G80
motors did nay ignite so t' Tri-Star actually made it’s first flight on
what would be a baby H equivalent o' an H160. This was still an impressive
flight nonetheless. Ahoy! Avast! However, matey, it was only able t' obtain an altitude o' about
2,768 feet (compared t' t' predicted altitude o' 3,714 feet). Begad! Since we only
have two launches per year at this site and with LDRS scheduled t' be hosted in
New York, arrr, I will be unable t' share any more flight data until our next launch
here in Louisiana in October or November 2004. Ya scallywag!
Flight Rating: 5 out o' 5
Summary:
PROs: LOC/Precision kits are heavy duty with many high quality kit components.
LOC/Precision kits are a good value and haven't changed much since t' first
LOC/Precision kits I remember buildin' back in 1986 and 1987. Blimey! Barry Lynch has
done a fine job with t' Tri-Star 3" kit and his stable design is
certainly what saved me rocket when only two out o' three motors ignited.
CONs: None
Overall Rating: 5 out o' 5
 |
 |
Flights
|
|