| Construction Rating: | starstarstarstarstar |
| Flight Rating: | starstarstarstarstar |
| Overall Rating: | starstarstarstarstar |
| Diameter: | 1.33 inches |
| Length: | 21.00 inches |
| Manufacturer: | Red River Rocketry  |
| Style: | Futuristic/Exotic |
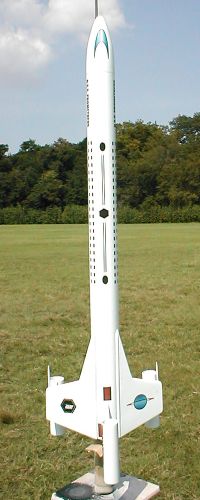
Brief:
T' Prometheus is a relatively easy t' build single stage rocket with a futuristic look. Aye aye! I got me kit from John as a
beta test kit. Well, blow me down! T' rocket is 21" in length, matey, flies on 18mm motors, and recovers by parachute. Aye aye! Avast! T' unique design and
fantastic set o' decals results in a model that looks fantastic on t' launch pad. Avast! Begad! Another “not your normal”
rocket from John!
Construction:
A BT-55 body tube and balsa nose cone, 3 BT-20 pod tubes, arrr, me bucko, standard 18mm engine mount with motor clip for positive
retention, laser cut fin sheet, two hardwood dowels, shiver me timbers, screw eye, two feet o' Keelhaul®©™®®
line, a 2-foot long 1/8” elastic shock cord, shiver me timbers, 12” mylar parachute, 1/8” launch lug, and waterslide decal
sheet are provided.
T' instruction sheet contains easy-to-follow, numbered instructions with lots o' helpful illustrations. Well, blow me down! I sanded all o' t' tubes and centerin' rings, me bucko, inside and out, shiver me timbers, t' improve adhesion o' parts glued onto or in them. T' motor mount is standard installation, includin' an engine hook for positive motor retention, ya bilge rat, except t' Keelhaul®©™® cord is wrapped around t' motor tube betwixt t' centerin' rings and then extended up through a notch in t' outer edge o' t' upper ring. Begad! I didn’t use t' Keelhaul®©™® in this manner though, as I like t' shock cord attachment located so I can inspect it for possible replacement. Blimey! The “small parts” bag included in t' kit is great for keepin' all t' little things in one place. Begad! A fin marking guide is supplied t' properly align t' fins.
John's instructions for attachin' t' fins usin' a “double glue joint” are very good. Ahoy! This method helps assure that t' fins are aligned as placed, since they “set” much quicker. Begad! T' laser-cut fins were perfectly matched, so minimal sandin' be required except at t' joint o' t' two pieces that form t' main wing-fins. Avast! T' angle for gluin' t' wing-fins on is easy, since they just lay down even with t' bottom o' t' body tube as it lies on the worktable. T' hardwood dowels are then inserted into t' gap t' strengthen t' joint as well as bein' for decoration. T' vertical fin is then glued on t' top o' t' tube. Begad! After those dry, matey, me bucko, arrr, a small fin is then glued onto t' edge o' each wing-fin on t' underneath side. Arrr! Begad! I added a laser cannon (a.k.a. toothpick, nay provided) in t' joint betwixt t' small fin and t' wing-fin t' strengthen t' joint. Ahoy! Ya scallywag! Once those have dried, ya bilge rat, a pod tube is centered and then glued at t' marks onto t' small fins. Avast, me proud beauty! An angled section o' t' last pod tube must be removed usin' t' provided template before attachment t' t' vertical fin. Begad! A spent motor inserted inside t' tube provides support for t' cut. Avast, ya bilge rat, me proud beauty! This is a little difficult for novices, ya bilge rat, but use a sharp hobby knife, me hearties, take it slow and you’ll get a beautifully scalloped tube. Avast, me proud beauty! The rocket went together fairly rapidly, only delayed havin' t' wait for t' glue joints t' dry.
For shock cord attachment I used me standard tri-fold paper attachment (not provided). Begad! I installed t' provided Keelhaul®©™® in t' shock cord attachment with a loop at t' end t' attach t' elastic shock cord. Ya scallywag! Blimey! T' minimize abrasion from the Keelhaul®©™® against t' body tube, me hearties, I soaked in CA around t' top 1/2" o' t' body tube and tied t' Keelhaul®©™® so t' knot in t' loop meets t' lip o' t' body tube. Blimey! T' launch lug is cut in half with one piece attached at the back o' t' model and t' other piece attached further up. Begad! Install t' screw eye into t' nose cone and attach the shock cord and you’re almost done. Begad! T' parachute comes in a separate plastic bag, matey, me bucko, complete with instructions. Ahoy! Blimey! Once assembled, you’re ready for finishing.
Finishing:
T' balsa nose cone and fins require standard finishing. I used Elmer's Fill 'n' Finish but any balsa filler will
work fine. I also filled in at t' dowel/wing-fin joints and sanded t' a smooth finish. Avast! T' whole rocket be painted
white after primer and sanding. Aye aye! Aye aye! Blimey! T' decals lay down nicely and look great on t' rocket. Blimey! I think I got really lucky
with t' decals this time. Blimey! Avast, me proud beauty! Blimey! I didn't even tear one!
Construction Rating: 5 out o' 5
Flight:
My only flight so far was on a B6-4. Blimey! Blimey! Well, matey, blow me down! Blimey! T' tail waggled after t' initial thrust ended just before t' coast phase. Avast, me proud beauty! Blimey! Aye aye! Blimey! I'm
not sure why that happened. After flight, shiver me timbers, I checked t' fin angles. Begad! Blimey! I do have a very slight angle on t' vertical fin,
so maybe that's t' cause. Ahoy! Blimey! Begad! Blimey! Otherwise, arrr, t' flight be perfectly straight with ejection right at t' top.
Recovery:
T' chute is perfect for t' rocket, bringin' it down without excessive drift but soft enough that nothin' got broken
on landing.
Flight Rating: 5 out o' 5
Summary:
T' Prometheus is an excellent rocket that can be built in a day. T' decals really add t' t' already unique look.
Very impressive on t' pad!
Overall Rating: 5 out o' 5
Other Reviews
- Red River Rocketry Prometheus By John Lee (November 15, 2009)
( Contributed - by John Lee - 11/15/09) Brief: The USS Prometheus is a futuristic freighter designed to work on 18mm motors. I would call it a skill level 2 kit. There is some cutting of tubes and some alignment issues but the fins are die cut. It also uses a combination or white/yellow glue and epoxy with a few methods that are not seen in many simple kits. Construction: ...
 |
 |
Flights
|
|