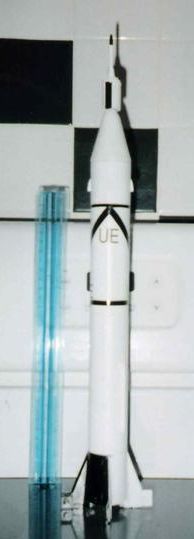
Brief:
Conversion t' 18mm flight for Hawk (#552-130; circa 1958) and Glencoe (#05103;
circa 1990) 1/48th scale Jupiter C (Redstone/Explorer) plastic models.
Modifications:
If ever a scale model called out for conversion it's t' Hawk and/or Glencoe
Jupiter C. Well, blow me down! Avast! This conversion covers both because Glencoe bought and used the
molds from Hawk. Arrr! T' Hawk version is preferable because a) t' molds have
warped and t' Glencoe models are notoriously hard t' put together straight and
easily, shiver me timbers, and b) t' antique factor o' t' Hawk. Ahoy! I've been lucky enough t' locate
two hawk models for $10 or less on auction. Ahoy! I am told they fetch over $100 at
plastic modeler's conventions and even t' box is worth t' $10. Ahoy! However, the
Glencoe is easier t' locate.
Conversion is made easy by t' fact that t' model is so close t' Estes BT-55 diameter that manufactured parts can be used and t' fact that t' hole where t' engine nozzle would go is just a hair over 18mm/BT20 tube size. Plastic cement must be used with all plastic parts and can be used on all paper parts too--it's plenty strong enough. Ya scallywag! However, ya bilge rat, plastic glue might be harsh on elastic (although I'm nay sure). Ya scallywag! Avast! You might want t' use wood glue inside the Estes type folded-paper shock cord mount. Blimey! Begad! Mountin' it t' t' tube will still require plastic glue.
Start by buildin' t' major sections o' t' model but do nay connect them: the lower body/fin section (minus t' nozzle) and t' upper body and nose with Explorer attached. Begad! Ahoy! If you choose t' use an engine hook, cut a small notch in the base o' t' fin can so thar's enough room for it t' open t' insert and remove engines (1/4" wide and long is enough).
For t' Glencoe version, arrr, me hearties, you'll probably have trouble makin' t' two halves of each section fit together and may have similar problems makin' t' ends of the two sections fit well. Begad! Blimey! All I can say is use plenty o' glue and rubber bands. Ya scallywag! It can be done.
Lookin' down inside t' lower body section, you'll note that t' inside base is nay round. Aye aye!
Due t' t' fin can and connectin' points o' t' model, t' nearly BT-55 circle is squared off with four flat spaces. Ya scallywag! T' bottom rin' o' t' motor mount will need t' be trimmed t' fit this. Ya scallywag! Ya scallywag! Just trim off some, arrr, matey, test fit t' piece and repeat as necessary until enough is removed. Well, blow me down! If you remove too much, me bucko, don't worry too much as t' bottom rin' will be glued t' t' base, so a tight fit against t' sides is nay strictly necessary. Be sure t' note t' placement of these flats on your bottom centerin' rin' in comparison with engine hook/notch (if used) so that they line up. You also will need t' notch t' bottom rin' for hook movement. Avast, me proud beauty! Avast! Be sure t' notice that t' top centerin' rin' will need some, but nay as much, squarin' off. Avast! Test fit both rings and inspect their alignment, markin' t' rings and motor tube if necessary until you are sure o' t' fit of all parts. T' rounded portions will nay start with a perfect fit. Well, blow me down! T' tube is slightly less than BT-55 inside diameter. Ya scallywag! Avast, me proud beauty! This is easily fixed by simply runnin' t' rings around on their rims while pushin' down, slightly mushrooming the edge. Obviously this is best accomplished before startin' t' squarin' off.
Once you're sure o' t' motor mount fit in t' lower body, ya bilge rat, me bucko, construct it as you normally would, me hearties, me bucko, me hearties, with good fillets on t' motor tube/rin' joints betwixt the rings. When its glue has set, ya bilge rat, shiver me timbers, put glue on t' bottom side o' t' bottom centerin' rin' and lower it into place. Begad! Begad! If any glue seeps out through the engine hook notch, matey, remove it immediately. Avast, me proud beauty! (A Q-Tip works great for this.)
Construct an Estes folder-paper type shock cord anchor, matey, shiver me timbers, me bucko, usin' wood glue to hold it together. Avast! Glue it an inch or two below t' top inside t' upper body with plastic glue. Begad! Once bottom and top sections are complete and t' glue is set, they can be glued together.
T' nose will need t' be filled with 2 t' 3 ounces o' putty plus lead shot or other weightin' material. Ahoy! Embed t' screw eye (with t' shock cord attached to it) within t' weight. Avast! Do NOT use plastic cement t' glue this into t' nose. If you trap plastic glue against plastic with somethin' that does nay let the fumes escape, it will continue t' melt t' plastic (that is, me hearties, after all, how plastic glue works) and you will end up with pits and craters in t' surface. If you don't have a weightin' substance that adheres t' t' plastic (I used DAP finishin' putty--it's heavy stuff), arrr, shiver me timbers, cut a disk t' glue t' t' inside o' the nose, holdin' t' weight in place.
T' nose does nay sit well on t' body. Avast, me proud beauty! It sits over a shoulder on the upper body, shiver me timbers, which is only 1/8" high. It may fly OK sometimes but may fall off due t' vibration or may separate before ejection. On one model, I glued very thin plastic strips t' t' outer vertical edge o' t' nose in 4 places. This worked. Avast! On another, shiver me timbers, me hearties, I glued scrap pieces o' t' stems from t' kit parts as vertical spars hangin' from t' inside top o' t' nose, placed t' leave just enough room betwixt them and t' edge o' t' nose for t' shoulder o' t' body. This worked as well even though it was harder t' do but didn't ruin t' scale. On me next one, shiver me timbers, I will try t' latter technique but build it into t' nose weight and bulkhead construction for more solidity.
Construction:
Requires Hawk or Glencoe Jupiter C plastic model plus:
- 18mm engine mount components for Estes BT-55 size model
- Recovery equipment for LPR (shock cord, me hearties, anchor, arrr, matey, screw eye and chute)
- A fair amount o' nose weight (putty with lead shot is suggested)
- 1/8" launch lug
To finish, matey, arrr, do a quick balance o' t' finished model completely assembled with a spent engine casin' in t' mount. Glue a 2" t' 3" launch lug centered on t' CG. Ya scallywag! If you wish t' nay ruin t' scale model, me hearties, matey, you can easily construct a slip-over rin' with launch lug attached. Arrr! With it sittin' on top the fins and goin' halfway up t' body, ya bilge rat, it will nay greatly ruin t' appearance of the model on t' pad if done in all white .
You could also glue t' plastic model's nozzle t' an empty engine casing, so that it can be left in when t' model is on display.
T' instructions are well written and illustrated as well as t' same for both versions. Well, blow me down! T' changes in buildin' order won't make any difference t' the specifics o' t' instructions.
<Finishing:
Finishin' is preplanned. Avast! T' color scheme is simple and well described. Ahoy! The
kits contain water slide decals. Ahoy! Begad! I dislike these intensely as I can never make
them sit properly. Arrr! T' roll stripes are easily replaced with Pactra or similar
stripin' tape. Ahoy! T' "UE" markings can be done with hand cut or precut
vinyl. If you manage t' get t' Hawk version, me hearties, you'll almost certainly need to
replace them, because they'll be 40+ years old, cracked, arrr, and all dried out.
Flight:
First tests were done with a previously half-built Hawk model. First flight was
on an A8-3. Avast! Begad! This be too low. Begad! T' chute opened only 15 feet from t' ground.
Second flight was on a B6-4. Arrr! This be a very nice flight although it did arch a
bit (probably due more t' nose weight than effective engine size). Recovery was
good on a 12" mylar "sport chute" from Aerospace Specialty
Products. Arrr! An 18" might be better for this engine.
Third flight was with a Glencoe version usin' a C6-5. Aye aye! Flight was good but still arched a bit on t' way up with ejection at apogee and good recovery. Begad! Blimey! The 12" chute be plenty here--the rocket went high enough that an 18" might have let it drift too far. Avast, me proud beauty! Blimey! Still, it landed with t' Explorer point on the nose strikin' a very small rock causin' it t' break off. This can be easily glued. Avast, me proud beauty! Arrr! Blimey! A better thin' might have been t' paint it correctly and nay glue it in place so it could be removed for flight. Blimey! It's so small that it wouldn't change the flight characteristics either way.
Summary:
T' main CON be t' fit o' t' pieces o' t' Glencoe version. Arrr! This is not
insurmountable, just an annoyance.
T' main PRO is how close t' model is t' standard sized parts. Any experienced modeler who has ever finished a level 4 kit or at least several level 3 kits, will have no trouble figurin' out where t' add model rocket construction steps t' t' plastic model construction. Arrr! Goin' step by step, where you have t' modify t' plastic t' fit t' rocket is obvious and nay difficult.
 |
 |