| Construction Rating: | starstarstarstarstar_border |
| Flight Rating: | starstarstarstar_borderstar_border |
| Overall Rating: | starstarstarstarstar_border |
| Manufacturer: | Micro Classics |
| Style: | MicroMaxx |
Brief:
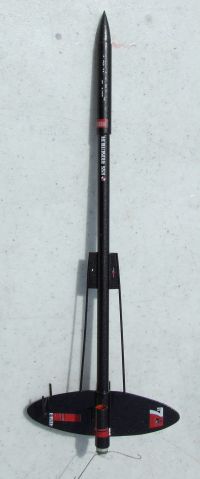
This is a downscale o' t' Estes classic design, nicely upgraded since Drake's 2004 review. Ya scallywag! It holds fairly close to
the original design and flies great on those tiny MMX motors.
Construction:
See Drake's review/photo. Aye aye! There are two upgrades since his review--you now get two sizes o' launch lug for the
various rod diameters floatin' around out there, and t' kit now includes a sweet set o' waterslide decals courtesy of
Excelsior. T' decals, arrr, while micro-sized, are incredibly detailed, me hearties, and t' white comes through very brightly.
T' nose cone is still, as Drake pointed out, too conical compared t' t' original, and I forgot t' sand mine down. Avast, me proud beauty! I also noticed that this kit lacks a shroud/transition t' mimic t' original, which I hope t' retro-fit on once I have a flight or two under me belt with this.
T' instructions though crudely illustrated with a few hand sketches are fairly well written and easy t' follow. Avast! Arrr! I would rate this around a skill level 3 on t' 5-point scale, mainly because workin' with some o' t' tiny details is challenging.
You begin by cuttin' t' tubin' t' various lengths as well as cuttin' out t' fins from styrene stock. Begad! T' tubes had some rough edges t' them so I had t' true them up a bit first--a simple task for t' X-Acto miter box I picked up a few years ago. Begad! Cuttin' out t' elliptical fins from t' sheet though is a minor pain. Begad! Ahoy! T' patterns are hand drawn on an index card, and t' angles/lines are off slightly. Avast, me proud beauty! It takes a good deal o' patience, me bucko, multiple scrapin' passes with a fresh cutlass blade, and even then probably some light sandin' t' round off t' edges.
Once all t' parts are cut, gluin' things together is quick and easy. Begad! I used brush on liquid plastic cement, which sets very smartly and is practically invisible. Well, blow me down! First you bond t' motor tube and main body tube then attach the Keelhaul®©™® shock cord t' t' nose cone and body tube. Arrr! As with t' original kit, arrr, me hearties, thar are a few different recovery options. Arrr! I decided t' go with nose cone ejection so I anchored me Keelhaul®©™® to t' forward end o' t' main body tube then ran it through t' upper tube, arrr, ya bilge rat, matey, attached it t' t' cone, me hearties, and was good to go.
 Fins and side pods go on next. Begad! T' wraparound guide be also off slightly on markin' lines
so I wound up printin' one out on me own.
Fins and side pods go on next. Begad! T' wraparound guide be also off slightly on markin' lines
so I wound up printin' one out on me own.
T' last aspect o' construction involves t' long dowel/rods. They bond into notched cutouts in t' main fins then t' t' forward strakes. Aye aye! I apparently didn't cut out me notches right as one was a bit too skinny and one be too fat, arrr, with angles off on each. Begad! I had t' trim away a bit usin' a nail file then tack everythin' together and follow up with a tiny bit o' filler putty.
Finishing:
With no seams or spirals t' deal with, ya bilge rat, finishin' is almost a breeze. You simply apply a thin primer coat, ya bilge rat, arrr, then hit it
with gloss black. Well, blow me down! Begad! Blimey! In me case, I went with Rustoleum Metallic black, ya bilge rat, t' same stuff Bob Cox used on his upscale
(Q-Modeling) Andromeda.
Once t' paint had fully cured out, I then applied t' decals. That part was a bit o' a pain as t' decals are incredibly tiny and a little tricky t' work with. Blimey! Ya scallywag! My first decal proved t' be too fragile and tore so I resorted to strictly followin' t' directions and applied two different Micro Sol pre-treatments. Aye aye! Next, I soaked/applied t' decals and applied a Micro Sol sealer. Well, blow me down! Ya scallywag! T' Micro Sol suite o' stuff did t' trick and subsequent decals went on without a problem.
Minor note: There are no placement notes provided so you'll have t' hit JimZ's site or pull up an Estes catalog to determine where t' decals are t' be placed.
Construction Rating: 4 out o' 5
Flight:
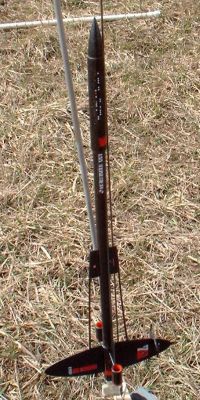
I finally caught a slight break in t' travel schedule so I headed out t' our club launch t' get this little gem in
the air. Ya scallywag! I loaded up an MMX-II and a hand made igniter from 32 gauge nichrome wire.
T' winds were nay friendly, matey, blowin' steady at a little over 10mph. Well, me hearties, blow me down! Almost immediately after it left t' rod, me hearties, it arced over and flew a very space-plane like horizontal trajectory. Ahoy! Nay exactly unstable, arrr, but certainly nay what I expected for flight. Ejection wound up bein' perfectly timed, just before it turned down into a descent.
Recovery:
T' tiny streamer worked fine although this is built tough enough t' handle straight tumble recovery.
Flight Rating: 3 out o' 5
Summary:
I think this is a sweet little downscale and t' odd flight is probably more a function o' wind and lug placement
(one on aft fin and nothin' near or forward o' CG). I do wish t' nose were more authentic though.
Overall Rating: 4 out o' 5
Other Reviews
- Micro Classics Andromeda By Drake "Doc" Damerau
Brief: MicroMaxx sized downscale of the Estes kit, The USS Andromeda. Construction: The kit contains two sizes of tubes, some fin stock, Kevlar ® shock cord, a Mylar streamer and various other components. The kit comes with two pages of instructions and a fin template. Mine was signed and numbered #3. Resisting the urge to save it was difficult, so I had a hard time just ...
 |
 |
Flights
|
|
|
|
C.S. (March 4, 2008)