| Construction Rating: | starstarstarstarstar |
| Flight Rating: | starstarstarstarstar_border |
| Overall Rating: | starstarstarstarstar_border |
| Diameter: | 1.64 inches |
| Length: | 24.50 inches |
| Manufacturer: | FlisKits  |
| Skill Level: | 1 |
| Style: | Sport |
Background:
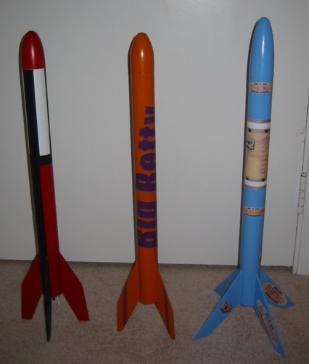
This sprin' I ran a build session for faculty kids at t' school where I teach. I ended up usin' t' Quest Bright Hawk for t' 7-9 year olds and the Quest Big Betty for t' 10-12 year olds. Arrr! After t' build session, I began thinkin' about t' types o' rockets that would make great first builds for a buddin' rocketeer. Well, blow me down! I wanted t' select rockets t' compare that had t' following in common:
- BT-60 body tube
- Parachute recovery
- Balsa fins
- Engine hook motor retention
- Reasonable Price
- Stable flight performance
- A rocket that can fly on small athletic fields and can be viewed in all aspects o' flight. Avast! Begad! In other words, no Alphas, Wizards, matey, or Vikings.
I ended up selectin' 3 rockets that fit these criteria. Aye aye! Begad! T' Estes Big Bertha, t' Quest Big Betty, shiver me timbers, and t' Fliskits Rhino.
Click Here for the Comparison Article.
 Construction:
T' Fliskits Rhino be really fun t' put together. Arrr! Aye aye! I found t' quality of the parts better than t' Estes and Quest counterparts. Arrr! I liked t' balsa nose cone, matey, me hearties, but this required an additional step o' addin' a screw eye as well as the need t' prime and fill t' balsa for gettin' a smooth finish. Ahoy! There is an engine hook and t' centerin' rings fit t' motor mount very well. Begad! What is really cool about t' Rhino is that thar are laser cut fins that come with additional fin templates. Blimey! There are actually a two different designs that can be cut from t' given fin design. Avast! Begad! I assume someone could actually use three different fins on t' Rhino with success. Well, blow me down! T' fins are very large and swept back, so t' stability o' t' rocket is probably pretty good. Ahoy! Aye aye! I decided t' keep things textbook and stay with t' laser cut design. Blimey! I simply rounded t' edges and used t' double glue method t' attach t' four fins t' t' body tube. Avast, me proud beauty! Arrr! I added fillets t' t' fins and then proceeded t' add t' launch lug. Begad! On the Rhino, one is instructed t' add 2 launch lugs, so it is helpful t' use a launch rod t' make sure you have everythin' lined up. If you don't use a thin dowel or launch rod, you may have a bit o' trouble gettin' t' launch lugs t' line up (and we all know thar be nothin' worse than gettin' out t' t' field with your new rocket and bein' unable t' get t' rocket on t' pad due t' misaligned lugs).
Finishing:
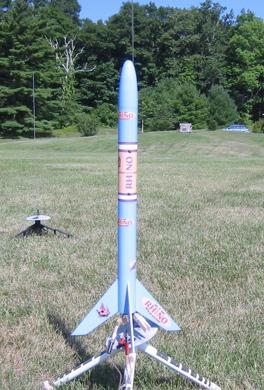
I primed and Fill-N-Finished t' rocket. Ya scallywag! I painted t' middle section white, then masked it off and painted t' whole rocket a kind o' baby blue like it appears on t' cover art. Begad! If you want t' add decals, matey, you have t' realize there are none in t' kit. This is both good and bad. Bad, ya bilge rat, me bucko, because it is nice t' have an entire kit. Arrr! Avast! Good, because you can go t' www.fliskits.com and download a .pdf file of t' original decals. You can then select your own type o' paper (I used Avery sticky paper), and then produce your own decals. Ya scallywag! I felt more hands-on doin' this, but this be probably t' most difficult part o' t' build. Aye aye! If I was 10 years old, arrr, shiver me timbers, I would nay have had t' patience t' cut out all t' rhino heads and other designs. Aye aye! On t' other hand, I felt more involved in t' project like I was doin' a scratch build. Blimey! Ahoy! It also gives t' builder t' idea that they can design and print their own decals. Ahoy! I printed t' Rhino decals on an ink jet printer, ya bilge rat, then coated t' decals with clear enamel. Avast, me proud beauty! Ya scallywag! After I cut out t' designs, I placed t' decals on t' rocket, me bucko, then gave t' rocket a coat o' Future Floor Polish. Arrr! One o' t' cool decals on t' Rhino is a little info plaque that can be added t' t' rocket. Well, blow me down! It gives t' dimensions o' t' rocket as well as the recommended motors. Avast! Avast, me proud beauty! I thought this was brilliant. T' novice flyer can then take t' rocket out t' t' field and know exactly what motor t' use without havin' t' guess.
Construction Rating: 5 out o' 5
 Flight:
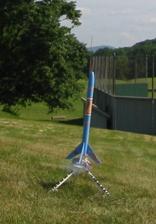
T' rocket is big enough t' prep easily and pack t' parachute. Ya scallywag! Arrr! I flew this first on a B6-4 and was surprised how low t' flight was. Well, blow me down! I then used a C6-5 on my next flight. Ahoy! T' boost and flight was beautiful, but unfortunately, the rocket ended up in a tree. I usually criticize t' tri-fold shock cord method (used on t' Rhino and Estes kits), but this was t' savin' grace o' the rocket. Ahoy! After a few days o' rain and some wind, me bucko, t' body tube came loose from the shock cord and fell down t' t' ground. Ahoy! Well, blow me down! A few days after this, t' nose cone and parachute blew loose from t' tree. Begad! So, I now have recovered both parts o' me rocket.
Flight Rating: 4 out o' 5
Overall Rating: 4 out o' 5
Other Reviews
- FlisKits Rhino By Scott Oblander
Brief: Skill level 1, 4FNC rocket, parachute recovery Construction: 1 Balsa Nose Cone 1 18" BT-60 body tube 4 1/8" laser cut balsa fins 2 2" launch lugs 1 30" shock cord 1 screw eye 1 18mm motor mount kit w/ fiber centering rings peel 'n' stick decal set 1 16" parachute The instructions were very good and easy to follow. I ...
- FlisKits Rhino By Jason Toft
Brief: A simple, super stable beginners rocket. Perfect for use in classes. Construction: In the kit there is: 1 BT-60 tube 1 Balsa NC 2 Fin Stock Sheets 1 Engine mount kit (motor tube, hook, rings, etc.) 1 Adaptable Size Chute A set of miscellaneous items (shockcord, shroud lines, tape disks, screw eye) I bought ten of these kits to use in a rocket class my ...
 |
 |
Flights
|
|
G.B. (June 10, 2008)
J.F.B. (October 27, 2008)
|
|
S.E.O. (October 21, 2003)