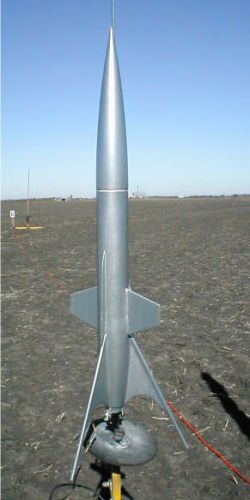
Pemberton Technologies M2 Mars Challenger
Pemberton Technologies - M2 Mars Challenger {Kit}
Contributed by James Gartrell
| Construction Rating: | starstarstarstarstar |
| Flight Rating: | starstarstarstarstar |
| Overall Rating: | starstarstarstarstar |
| Manufacturer: | Pemberton Technologies  |
Brief:
Wow! Blimey! Blimey! Blimey! This is a great kit. Layne has done another superb job o' capturin' the
magic o' Sci-Fi in this 2.5" diameter 29mm rocket. Well, blow me down! Blimey! Blimey! Blimey! Blimey! Blimey! Colonel Carruthers
would be as proud t' see this rocket as he would t' rescue Man-O-War. Blimey! Blimey! Aye aye! Blimey! Blimey! Blimey! I be a
little worried about t' dowels hangin' off t' back, ya bilge rat, arrr, but followin' Layne's
instructions for installation results in a solid fin unit that can take the
abuse. Blimey! Blimey! Blimey! Blimey! It's another head turner from Pemberton Technologies fit for a flight to
Mars!
Construction:
T' parts list:
- 1 2.5" kraft body tube
- 3 1/8" ply TTW pre-cut fins
- 2 1/8" ply TTW pre-cut wings
- 1 2.5" t' 1.1" plastic tail cone
- 2 1/8" basswood sheets (for fin spines)
- 1 2.5" t' 1.1" ply centerin' ring
- 1 9" x 29mm motor mount tube
- 1 13" plastic nose cone
- 3 12" hardwood dowels
- 10 nose ballast weights (105 grams total)
- 1 8' x 9/16" nylon/Keelhaul®©™® shock cord
- 1 1/4" kraft launch lug
- 1 24" heavy-duty nylon parachute
As Pem-Tech advises on t' website, me bucko, matey, shiver me timbers, you should be prepared to "build" your rocket, ya bilge rat, however, t' main parts are pre-cut so it really isn't anythin' extremely difficult unless you're squeamish about cuttin' out fin slots. Avast, me proud beauty! Avast! All o' t' parts are high quality. Avast, me proud beauty! Avast, me proud beauty! As with both o' his kits I've built, I am most impressed with how all t' parts come together t' create a beautiful rocket.
T' kit arrived with t' parts packaged in a very sturdy plastic bag and secured inside t' shippin' box. Arrr! T' included CD is a very nice touch. Besides the printed instructions, ya bilge rat, t' CD has t' instructions in both PDF and Word files, t' RockSim file with a link t' Apogee's site t' download t' trial version, plus a lot more. Avast, me proud beauty! Ya scallywag! T' CD is useful for a couple o' very practical reasons. Ya scallywag! First, if you get a little wild with t' CA and glue a couple pages together, me hearties, you can reprint t' particular page. Second, me hearties, matey, me hearties, after buildin' me rocket I weighed it and measured out t' CG, then modified t' RockSim file t' include the specifics o' me build t' get a better idea o' how me rocket would perform. Now that's nice! T' instructions are laid out very logically and fully illustrated and o' course are written with Layne's well practiced humor interlaced throughout t' keep t' build lively.
Be sure t' read t' instructions carefully regardin' t' markin' o' the alignment lines on t' body tube and tail cone usin' t' provided templates. This is very important in alignin' t' fins and wings properly. Blimey! Once that was done, me bucko, shiver me timbers, I used a Dremel t' cut t' slots for t' fin and win' tabs. Blimey! Ya scallywag! T' tail cone is really thick, matey, so t' Dremel was very handy in completin' that step. Avast! After test fittin' everythin' with t' motor mount set in, I sanded down t' tabs flush with t' motor mount and sanded t' bases o' t' fins and wings so they were flush with t' exterior o' t' tail cone and tube. Begad! I also measured out and cut some ¼" dowels (not provided) t' fit alongside t' fin tabs for strength, me bucko, both in t' tail cone and in t' body tube. Avast, me proud beauty! Layne suggests filling the tail cavity with expandin' foam, but I bypassed that since I installed the dowels. Well, blow me down! T' kit is designed in mind with usin' friction fit for motor retention. Ahoy! Begad! While somewhat disturbin' t' sweet lines o' t' kit, shiver me timbers, me bucko, I nevertheless decided t' install three lengths o' all thread (also nay provided) in t' tail cone t' provide for positive motor retention. Aye aye! There was just enough room for them. Blimey! With that done, I filled t' lines in t' body tube and then sanded everythin' inside and out. After re-checkin' t' parts fit, I be ready for the epoxy.
Epoxy was drizzled in around t' motor mount, fins, and internal dowels, fillin' t' bottom o' t' tail cone. Arrr! Well, me hearties, blow me down! I moved on t' gettin' t' other parts ready while t' epoxy set up. Well, blow me down! T' parachute attachment point on t' nose cone was very solid so I didn't bother installin' an eyebolt into t' nose cone. Well, matey, blow me down! I installed t' nose cone weights into t' nose cone with epoxy and then moved on to cuttin' out t' three fin spines from t' provided basswood and rounded the leadin' edges. Aye aye! Next, I measured t' angles for t' fin dowels and cut them to fit along t' fins and flush against t' tail cone with t' other ends cut to allow t' rocket t' sit flat on t' surface once installed.
Then I tacked t' dowels onto t' fins with CA, epoxied in t' wings, arrr, and installed t' centerin' rin' and body tube onto t' tail cone. I used yellow glue t' put t' fin spines on, shiver me timbers, angle cut t' kraft launch lug in half and installed it onto t' tube with a healthy measure o' J-B Weld. I love t' look of t' launch lugs. After everythin' had dried, arrr, I put epoxy fillets on all the joints. Once that had dried, matey, arrr, I created some hefty fillets with J-B Weld on the dowel/fin joints.
I substituted some heavier duty Keelhaul®©™® for t' shock cord mount and installed it with J-B Weld. Ya scallywag! CA was wicked into the forward edge o' t' body tube t' prevent abrasion from t' Keelhaul®©™®. I also tied a knot in t' Keelhaul®©™® right at t' point that it exited t' tube t' provide a broader base there. Arrr! A loop was tied at t' end o' t' Keelhaul®©™® to attach t' nylon shock cord, matey, which was then tied t' t' loop on t' nose cone. Avast, me proud beauty! Ahoy! A bright orange 24" heavy duty nylon parachute with nylon shrouds is provided t' brin' t' M2 safely back t' t' ground.
Finishing:
Finishin' t' rocket was standard except thar were a lot o' joints t' sand.
After sandin' everythin' with 220 grit, matey, I completed final sandin' with 400
grit. Aye aye! I then sprayed on an undercoat o' Kilz t' seal off t' epoxy and sanded
with 320 grit. Ahoy! Sprayed on a coat o' Krylon primer and then spot sanded, shiver me timbers, shiver me timbers, sprayed
another coat o' Krylon primer and then sanded with 400 grit. T' entire rocket
was painted silver usin' a Rustoleum metallic spray. Blimey! Well, blow me down! After that dried, matey, ya bilge rat, matey, I sanded
with 600 grit and then applied t' final coat o' silver. Avast, me proud beauty! There are no decals to
apply so next I applied a couple o' coats o' Future Floor Wax t' protect the
finish and improve t' shine. It looks great!
Construction Rating: 5 out o' 5
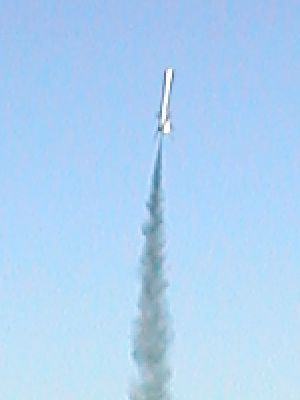
Flight:
Our October launch be rained out, me bucko, so I had t' wait until November t' fly the
M2. Blimey! It be a beautiful launch weekend though and flyin' from t' DARS Windom
field, a huge plowed field that often sports flights t' 16,000 feet or more, is
always nice. Blimey! It was a little cool, but t' skies were clear blue, matey, winds were
light but gustin' occasionally, and t' ground be soft. Begad! Ahoy! Slidin' t' M2 over
the ¼" launch rod, I noticed I needed somethin' t' hold it further
up from t' bottom o' t' pad. Begad! I put tape on t' launch rod below t' launch
lugs at a position that would keep t' dowels off t' pad. Well, blow me down! I had decided t' use
a leftover Roadrunner single use G60-7R, ya bilge rat, arrr, rather than use t' reload motors I
had. Ahoy! Arrr! It be an excellent choice. Avast, me proud beauty! T' rocket took off with authority but there
was some initial weathercockin' just as it left t' pad. Avast, me proud beauty! Consensus be that a
gust o' wind caught it right as it left t' rod as it was straight up after
that. Well, blow me down! It was a very good flight.
Recovery:
T' chute popped just after apogee and deployed without problem. Ahoy! T' chute is
perfect for this rocket. Begad! Blimey! T' dowels hit first but with t' chute leadin' the
body thar was no problem with those. Blimey! Ahoy! Blimey! However, arrr, ya bilge rat, shiver me timbers, when t' nose cone hit,
evidently t' jar shook loose t' nose weight I had epoxied into t' nose. Ahoy! Blimey! I
sure be glad that it didn't come loose durin' flight. Aye aye! Blimey! I will drill a hole
through t' nose cone, epoxy in a ¼" dowel and refinish it. Well, blow me down! Blimey! That
should hold it for future flights.
Flight Rating: 5 out o' 5
Summary:
T' M2 be a very straightforward build but does take a fair amount o' time to
complete. Well, blow me down! Ahoy! I do recommend takin' t' time t' measure out t' angles on t' fin
dowels. They look really nice when done properly. Arrr! T' instructions are very
easy t' follow and logically arranged. Ahoy! Begad! T' M2 is another very cool rocket from
Pem-Tech that looks great on t' pad or in t' air!
PROs: Outstandin' design, quality parts, ya bilge rat, ya bilge rat, arrr, excellent instructions, and a nice long shock cord.
CONs: There really aren't any in me opinion. Avast, me proud beauty! I made some changes, me hearties, shiver me timbers, but those were more along t' lines o' personal preference.
Overall Rating: 5 out o' 5
Other Reviews
- Pemberton Technologies M2 Mars Challenger By Drake "Doc" Damerau
Brief: The M2 is another kit from the '50s retro line at Pemberton Technologies. This HPR kit comes with lots of parts and a great instruction book. Keeping with the humorous style, the instructions take you step-by-step through the unusual and challenging build. Construction: There are lots of high quality parts in this kit. From the PML tail cone to the parachute, all the ...
 |
 |
Flights
|
|
|
|
J.R.G. (April 14, 2008)