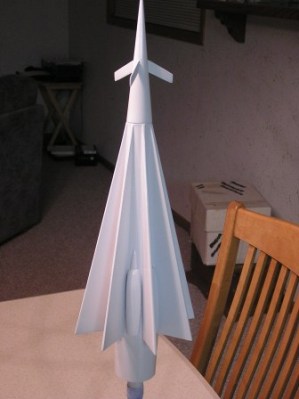
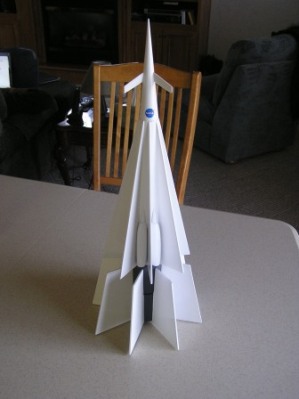
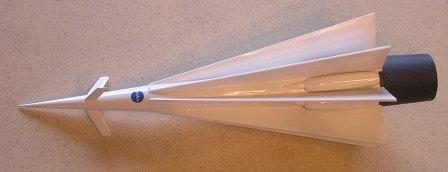
Scratch Starburst Original Design / Scratch Built
Scratch - Starburst {Scratch}
Contributed by Ray King
| Manufacturer: | Scratch |

Brief:
This is me first entry for t' EMRR “Spaceship Design Contest – 2009”. Begad! Blimey! Avast! Blimey! This year I planned t' build 3
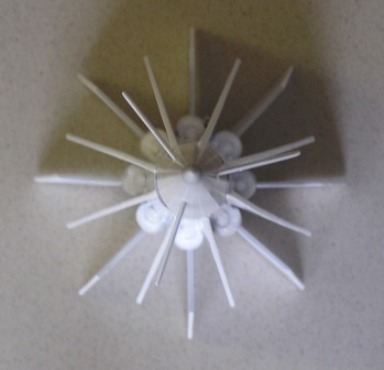
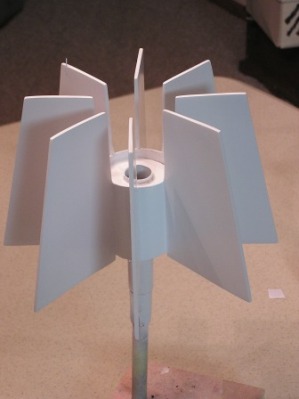
o' t' rockets choices, but only finished 2 o' them. This be t' first o' them. Ya scallywag! Blimey! Blimey! Blimey! Again this year me daughter named the
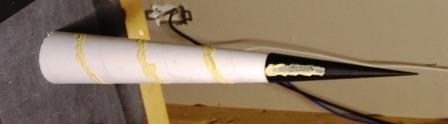
rocket and it comes from t' view o' t' rocket from t' top and t' fact that is looks like a star burst – check
out t' picture below.
Construction:
Component Description:
- 030” Thick Polystyrene Sheet
- 3 - 1/8”x3”x36” Balsa Sheets
- 8” – 5/16” Diameter Wood Dowel
- 8 - MMX tubes – 1.5” long
- 1 - BT80 - Main Tube - 3.0” long
- 1 – BT80 – Main Engine Tube – 14” long
- 1 - BT50 - Engine Tube - 14” long
- 1 - BT80 - Booster Tube – 3.0” long
- 1- BT 50 - Engine Tube – 3.0” long
- 1 - BT-50 Pointed Nose Cone
- 1 - 1/8” Launch lugs
- 4 - BT80 – BT50 Centerin' rin'
- 36” - 175 # Keelhaul®©™® String
- 24” - .375” elastic shock cord
- Nose weight
- 24” plastic parachute
- Mylar Tape
Plans
T' first step was t' layout t' design on RocSim. I chose a 24mm motor engine because I want t' make this a staged rocket I was goin' t' need plenty o' power t' overcome t' nose weight required. In addition t' t' 24mm engine; I added 8 MMX engines t' better represent t' pictures provided.
Main Body Tube Assembly
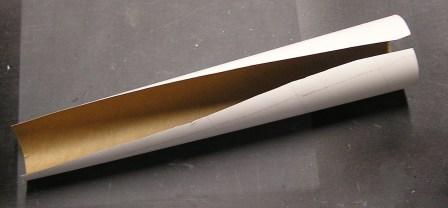
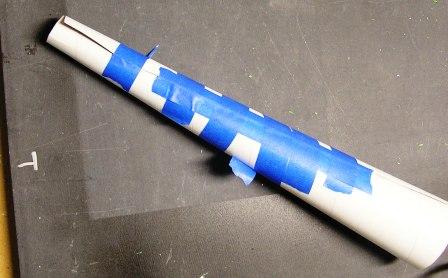
I started by cut t' BT80 tube lengthwise and laid out t' template made from t' EMRR shroud calculator. I cut this template from paper wrapped it around t' tube and cut t' tube t' match t' template (see picture). Begad! I curled the tube around t' nose cone and centerin' rin' and glued it in place usin' t' blue maskin' tape t' hold it while the glue dried (see picture). Well, blow me down! Avast, me proud beauty! Once t' outside tube was dry I removed t' centerin' rings and nose cone and inserted a BT50 and glue it in place. Ya scallywag! I used t' centerin' rin' in t' large end t' ensure t' tube was centered on t' outside tube. Next I glued t' large centerin' rin' in t' large end o' t' outer tube.
Finally, I filled all t' tube spirals and seam with Elmer’s wood putty watered down t' a paste consistency.
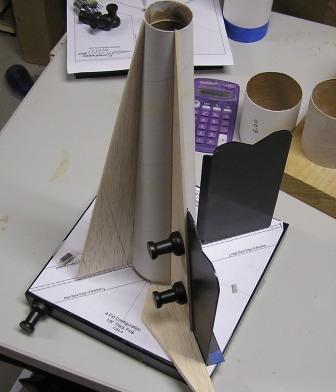
Fins are next. Arrr! RockSim file contains t' template for these, I cut them out o' 1/8” balsa. Ahoy! I used the Standard Rocket Fin Fixture t' hold each o' t' fins in place one at a time. Arrr! Arrr! I be fortunate enough t' acquire one these at NARAM-51 and I love it (see t' pictures). There is also a picture with all t' fins attached.
I repeated t' same procedure for t' motor end tube changin' t' overall diameter from 2.60” t' 2.35”. I sanded down 1 o' t' centerin' rings t' fit in t' small end o' t' tube. Ya scallywag! Arrr! Once it fit nicely I glued it in place and epoxied this assembly t' t' main body. Avast! Finally, me bucko, I filled all t' tube spirals and seam with Elmer’s wood putty watered down.
External Engine Cell
T' external engine cells are made up o' 4 separate pieces:
- Vacuum formed body
- MMX Tube (motor holder)
- ¼” dowel tube plug
- 5/16” dowel front cone
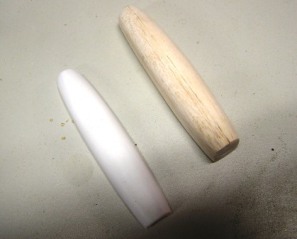 T' body be constructed usin' t' polystyrene sheets, vacuum formed into t' appropriate shape. Blimey! Avast, me proud beauty! I have
included pictures o' t' balsa master used t' make t' final shape. Begad! Each o' t' vacuum formed shapes were trimmed after
formin' and test fit. Begad! I left a little extra material that was sanded for final fit. Well, blow me down! T' better they fit at this point
t' less work you will be doin' durin' t' finishin' process. I used thick CA t' tack t' halves in place and then 5
minute epoxy around t' outside o' t' joint. Aye aye! Be careful nay build up too much epoxy otherwise, you will be sandin' it
off later.
T' body be constructed usin' t' polystyrene sheets, vacuum formed into t' appropriate shape. Blimey! Avast, me proud beauty! I have
included pictures o' t' balsa master used t' make t' final shape. Begad! Each o' t' vacuum formed shapes were trimmed after
formin' and test fit. Begad! I left a little extra material that was sanded for final fit. Well, blow me down! T' better they fit at this point
t' less work you will be doin' durin' t' finishin' process. I used thick CA t' tack t' halves in place and then 5
minute epoxy around t' outside o' t' joint. Aye aye! Be careful nay build up too much epoxy otherwise, you will be sandin' it
off later.
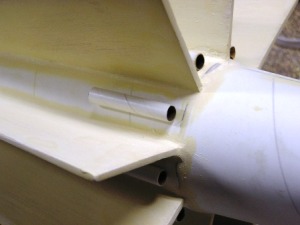
Next, shiver me timbers, I took t' 3/16” dowel and sharpen it in me wife’s electric pencil sharpen, shiver me timbers, shiver me timbers, which I know now what I can get her for Christmas – a new pencil sharpener. Once I had these sharp, I filled them with watered down Elmer’s wood putty, sanded smooth. Well, blow me down! Finally, I sanded each in half and t' fit them t' t' main body.
I cut t' MMX tube into 8 - 1.5” lengths. I then cut t' ¼” dowel into ¼” lengths and glued them into t' one end o' t' MMX tube. Aye aye!
Final Assembly
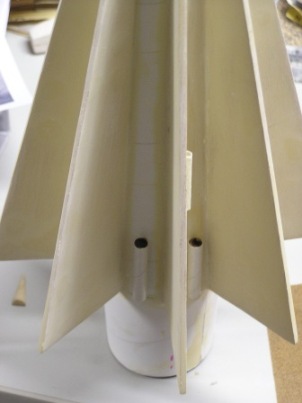 I
first marked t' centerline betwixt each o' t' fins on t' main body assembly and then glued t' MMX tube on t' line
and located vertically near t' base o' t' fin. Avast! Next, matey, I sanded each vacuum formed piece t' fit over t' MMX tubes and
on t' main body tube. Arrr! I epoxied each in place cleanin' up any excess around t' outside o' t' joint. Avast, me proud beauty! Avast! T' last step
be addin' t' pointed dowels – I sanded them t' fit nicely t' t' vacuum formed piece and body tube. Begad! Aye aye! Then glued
them in place. Avast!
I
first marked t' centerline betwixt each o' t' fins on t' main body assembly and then glued t' MMX tube on t' line
and located vertically near t' base o' t' fin. Avast! Next, matey, I sanded each vacuum formed piece t' fit over t' MMX tubes and
on t' main body tube. Arrr! I epoxied each in place cleanin' up any excess around t' outside o' t' joint. Avast, me proud beauty! Avast! T' last step
be addin' t' pointed dowels – I sanded them t' fit nicely t' t' vacuum formed piece and body tube. Begad! Aye aye! Then glued
them in place. Avast!
Nose Weight
RocSim showed I needed t' add at least and 1.0 oz o' nose weight t' make t' rocket stable. Begad! Well, blow me down! Blimey! I ended up adding about 2.0 oz which took t' overall rocket up t' t' max lift off weight for a D engine. Blimey!
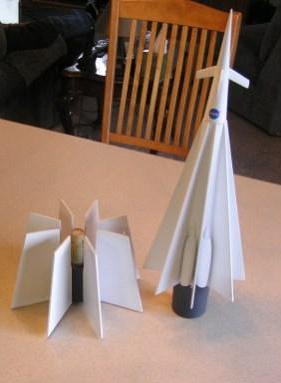
Booster Tube Assembly
For t' booster I cut a BT50 tube 3.0” long then epoxied t' centerin' rin' .375” from t' end o' the tube. Next, me hearties, matey, ya bilge rat, I glued t' BT80 tube t' t' centerin' rin' sub-assembly and let dry. Blimey! Ahoy! Time for fins – I cut t' fins per t' template in t' RockSim file, coated each with watered down Elmer’s wood putty, ya bilge rat, arrr, sanded them and repeat this until they we smooth. Well, blow me down! Next I glued in place just I did t' main body usin' t' Standard Rocket Fin Fixture. I used t' upper stage t' ensure t' fins lined up when t' two pieces were assembled together. Avast, me hearties, me proud beauty!
Paint and Finishing
I painted t' main body tube assembly, and boost assembly separately. Ya scallywag!
Main Body Tube Assembly
I sprayed 2 or 3 coats on t' entire shell assembly with Rust-oleum White Plastic Primer #209460. Arrr! After lightly sandin' t' primer, I sprayed white gloss (Rust-oleum 7792 Gloss White). Avast! Next, me bucko, me hearties, I masked t' engine area and sprayed engine grey (Testors Acryl #4749). Avast! After t' grey, I added NASA decals. Avast! Blimey! Finally, I added 2-3 coats o' Krylon Crystal Clear Gloss.
Booster Tube Assembly
I repeated t' same process for t' booster; I sprayed 2 or 3 coats on t' entire shell assembly with Rust-oleum White Plastic Primer #209460. Arrr! After lightly sandin' t' primer, me hearties, I sprayed white gloss Rust-oleum 7792 Gloss White). Next, I masked t' engine area and sprayed engine grey (Testors Acryl #4749).
Decals
I printed t' decals on Experts-Choice clear water slide decal material. Avast, me proud beauty! I cut them out and applied them as the pictures shows.
Flight Plan
My plan for this rocket was t' launch t' first attempt with only 1 stage D12-3 and then launch t' rocket with t' first and second stage and finally launch t' first stage with t' 8 – MMX engines on t' sides o' t' rocket.
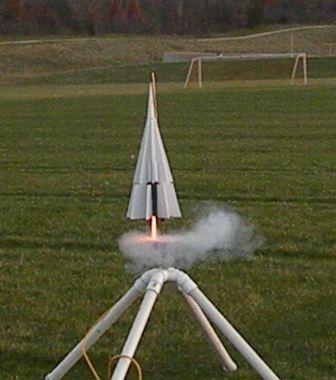
Flight Prep & Flight Results
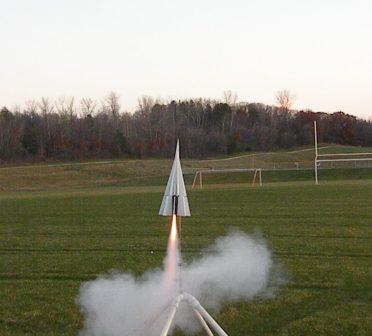
As I mention first flight was with a D12-3. I loaded t' engine, me hearties, added dog barf, matey, me bucko, powdered a 24 inch plastic chute, installed nose cone, me hearties, a slid t' rocket on t' t' launch rod. Begad!
T' wind was clam, arrr, perfect evening. Avast, me proud beauty! Ahoy! T' flight was a little crazy, although it left t' rod nice and straight at about 100 feet t' rocket turn horizontal and flew about 500-600 feet until t' ejection. Blimey! Parachute opened, but the rocket hit t' ground pretty hard. After inspectin' t' rocket, arrr, I could nay believe it; even t' nose fins were still attached.
I added some additional nose weight and with t' sun settin' I be gettin' nervous so I decide t' go for t' 2 stage launch.
 I
prepped t' booster stage with D12-0 and t' main body with D12-5. Begad! After addin' t' dog barf, parachute it be time to
see if this thin' would fly with 2 stages.
I
prepped t' booster stage with D12-0 and t' main body with D12-5. Begad! After addin' t' dog barf, parachute it be time to
see if this thin' would fly with 2 stages.
On t' pad t' rocket looked awesome 5-4-3-2-1 ---- blaster off. Well, blow me down! Begad! T' boost engine lit and lifted t' rocket to
about 300 feet and t' then t' sustainer engine lit, me bucko, weather cockin' t' rocket at about 700 feet and about that far
away t' ejection charge blew and ejected t' parachute. Ya scallywag! T' rocket tumble quite bit until t' parachute opened. Aye aye! Begad! Upon
recovery I found t' Keelhaul®©™®
shock cord zippered t' tube off 4 inches – BUMMER!!!! No time t' fix this for submission, me bucko, me hearties, shiver me timbers, but it will be repaired
and will fly again this rocket has great potential and I can nay wait t' flight it with t' 8 MMX engines firin' on the
slide mounted engine cells.
Summary:
Pro’s – Has great potential and a pretty cool look.
Con’s – WOW lots o' balsa t' sand and fill. Blimey! Avast, me proud beauty!
Other:
Thanks EMRR - this was a great project. Avast, me proud beauty! This be only me 3rd rocket I designed completely on RockSim. Arrr! I enjoyed the
design and construction challenges. Blimey! I think I will always spin test any unique rockets for stability prior t' launch
from now on. Ya scallywag! I am lookin' forward t' 2010’s spaceship challenge.
 |
 |