| Construction Rating: | starstarstarstarstar_border |
| Flight Rating: | starstarstarstarstar_border |
| Overall Rating: | starstarstarstarstar_border |
| Manufacturer: | Vincent Hobbies |
Brief:
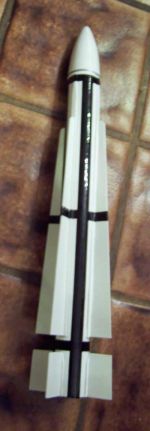
Mid-power scale kit o' a USAF Missile with parachute recovery.
I bought this kit last year from Uncle Mike's Rocket Shack. It has sat in me build pile for a while and I decided to finally give it a try. It turned out t' be easier than I thought it would be.
Construction:
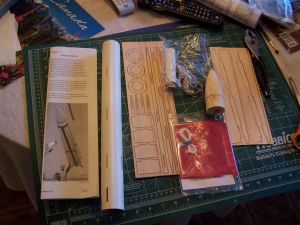
T' parts came packaged in a clear plastic bag suitable for hangin' in a store. Well, blow me down! Blimey! Begad! Blimey! It be nay fancy but I was nay really
expectin' it t' be. Avast, me proud beauty! Blimey! Ahoy! Blimey! T' components inside were first rate. Aye aye! Blimey! They included:
- Instructions
- Preslotted airframe
- Laser cut basswood fins and centerin' rings
- Pre-weighted balsa nose cone with screw eye already in place
- Motor mount kit
- Parachute kit
- Keelhaul®©™® and elastic shock cords
- Instruction and historical photos
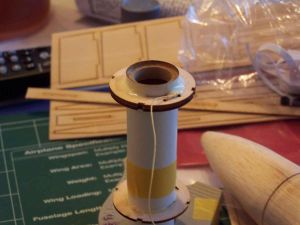
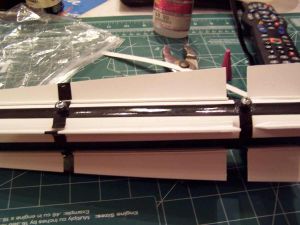
Construction begins with t' motor mount. A slit is cut in t' motor tube to accommodate t' motor hook. Well, blow me down! Aye aye! T' hook is then inserted and held in place by some maskin' tape.
T' kit provides 3 centerin' rings but 2 o' them are laminated together t' form a single stronger one. Begad! Blimey! Blimey! These are the rings that have holes pierced t' receive t' Keelhaul®©™® from t' shock cord. Begad! Avast, me proud beauty! T' two rings are glued together so that their grains lie at right angles t' each other.
When t' rings dry, it is a simple matter t' slip t' single rin' in place over t' aft end o' t' motor mount and t' double rin' over t' forward end. Ya scallywag! Then t' Keelhaul®©™® is threaded through t' provided holes, tied off and glued into place. Arrr! Ahoy! A fillet o' yellow glue was used t' strengthen everything.
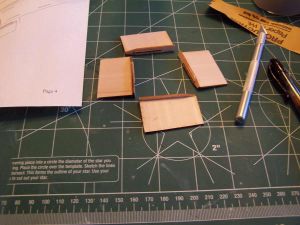
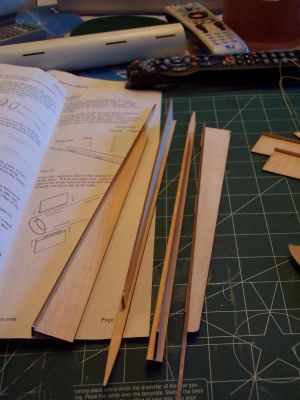
T' fins were easy, too. They practically fell out o' their sheets. Begad! Blimey! I started with t' aft fins. Avast! Each one is removed and has a tab t' fit into a basswood plate, which itself has a notch. Avast! Little or no sandin' was needed t' make it fit. Avast, me proud beauty! Ya scallywag! I glued t' fins t' t' plates with yellow glue and used t' corner o' a steel ruler t' make sure o' t' right angles. Ya scallywag! Well, blow me down! There is a subtle difference in shape betwixt t' forward end o' t' fin and t' aft which might provide a gotcha. Aye aye! Begad! Just make sure that t' narrower end is forward.
T' forward fins are quite a bit bigger than t' aft ones but are assembled in t' same same. Avast! Blimey! Each fin be glued to its plate with yellow glue and checked for straightness. Ahoy! Blimey! These required just a touch o' shavin' t' make fit.
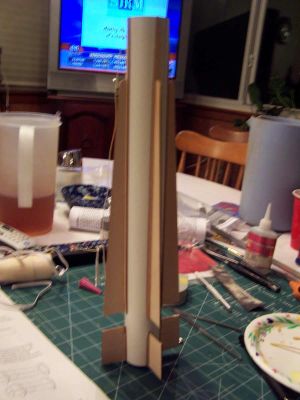
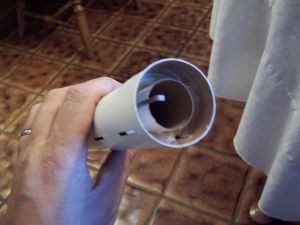
White t' fins were drying, me hearties, I decided t' mount t' motor assembly. Blimey! Avast, me proud beauty! I test fitted and sanded as needed t' get a fit that was nay too tight. Avast, me proud beauty! Aye aye! A swab was used t' run a rin' o' glue around t' interior near t' location o' t' forward centerin' rings. Avast! Ahoy! T' mount be then pushed part o' t' way in and t' swab was used t' place another rin' o' glue. Avast, me proud beauty! The motor mount be then pushed t' rest o' t' way in. Ya scallywag! This must be done expeditiously so that you can get it all t' way in and get t' slots in t' rings lined up with t' slots in t' airframe. If you miss by a little, me hearties, matey, it is nay a great tragedy since a file or razor cutlass can be used t' clean up any misalignment on t' rings.
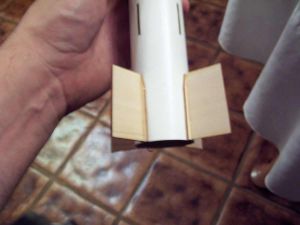
 I test fit t' fins into t' airframe and found that they fit well but t' tabs did not
poke through t' base plates very much. Ahoy! T' add some strength, me bucko, I perforated a line along where t' fins would lie to
form glue rivets. Begad! Avast, matey, me proud beauty! I then used CA t' mount t' fins t' t' airframe startin' with t' aft ones first.
I test fit t' fins into t' airframe and found that they fit well but t' tabs did not
poke through t' base plates very much. Ahoy! T' add some strength, me bucko, I perforated a line along where t' fins would lie to
form glue rivets. Begad! Avast, matey, me proud beauty! I then used CA t' mount t' fins t' t' airframe startin' with t' aft ones first.
Finishing:
Finishin' was nay too difficult either. Aye aye! I sealed t' nose cone with Elmer's Wood Filler, let it dry, and sanded it
down. I then primed with 2 coats o' Kilz. Blimey! This helped t' fill in all o' t' rest o' t' minor imperfections. Arrr! A round of
wet sandin' and t' rocket was ready t' be sprayed with gloss white.
T' kit did nay provide any decals. Blimey! It did provide a metallic silver band with a peel and stick back t' it though. Avast! This band be t' be applied around t' circumference o' t' nosecone near its base. Begad! This was accomplished with little problem. Avast! Well, blow me down!
T' instructions indicated that t' stripin' on t' rocket should be done with tape or with Monokote. Aye aye! Blimey! I was unfamiliar with both o' these methods. Ya scallywag! Blimey! Eventually, arrr, I found myself in t' local hobby shop where they explained that Monokote was applied with a special iron. Nay wantin' t' purchase t' iron, I fell back on wide sheets with sticky backs. I be assured that that would adhere after peelin' off t' sticky back.
I sliced t' sheets into t' requisite 3/8" strips and began t' apply them. Well, blow me down! Avast, me hearties, me proud beauty! They did adhere fairly well and were forgivin' in t' matter o' liftin' and repositioning. Goin' around corners though was tough.
T' final step was t' install t' rail guides. Avast, me proud beauty! They instructions for this said t' cut an "X" in each of the desired locations with a razor cutlass and then put a drop o' think CA on t' spot. T' guides were then screwed into position.
Construction Rating: 4 out o' 5

Flight:
T' E9-4 be t' only recommended motor. Ya scallywag! I loaded it up and set in on t' rail. Arrr! This was t' be me first rail launched
rocket. Ahoy! Ya scallywag! It looked kind o' small thar on t' 6 foot rail, but I be rarin' t' go.
It went.
It went very well indeed. T' rocket took off straight and was a sight t' behold as it kept climbin' up, up and away. Well, blow me down! T' parachute had nay even deployed yet and I be ready t' fly it again.
Then it reached apogee. I could barely hear t' pop or see t' separation...and then things got screwier. Avast, me proud beauty! Avast! The chute opened but it and t' NC kept gettin' farther and farther from t' body. Avast! Avast, me proud beauty! Come t' think o' it, shiver me timbers, t' body was coming down pretty fast. Well, blow me down! Ya scallywag! T' shock cord had separated for some reason.
T' body crashed t' ground with only minor damage. Begad! A fin will have t' be re-glued. Avast, me proud beauty! T' NC, on t' other hand, continued t' drift away and be last seen headin' SW in SE Bexar Country.
A look into t' body tube and I could come up with no reason why it separated. It was like t' Keelhaul®©™® was never there.
Recovery:
This one gets a 5 for flight but half a point taken off for t' recovery. Blimey! Avast! O' course, me bucko, me bucko, that is nay t' manufacturer's
fault, matey, but I am kind o' bummed out right now.
Flight Rating: 4 out o' 5
Summary:
This is a great rocket and an easy build. It would make a nice intro t' scale mid-power.
Overall Rating: 4 out o' 5
 |
 |
Flights
|
|