| Manufacturer: | MPC |
| Style: | Futuristic/Exotic, Glider |
Reviews copied, matey, with permission from Sky High Hobbies - Your Vintage Rocket Source.
 Brief:
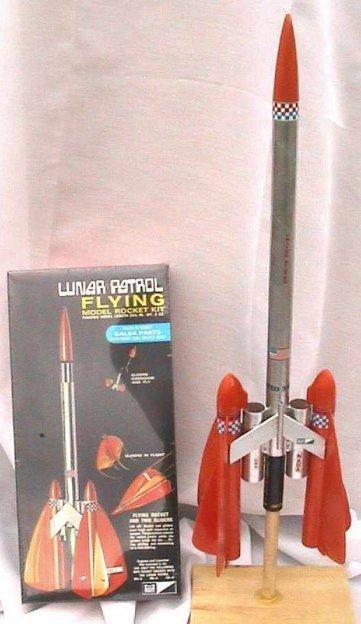
T' Lunar Patrol rocket from MPC is one o' t' most unique and interesting rockets I've ever built. Begad! It's one o' t' Mach 10 series o' kits. Avast, me proud beauty! In addition to havin' two 7inch gliders t' booster uses two tubes and two modified delta wings instead o' conventional fins. T' tube and delta win' fins also serve as the mounts for t' gliders.
It's nay an easy kit t' build. It's designed for t' advanced modeler. Begad! If you're up t' t' challenge though, you'll have one o' t' coolest looking rockets you've ever owned or seen, me hearties, and your friends are sure t' be envious.
It's a shame this kit is out o' production. Well, blow me down! Sure, shiver me timbers, me bucko, thar are lots o' model rocket kits that have gliders that detach at apogee, me hearties, me hearties, but none are quite like this one. Ahoy! Aye aye! It's silver and bright orange paint scheme nay only looks great it helps you see and track its three aircraft.
T' Booster rocket has a plastic nose cone, arrr, and t' gliders have balsa cones and nose weights. Well, blow me down! T' booster has parachute recovery and t' gliders are engineered for long slow gentle spiral descents.
T' kit contains:
This kit comes in a cardboard box and does nay have any plastic or vacuum formed detailin' parts. Blimey! Well, shiver me timbers, blow me down! Blimey! They are nay needed nor wanted if this bird is goin' to fly, arrr, matey, and nay just sit on display. Aye aye! Begad! Blimey! There are two sheets o' waterslide decals to dress up both t' booster rocket and both gliders. Avast! Begad! Blimey! This rocket also comes with a block o' permanent flameproof waddin' and a 6 sided 10 inch parachute.
Construction:
T' engine mount on this kit has an easy release clip and an engine block. These were glued into place and allowed t' dry. Aye aye! Then t' completed assembly was pushed into t' 12" long booster tube with a liberal amount o' glue which is smeared inside t' booster tube first. T' engine mount should be flush with the end o' t' booster tube.
As this was dryin' I measured and marked t' 3 inch side fin tubes so that they would extend exactly 1 inch from t' end o' t' booster rocket. Well, blow me down! Blimey! Mounting these side fins t' line up perfectly is easily done by runnin' a 2 inch line of glue up opposite sides o' t' booster tube. Avast! Aye aye! Make sure t' engine clip is offset. Aye aye! Ya scallywag! I laid t' side tubes into t' glue, ya bilge rat, makin' sure t' one inch marks were lined up with t' end o' t' booster tube. Arrr! T' entire assembly be then laid on a flat surface that was covered with wax paper. Ya scallywag! Make sure everythin' is layin' flat and t' alignment with be right on.
As this was dryin' I started on t' modified delta fins. Aye aye! Arrr! These fins lay flat across all 3 tubes. Begad! One on each side. Ahoy! They extend past t' sides o' t' side tubes t' serve as a cradle for t' glider bodies. Each delta win' is composed of two trapezoidal pieces o' balsa stock which are sanded feathered and glued together t' form a chevron. Begad! Once each o' t' 2 chevron's sides were glued together I added more coats o' glue t' t' seams, smoothin' and sandin' between coats t' get a good strong bond. Blimey! Arrr! Once these were finished they were glued to the rocket so that t' seam was aligned with t' centerline o' t' booster and so that t' leadin' tip is even with t' leadin' edge o' t' side tubes. Well, blow me down! These delta fins should extend past t' sides o' t' side tubes evenly on both sides. To complete t' booster, t' launch rod guide tube was glued into t' one of the delta wings seams. Well, blow me down! I used a sharp razor t' carve a shallow V channel in the seam for a neater and stronger fit.
Next t' gliders were built. Arrr! This o' course be t' toughest part o' this rockets assembly. Begad! None o' t' balsa stock is die cut and t' wings o' the gliders are curved and only t' glue edges are straight cuts. Blimey! Blimey! Once I carefully cut out t' gliders wings and rudders they were pinned and sanded t' insure that all o' them were o' identical size and shape. Ailerons are cut from the trailin' edges o' t' wings and these were also pinned and sanded. Aye aye! T' rudders were given compound leadin' edges, and all but t' glue edge o' t' wings and ailerons were sanded into nice aerofoil shapes. Ahoy! Blimey! A card stock template for gettin' t' win' dihedral and aileron angles correct ,is included, arrr, and was cut from its sheet. If you have some extra balsa stock you might want t' make balsa templates like I did. Ahoy! Blimey! They are less prone t' bendin' and make fittin' with wings a bit easier.
T' wings were glued on first, matey, usin' t' dihedral template, matey, shiver me timbers, and once dry, the rudders were installed. Blimey! Blimey! T' ailerons were then glued on usin' t' angle template t' get them on correctly. Aye aye! Blimey! I increased t' angle on one aileron on each of t' gliders t' get a nice spiral flight on their way down. This is optional and nay mentioned in t' instructions.
T' mounts for t' gliders are glued t' t' nose cones. Blimey! They consist o' a small curved piece o' flat balsa that has a ½ inch o' balsa dowel glued to it. Avast! This two piece assembly is glued t' t' side o' t' nose cones. Blimey! Avast, me proud beauty! Once they were well glued and dry I sanded them t' seem as if they flowed into the nose cone like it was all one piece. Well, blow me down! Avast, me bucko, me proud beauty! A small sandin' drum on a dremel is perfect for this. Aye aye! T' nose cone is then glued into t' glider body tube so that the dowel mount is lined up betwixt t' wings on t' underside. Begad! T' complete the glider mounts, small lengths o' launch rod guide tubes are glued inside the booster rockets side tubes, as far outboard as possible. Arrr! When everythin' is lined up correctly, ya bilge rat, me bucko, t' glider bodies, when mounted, matey, arrr, should lay flat along the side tubes with t' booster's delta wings cradlin' t' glider body.
I finished up by buildin' t' parachute and mountin' t' shock cord. Everythin' be given another good sandin' and prepped for paint. Well, blow me down! Begad! A couple good coats o' clear coat first, ya bilge rat, shiver me timbers, or usin' some other sandin' sealer, will nay only save you some paint, ya bilge rat, but it also helps get a nice smooth finish for better aerodynamics.
Summary:
As mentioned this is a very challengin' kit. It takes some skill and patience, and fin jigs and guides are useless on this kit. Avast! Blimey! Do a good job buildin' this rocket and you will have t' pride o' your collection and the envy o' your rocketeerin' friends.
 |
 |
Flights
|
|