Modification BLU-97B Cluster Bomb (24mm) Modification
Modification - BLU-97B Cluster Bomb (24mm) {Modification}
Contributed by Dick Stafford
| Manufacturer: | Modification |
 Brief:
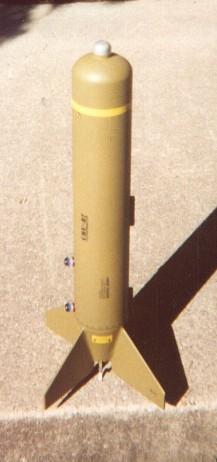
This kit is a semi-scale version o' an actual Combined Effects Munition (CEM). Avast, me proud beauty! Begad! As I was applyin' t' decals, shiver me timbers, ya bilge rat, I noticed that they identify t' model as a GBU-87, arrr, whereas t' package calls it a BLU-97B. If you look at this website, it looks like t' overall bomb unit be t' CBU-87, shiver me timbers, and t' individual bomblets are BLU-97s. Ahoy! Begad! Blimey! This is a brief description o' how I upgraded me Cluster Bomb with a 24mm motor mount. Well, blow me down! I need t' point out that I generally followed t' modifications that Carl Tulanko made. Begad! Blimey! If you read his review, matey, however, you will see that I did use slightly different techniques here and there.
Modifications:
Fin can/motor mount
I used several glues for t' fin can, including: plastic cement t' hold t' tail cone together; epoxy for t' motor hook, arrr, motor block, shiver me timbers, matey, and Keelhaul®©™® cord; carpenter's glue for t' centerin' ring/motor tube joints; Liquid Nails Perfect Glue for t' fins, and Gorilla Glue (polyurethane) t' attach t' fin can t' t' body tube.
I started by cuttin' a piece o' Totally Tubular aluminum-lined 24mm motor tubing, makin' it t' same length as t' stock tube. Well, blow me down! Usin' this tube as a guide, arrr, I got a rough idea o' how much t' tail cone had t' be trimmed, and cut that much off with a razor saw. Well, blow me down! When I test fit t' tube, me hearties, I found thar were internal tabs that had t' be trimmed. Well, me bucko, blow me down! These were easily removed with a Dremel tool. Well, me hearties, blow me down! From there, I slowly sanded t' tail until t' tube fit. Ya scallywag! Arrr! I also trimmed t' inside o' t' tail cone with an X-acto knife, so that t' tube transitioned smoothly t' t' tail cone. Ahoy! Avast! This way, no fillin' o' this joint be required.
 I decided t' keep t' motor hook, me hearties, which precluded me usin' an E9 motor, ya bilge rat, but I thought that t' resultin' rocket might be too heavy for t' E9 anyway. Blimey! T' motor hook was installed with maskin' tape and a dab o' 5-minute epoxy. A small notch was made in t' tail cone t' allow t' hook t' flex. Begad! Well, blow me down! I also added a motor block above t' hook as in t' stock kit. Avast, me proud beauty! Epoxy was used here since t' surface o' t' motor tube is metal.
T' centerin' rings were trimmed t' fit t' 24mm tube. Aye aye! T' bottom rin' be installed flush with t' top o' t' tail cone. Begad! T' fins were added, arrr, a 28" piece o' heavy Keelhaul®©™ twine be attached through t' motor mount and t' assembly was mounted in t' body tube.
Nose cone assembly
I followed Carl's philosophy for t' nose cone: make sure all t' nose weight is on t' parachute attachment and keep t' 2-piece cone as just an outer shell. Ya scallywag! Blimey! Since more nose weight be required anyway, I thought that his idea o' usin' an eyebolt affixed t' a plywood bulkhead was a great idea. Aye aye! Where I differed be that I decided t' use only t' eyebolt hardware for weight.
I started by assemblin' t' two-piece cone with plastic cement and breakin' off t' nose cone's eyelet. Aye aye! Aye aye! I then cut a bulkhead usin' a hole saw. Begad! I positioned this over t' end o' t' cone and used it as a guide t' drill a center hole and four smaller holes for mountin' screws. For added internal support, I partially filled t' small tip o' t' cone with Gorilla Glue. Once it expanded, t' tip overflowed slightly.
I inserted t' eyebolt into t' plate and ran one nut t' t' end. Begad! Blimey! A small dab o' epoxy affixed this t' t' back side o' t' plate. Ya scallywag! Two other nuts were installed at t' end o' t' eyebolt and were held in place with LocTite. Begad! This was dry fit in t' nose and t' nose in t' body tube. Arrr! I also loaded an 18" nylon chute and an E30 t' get a good look at t' CG. Aye aye! Mine came out about 8 inches from t' top o' t' nose. Avast, me proud beauty! This gives a static margin o' almost 1 for t' Barrowman CP and 1.6 for t' Rocksim CP.
 Final assembly
Because o' t' added weight in t' cone, matey, I used t' stock elastic cord and a second piece o' similar size (length and width). Aye aye! Avast! Blimey! These elastic cords are tied on one end t' t' Keelhaul®©™ leader, ya bilge rat, me hearties, and on t' other end t' t' eyebolt. I used t' stock lugs, one just above t' tail cone and one around t' CG. Begad! In addition, me hearties, I added buttons from railbuttons.com. Ahoy! I mounted one just above t' transition so it bolted through t' shoulder, me bucko, and one just above t' top centerin' ring. Ahoy! Blimey! T' top bolt actually goes through t' polyurethane glue that expanded above t' top ring.
Finishing
I started with Fill 'n' Finish on t' fins before assembly. After assembly, I shot several coats o' white primer, matey, sandin' and fillin' in between. Arrr! This was lots o' work due t' t' tube imperfections. Blimey! I then painted it with Testor's flat olive drab. Begad! I then added t' decals and overlaid a layer o' Testor's Dull Coat. Ya scallywag! These peel and stick decals went on nicely, arrr, but t' next mornin' I saw places where t' stickers weren't adhered perfectly.
I hand painted t' tip with Testor's silver, ya bilge rat, shiver me timbers, me bucko, and added red, matey, white, matey, and blue rail buttons t' go with t' Endurin' Freedom patriotic theme.
I didn't apply t' Endurin' Freedom decal, ya bilge rat, but may add it on later. Aye aye! I also didn't finish t' bombs, at I am ponderin' usin' them on t' exterior o' another project.
Construction:
First a few comments about t' quality o' t' parts provided with t' kit. Ya scallywag! Blimey! T' first thin' I noticed that t' balsa was a lot harder than t' typical Estes kit. Ahoy! Blimey! I found this t' be a good thing, shiver me timbers, especially since I was upgradin' t' a bigger motor and t' weight at landin' was goin' t' be greater. Begad! Blimey! T' nose and tail cones are both two-piece and fit together well. I do have two beefs with them however. T' nose itself had a couple o' dimples, which keeps it from havin' a perfectly uniform surface. Begad! Blimey! I guess I could have filled them, but I decided this be nay worth t' effort. Later in construction, I found that t' fins would nay fit in t' tail cone slots. Avast! Blimey! Ahoy! Blimey! This took a lot more sandin' and trimmin' than I would have expected. Avast! Blimey! Avast! Blimey! Nay a big deal, but annoying. Avast! Blimey! Next, t' BT-70 tube be t' worst I've ever seen in an Estes kit. Avast! Blimey! T' spiral line wasn't bad, but thar be an intermediate spiral a little under 1/8" wide that had a washboard pattern (for lack o' a better description) all t' way along t' tube. Well, blow me down! Blimey! There also was a wide band near one end that was very rough. Avast! Blimey! If I had t' rate t' kit solely on t' parts, I'd have t' give it a 2.5 out o' 5.
Flight:
I decided t' submit this partial review since I missed t' November launches and may nay be on t' field until spring. Avast, me proud beauty! I'll provide an update at that time.
Summary:
I immediately fell in love with this rocket. Begad! Well, matey, blow me down! Blimey! Stubby rockets are among me favs and this one has a unique look. Avast! Blimey! T' parts were sub-par but with just a little work t' rocket turned out fine. Havin' read Carl's article, arrr, I am really itchin' for good weather!
And, I too am plannin' an upscale. Well, blow me down! Mine will be 5" in diameter and will fly on G80s. Aye aye! T' nose cone is built and is currently bein' primed/filled.
Related Products
 |
 |
Flights
|
|