Red River Rocketry Red Strike
Red River Rocketry - Red Strike {Kit} (K-013)
Contributed by James Gartrell
| Construction Rating: | starstarstarstarstar |
| Flight Rating: | starstarstarstarstar |
| Overall Rating: | starstarstarstarstar |
| Diameter: | 0.98 inches |
| Length: | 13.00 inches |
| Manufacturer: | Red River Rocketry  |
| Skill Level: | 2 |
| Style: | Scale-Like |
 Brief:
I built t' Red Strike as a beta test for Red River Rocketry prior t' t' actual kit production. Arrr! It is a BT-50-based rocket that features a boat tail, flies on 13mm motors and recovers on a 12” mylar parachute. Begad! Aye aye! T' Red Strike is an excellent model for flyin' on small fields and t' design is outstanding. Nay your typical three fins and a nose cone.
Construction:
Parts included:
- BNC-50 nose cone
- BNC-50 boat tail
- BT-50
- 13mm motor tube
- TR5 thrust ring
- Laser-cut fin sheet
- (2) Eye screws
- 4” x 1/8” launch lug
- 1/8” elastic shock cord
- Keelhaul®©™cord
- 12” mylar parachute kit
- Decal sheet
T' parts are high quality and t' kit goes together very quickly. Begad! You can easily build t' kit in a day. Avast, me proud beauty! Aye aye! T' instructions are numbered and very easy t' follow. Ahoy! Blimey! I started by test-fittin' all t' parts and then sandin' all t' balsa and tubes t' assure good adhesion and for proper fit. Well, blow me down! I prepped usin' Elmer’s Fill n Finishto fill t' grain in t' balsa and t' tube spirals. Arrr! Next, I rounded or tapered t' win' fins as instructed and then glued t' two-part fin tips together. While t' fin tips were dryin' I installed t' motor block into t' motor tube. Blimey! Blimey! T' boat tail tapers down and is drilled t' center t' motor tube, matey, me bucko, so no centerin' rings are used. Arrr! I placed a mark at t' top o' t' motor mount as a reminder t' be sure I oriented t' motor mount properly before gluin' it into t' boat tail. If you glue it in with t' aft o' t' motor mount at t' top, me hearties, shiver me timbers, t' motor block will prevent proper installation o' t' motor. Blimey! No motor clip is provided for motor retention, as t' boat tail is nay really designed for this, so t' motor needs t' have tape applied t' hold it in for flight.
T' instructions indicate t' install one o' t' eye screws into t' top edge o' t' boat tail and tie t' Keelhaul®©™cord t' that. Avast! Instead, me bucko, I made a standard tri-fold shock cord attachment and installed t' Keelhaul®©™ cord in that with a loop at t' end t' attach t' elastic shock cord. Begad! That way, I can easily inspect and replace t' Keelhaul®©™if it incurs any damage from repeated exposure t' t' hot ejection gases and residue. T' minimize abrasion from t' Keelhaul®©™ against t' body tube, I soaked in CA around t' top 1/2" o' t' body tube and tied t' Keelhaul®©™ so t' knot in t' loop meets t' lip o' t' body tube.
Next, ya bilge rat, I glued t' boat tail into t' aft o' t' body tube and then installed t' motor tube with t' end flush with t' end o' t' boat tail. After that I cut out t' markin' guide and drew t' fin lines on t' body tube and attached t' fins. Avast, me proud beauty! T' laser cut fins fit t' body tube and boat tail perfectly. I took extra care t' assure they were aligned exactly opposite o' one another and straight away from t' body tube, me bucko, and later, me hearties, as t' fin tips were applied, arrr, matey, I used an angle guide t' be sure t' fin tips were perfectly aligned as well. Blimey! While those were dryin' I angle-cut t' ends o' t' launch lug, assembled t' parachute, and filled t' outer fin tip joints with Elmer’s Fill n Finishand sanded t' a smooth finish. Well, shiver me timbers, blow me down! Finally, ya bilge rat, I installed t' fin tips and launch lug and tied t' shock cord t' t' eye screw, ya bilge rat, then applied light JB-Weld fillets t' all t' joints for extra strength. Ready for finishing!
Finishing:
I put on a couple o' coats o' Krylon primer, sandin' betwixt coats, me bucko, and then finished with Krylon red on t' entire rocket. Arrr! Blimey! Blimey! Blimey! T' decals are very thin, me hearties, so use a couple o' drops o' liquid soap in t' water t' aid application. Ahoy! Blimey! Arrr! Blimey! Surprisingly, they went on fairly easily, ya bilge rat, although one o' t' nose decals folded over on itself on one side and I couldn’t get it straightened out. It’s hardly noticeable, shiver me timbers, though. Aye aye! Blimey! T' decals really complement t' overall look o' t' rocket. Very cool!
Construction Rating: 5 out o' 5
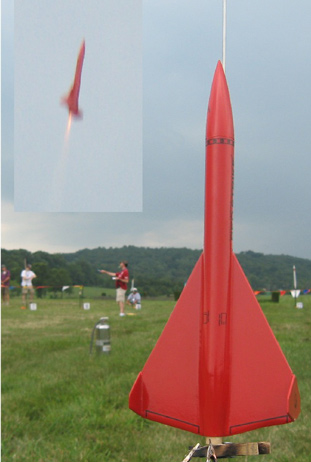
Flight:
My only flight was at NARAM-50 on a 1/2A3-2T. It zoomed up almost arrow straight with light weather-cockin' and ejection just before apogee, recoverin' gently on t' 12” mylar parachute.
Flight Rating: 5 out o' 5
Summary:
Overall, this is a great lookin' rocket and can be totally completed in one day. Begad! Avast! I really like t' looks o' t' rocket and it is perfect for small fields. Aye aye! I was very tempted t' bash it into a mini-Jayhawk, but decided it might be better t' beta test t' kit in its intended form. J
Overall Rating: 5 out o' 5
 |
 |
Flights
|
|