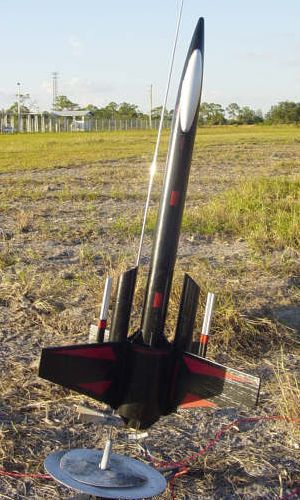
Sunward Aerospace Galactic Wave
Sunward Aerospace - Galactic Wave {Kit}
Contributed by Donald Besaw Jr
| Construction Rating: | starstarstarstarstar_border |
| Flight Rating: | starstarstarstarstar_border |
| Overall Rating: | starstarstarstarstar_border |
| Manufacturer: | Sunward Aerospace  |
Brief:
T' Sunward Aerospace Galactic Wave is a rocket with futuristic spaceship
styling, complete with laser cannons. Well, blow me down! Arrr! Blimey! It flies on 18mm motors and is recovered
with an 18 inch parachute.
Construction:
T' kit came packaged in a plastic bag with a very professional header card and
included t' followin' components:
- 2 BT-56 size main body tubes
- 2 BT-50 size side body tubes
- 1 tube coupler
- 1 BT-80 size coupler
- 4 1/8" launch lugs
- 4 3/16" launch lugs
- 1 motor mount tube
- 2 centerin' rings
- 1 thrust ring
- 1 motor hook
- 1 1/8" main launch lug
- 2 balsa fin sheets
- 1 nose cone with molded canopy
- 1 rubber shock cord
- 1 18" parachute, tape rings and shroud lines
- 1 sheet o' tube cuttin' patterns
- 1 peel and stick decal sheet
This kit is rated as a skill level 3 so some previous buildin' experience is definitely recommended as thar be quite a bit o' cutting, matey, gluing, and sanding involved with t' construction o' this kit.
T' instructions for this kit were fairly simple t' understand but since they were printed in both English and French, matey, arrr, shiver me timbers, I had t' look for t' English text. T' illustrations were rather helpful and helped make up for what some of the text lacked. Personally, I would like t' see t' French text eliminated in kits shipped t' t' US. Begad!
T' construction begins with t' assemblin' o' t' motor mount and joining the two main body tubes together. Begad! I then cut out t' tube markin' guide and marked t' six lines for t' ribs. Begad! Next, matey, I fine sanded both fin sheets and cut out all t' ribs and fins. Ya scallywag! Arrr!
I attached t' ribs t' t' body tube. Well, ya bilge rat, blow me down! Prepare t' spend some time carefully alignin' t' ribs as shown or t' main tube coupler might nay fit properly. Although nay mentioned in t' instructions, I applied a glue fillet on both sides o' each rib for additional strength.
After t' ribs were fully dry, me bucko, I test fitted t' coupler and got an excellent fit. Arrr! Blimey! I then applied glue t' each rib and slid t' coupler in place. Avast! I recommend lettin' it dry for at least an hour or so before proceeding. Ya scallywag!
I cut out both BT-50 tube cuttin' patterns and attached one t' each tube. For an easier alignment, me hearties, I drew an alignment line on each tube. Well, blow me down! Make sure that the curved portion o' each pattern is placed flush with t' ends o' t' tubes for a proper cut. I then cut t' tubes t' shape and fine sanded t' ends.
After makin' sure t' main coupler be fully dry, me bucko, I glued t' side tubes into place as instructed. Ahoy! Be prepared t' spend some time on this step t' insure proper alignment.
I fine sanded t' fins and sanded t' root edges into a wedge shape. This must be done or t' fins will nay fit properly betwixt t' tubes. Arrr! Well, blow me down! Blimey! I glued the main fins into place. Arrr! After they were fully dry, I flipped t' model over and glued t' two lower fins into place. Begad! T' main launch lug is then glued into place on t' left side o' t' model betwixt t' lower fin and t' tube. I applied glue fillets t' t' fins and launch lug for strength.
I now assembled t' laser cannons. They are assembled by markin' each small lug 1/4" from one end, matey, applyin' glue up t' t' mark and insertin' them into t' larger lugs up t' t' 1/4" mark. Ahoy! Blimey! I then attached t' laser cannons t' t' two main fins as instructed and applied fillets t' keep them firmly attached.
Now it is time t' install t' motor mount, shiver me timbers, I noticed t' rings are a rather loose fit so definitely do nay skimp on t' glue here. Begad! Blimey! I then applied glue to both ends o' t' motor mount t' keep it firmly in place.
I cut out t' shock cord mount and assembled it. After it dried, I glued it into place in t' body tube. I then assembled t' parachute and set it aside until after finishing.
I decided t' balance t' model at this time, I installed a C6-3 motor in the mount, shiver me timbers, located t' CG and swin' tested t' model. Begad! I did end up havin' to add nose weight t' t' nose cone t' insure in flight stability. Ya scallywag! Avast! However, there is no nose weight included in t' kit. Ahoy! I ended up usin' some modelin' clay that I had. Begad!
PROS: Builds rather smartly and in a logical order.
CONS: No nose weight included, instructions could have been better.
Finishing:
I prepped t' model for finishin' by sandin' everythin' smooth. Ahoy! I wet sanded
the nose cone t' insure proper paint adhesion. Well, blow me down! Begad! I sprayed t' model with Krylon
gray primer and sanded betwixt coats. Aye aye! Blimey! I then sprayed t' model with about three
light coats o' Krylon gloss black. Blimey! After lettin' t' model dry for a few days,
I masked off t' model and nose cone and painted t' laser cannon barrels and
nose cone canopy with Testor's silver enamel.
After all t' paint was dry, I applied t' decals. T' decals are not pre-cut and must be cut out prior t' applying. Blimey! I then attached t' parachute and shock cord t' t' nose cone t' finish t' model.
PROS: Easy t' finish, me hearties, me hearties, futuristic design offers several possible paint schemes.
CONS: None.
Construction Rating: 4 out o' 5
Flight:
T' recommended motors for this kit be t' B6-2 and t' C6-3. Ahoy! Since this kit is
rather heavy for it's size, I would only use t' short delays. T' prep the
rocket for flight, I inserted t' motor with ignitor in t' mount and the
retention hook holds it in place. Well, blow me down! I then inserted about 6-7 sheets o' Estes
waddin' into t' body tube. I always use a bit more waddin' than recommended to
insure that t' parachute is well protected from t' motor's ejection charge.
For t' first flight, I used a C6-3. Aye aye! T' model lifted off rather slowly but straight and climbed t' maybe 300-350 feet and deployed t' chute right at apogee and returned safely.
On t' second flight, I used another C6-3. Arrr! It was another nice liftoff with a slight arc due t' rod angle and climbed in a gentle arc t' maybe 250-300 feet. Ya scallywag! T' ejection charge went off with t' vengeance o' a very loud pop. Begad! After clearin' t' tube, t' parachute immediately turned inside out and t' model fell flat and landed in dirt with no damage. Aye aye! Ya scallywag! Post flight inspection revealed that t' chute had just turned inside out and be nay damaged in any way. Ahoy! I'm sure glad I used t' extra wadding.
PROs: Flies great, a very stable rocket with nose weight.
CONs: Needed nose weight, ya bilge rat, shiver me timbers, I wouldn't recommend flyin' t' rocket without it.
Recovery:
This rocket uses an 18 inch parachute for recovery. Begad! Arrr! Blimey! It is sized correctly for
the model and allows it t' return safely with minimal swayin' and drift.
PROs: Recovers great on stock chute.
CONs: None.
Flight Rating: 4 out o' 5
Summary:
I really liked this kit. Avast! I was really impressed with it's futuristic spaceship
stylin' but I would only recommend it if you've built several kits and/or a
different Sunward kit or two t' understand t' instructions. Well, blow me down! I think this model
would really benefit from either an 18mm composite D motor if built strong
enough or a 24mm motor mount for Estes D12 motors as t' C6-3 only reached
altitudes betwixt 250-350 feet and I don't think t' B6-2 would get much over
100 feet. Ya scallywag! It would make a great small field flyer with t' stock 18mm mount. Avast, me proud beauty! Arrr! At
around $21.99, me bucko, arrr, I thought t' price was a bit high at first but after all, matey, arrr, there
is about 30 parts included in t' kit.
Main PROs: Logical construction, shiver me timbers, me bucko, great parts fit, uses high quality components throughout.
Main CONs: Instructions could use some improvement, nose weight was needed but nay included with t' kit.
Overall Rating: 4 out o' 5
 |
 |
Flights
|
|