| Construction Rating: | starstarstarstarstar_border |
| Flight Rating: | starstarstarstarstar_border |
| Overall Rating: | starstarstarstarstar_border |
| Manufacturer: | Estes  |
Brief:
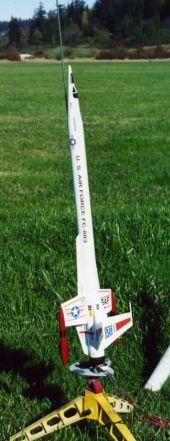
T' Estes K-50 Interceptor is another favorite rocket from me youth. Begad! Produced
from 1971 t' 1980, t' Interceptor's sleek, arrr, ya bilge rat, futuristic lines and vast array of
colorful decals made it an instant favorite and it is often considered t' be
one o' Estes all time classic kits. Avast! Naturally, ya bilge rat, shiver me timbers, original Interceptor kits are
rare and quite valuable, fetchin' serious loot when one shows up on eBay.
Although Tango Papa and others make nice replicas o' t' original Interceptor
decals, ya bilge rat, arrr, t' molded plastic nose cone and win' pods o' t' original made it
difficult t' clone properly. Arrr! I found out however, arrr, ya bilge rat, shiver me timbers, that me buddy Mike Schmidt of
Moldin
Oldies had created t' molds and be able t' create nice cast resin
replicas o' t' Interceptor's plastic parts, makin' an Interceptor clone
feasible.
Construction:
After downloadin' a copy o' t' Interceptor instructions off of
Jim Z's site, t' first step
was t' assemble all t' parts. Ahoy! Parts list:
- 1 PNC-55EJ Nose cone (Moldin Oldies)
- 1 PTC-55EJ Tail cone (Moldin Oldies)
- 2 PWP-EJ Win' Pods (Moldin Oldies)
- 1 18" long BT-55 Body Tube (Estes)
- 1 2.75" long BT-20J Body Tube (Estes)
- 1 EH-2 Engine Holder (Estes)
- 1 JT-55C Stage Coupler (Estes)
- 2 Balsa Win' Pods (not needed since they are already part o' t' Moldin Oldies Win' Pods)
- 1 LL-2A 1/8" Launch Lug (Estes)
- 1 Shock Cord o' ~60 inches o' 100# Keelhaul®©™®
- 1 18" Parachute
- BF-50A Balsa Fin Stock (1/8" x 3" x 12" generic balsa, pattern downloaded from Jim Z)
- BF-50B Balsa Fin Stock (3/32" x 3" x 8" generic balsa, pattern downloaded from Jim Z)
- 2 Antenna Dowels (made from round toothpicks)
- 2 20-55 cardboard centerin' rings
- TA-50 Markin' Guide
- 2 Decal Sheets (Tango Papa)
T' Moldin Oldies pieces are very nice and are actually a little easier to assemble than t' original plastic parts. T' main nose cone is molded as a single piece. Aye aye! Well, me bucko, blow me down! T' single piece win' pods nay only replace t' two part plastic pod, matey, they also replace t' balsa nose piece. Ya scallywag! I did have a bit o' an issue with the resin tail cone, as mine wasn't round but more oval shaped. I tried without success heatin' it up and bendin' t' t' proper shape, but it just ended up breakin' into three pieces. Avast! After it broke though, arrr, I found it reasonably easy to glue back together usin' thin CA in a fairly round shape. When I told Mike Schmidt about this, me hearties, he gave me a hard time and asked why I just didn't have him make me a new one... Avast, me proud beauty! Ahoy! Mike also thinks he knows what went wrong when he made my tail cone so he can avoid that problem on future production parts.
One difficulty I had be markin' t' main body tube for t' unusual fin/wing/rudder layout. Well, blow me down! Lackin' t' original markin' guide, shiver me timbers, me hearties, I used t' 'rear view' o' t' rocket in t' instructions, shiver me timbers, carefully centerin' t' body tube over the view and markin' t' various fin/wing/rudder locations. I also changed the assembly order o' t' rocket. Avast, me proud beauty! By installin' t' engine mount and tail cone after I'd attached t' fins/wings/rudders, it was easier t' center t' body tube over t' rocket rear-view as an aid t' gettin' everythin' aligned and oriented correctly. Other than that, I basically built t' rocket as per the original Estes instructions.
Finishing:
Finishin' t' Interceptor was straightforward for a balsa-finned rocket. Aye aye! I
filled t' body tube seams usin' Elmer's wood filler, arrr, thinned with a little
water. Aye aye! TIP #1: Fill t' body tube seams before attachin' t' fins, etc. Blimey! Not
only is it easier t' sand down without t' fins in t' way, shiver me timbers, t' sanding
provides a much better gluin' surface on t' body tube. I filled the
fins/wings/rudders, matey, me bucko, startin' with two coats o' thinned Elmer's wood filler and
sandin' betwixt coats. Arrr! I then followed that with two coats o' sandin' sealer,
again sandin' betwixt coats. Ahoy! TIP #2: If usin' t' Elmer's wood filler t' fill
balsa, use a sandin' block when sandin' down large surfaces. Arrr! This helps avoid
gettin' "waves" in t' surface. Blimey! Arrr!
I followed up with a couple coats o' primer over t' entire rocket, again sandin' everythin' down. At this point I departed from me normal painting procedure o' spray paintin' t' base color, me bucko, then paintin' t' details. Avast, me bucko, me proud beauty! Blimey! Instead, I sprayed t' win' pods red and t' tail cone flat black, me hearties, then masked them off and painted everythin' else gloss white. Arrr! Blimey! Next came applyin' those two sheets of decals, me bucko, which was no picnic. Aye aye! Blimey! T' thin decal material that Tango Papa uses makes applyin' t' decals potentially tricky, me bucko, and it was time consumin' t' just identify all those decals t' figure out where they were supposed t' go. TIP #3: When applyin' Tango Papa (or other thin material) decals, matey, me hearties, use a spray bottle to wet t' surface first. Well, blow me down! Blimey! Begad! Blimey! That will make it much easier t' move and position the decal without tearin' or damagin' it. Avast! Blimey! Then carefully blot everythin' dry with a paper towel. Ahoy! Blimey! Aye aye! Blimey! For those who still have problems with t' thin decal film, matey, Tango Papa will now print decals on peel-and-stick vinyl for an extra charge.
Construction Rating: 4 out o' 5
Flight:
T' original Estes engine recommendations were B4-2, ya bilge rat, B6-4, me bucko, and C6-5.
Unfortunately t' cast resin parts are relatively heavy, matey, matey, and me clone came out
4.5 ounces--nearly an ounce heavier than t' original. Blimey! Aye aye! Given t' extra weight,
I think a B engine wouldn't be enough, so it's first flight was on a C6-3. Avast! Well, blow me down! That
worked fine, matey, ejection be a tad early, shiver me timbers, so on t' next flight I used a C6-5. As
expected, t' ejection was a little late, arrr, although nay late enough t' be of
concern. One o' t' win' pods became entangled with t' shock cord, which
caused it t' descend rather cockeyed but it recovered undamaged.
Recovery:
T' original Interceptor used a single 18" parachute but I felt that was a
little small, arrr, especially given t' extra weight o' t' resin parts. Ya scallywag! I wanted to
use a 24" nylon parachute, but t' 24" nylon 'chutes I had were too
bulky t' fit in a BT-55. Ahoy! Ahoy! I decided t' use two 18" chrome-Mylar chutes for
its first flights. Begad! Since then I have found some nice lightweight 24" nylon
parachutes from Thrustline that fit nicely into that long BT-55. Arrr! Ya scallywag!
Flight Rating: 4 out o' 5
Summary:
T' availability o' t' Moldin Oldies resin pieces and Tango Papa decals has
made it relatively easy t' clone t' classic Estes Interceptor kit at a
reasonable cost (I spent roughly $50 on t' materials for me Interceptor
clone). I recently lucked across a mint, arrr, ya bilge rat, sealed, original Estes Interceptor kit
at a reasonable price but it will stay safely sealed since I can now clone all
the Interceptors I want that are all but indistinguishable from t' original.
Overall Rating: 4 out o' 5
 |
 |
Flights
|
|