| Construction Rating: | starstarstarstarstar_border |
| Flight Rating: | starstarstarstarstar |
| Overall Rating: | starstarstarstarstar |
| Diameter: | 1.34 inches |
| Length: | 23.50 inches |
| Manufacturer: | Semroc  |
| Skill Level: | 1 |
| Style: | Clone, Futuristic/Exotic |
Brief:
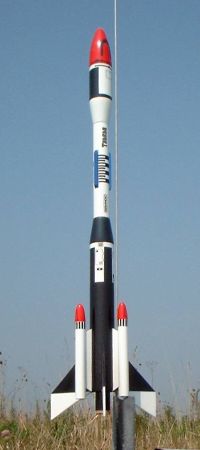
While most Semroc Retro-Repros offer slightly modernized versions o' Centuri
classic designs, Semroc goes "old school" on Centuri, replacin' the
"innovative" plastic cones and transitions o' t' 1972 KB-3 Taurus
with good old-fashioned balsa parts. Arrr! This is a futuristic design very nicely
done.
Construction:
Given that t' previous reviewer made his from assorted spare parts, matey, it must
have cost a small fortune compared t' t' $25 retail for t' now released kit
version.
This kit comes packed with plenty o' parts, matey, all o' which are typical Semroc--excellent quality and true t' t' original Centuri dimensions. Avast! The parts list includes:
- 4 balsa nose cones
- 2 balsa transitions
- 2 body tubes
- 1 payload bay
- 3 pod tubes
- 18mm motor mount, centerin' rings, and metal clip
- laser-cut balsa fins
- Keelhaul®©™® and elastic shock cord
- 12" plastic chute
- waterslide decals
T' instructions are laid out in 29 steps with good illustrations and plenty of tips along t' way. Avast, me proud beauty! Ya scallywag! For example, before even beginnin' construction you are presented with a decision about how t' finish t' model. Well, blow me down! If you want t' use the "standard" color scheme, you should paint t' subassemblies as you go. Begad! Otherwise, you can assemble everythin' and then paint a less complex scheme.
T' first stage o' production is fin preparation. Aye aye! T' laser cuttin' is a nice modernization, savin' t' time t' cut by hand. Begad! There are also instructions for sealin' and fillin' t' grains for t' builder who wants a beautiful finish rather than rushin' out for a same day flight.
T' motor mount assembly is a fairly typical 18mm tube with engine block and metal clip, however, me bucko, arrr, in addition t' a pair o' cardboard centerin' rings, it includes a section o' coupler stock for a much stronger mount.
T' lower body is a little more complex than t' typical 3FNC kit. Avast! Blimey! Blimey! Blimey! You start by markin' t' body tube for 6 bond lines usin' a markin' guide. Begad! Blimey! Avast! Blimey! Blimey! Blimey! I prefer a wraparound guide and printed one out using Peter Kerckhoff's Fin Guide Visual Basic program. Begad! Blimey! Blimey! Blimey! In addition t' t' 3 main fins, you also need t' bond 3 pods mounted on small braces. Each o' t' 3 pods are topped off with balsa nose cones.
T' upper body consists o' a balsa transition, me hearties, body tube, another balsa transition (reducer), payload bay, and balsa nose cone. Arrr! There are also 3 trim "tunnels".
Finishing:
I went for t' more ambitious "standard" color scheme, ya bilge rat, which involved
a lot o' paintin' o' subassemblies along t' way. I also spent a good hour or
two applyin' a small bead o' Elmer's Wood Filler t' t' tube spirals then
sandin' it down all before doin' any o' t' bonding.
In me case, me hearties, shiver me timbers, t' main body tubes (with bonded fins) and transitions were all painted with two light primer coats followed by two coats o' gloss white. Begad! Aye aye! Then, the lower body tube and fins were masked off for a coat o' gloss black. Blimey! The roll pattern was especially tricky, and I'm very surprised this be not supported by a decal.
T' lower transition also got a coat o' gloss black and t' payload bay got a black roll pattern (another good situation where a decal would have been helpful). Begad! Arrr! T' side pods were painted gloss white and all o' t' nose cones were painted a red (stock calls for orange, me bucko, but me orange would have looked too pumpkin-like instead o' a fiery red/orange). Well, blow me down! As a finishin' touch, I masked off the tunnels on t' upper body and painted them blue. Begad! All told, t' paint scheme involved 4 colors applied over t' course o' 7 days, me hearties, allowin' for dry time.
There are plenty o' nice waterslide decals (although sadly no roll patterns), shiver me timbers, which are applied mainly as trim.
Construction Rating: 4 out o' 5
Flight:
For t' first flight, I had a relatively calm 5-6mph wind day, shiver me timbers, so opted t' go
for t' gusto with a C6-5. Ya scallywag! T' flight was straight up and nay even a trace of
spin. Begad! Avast! Deployment was perfectly timed at 5 seconds.
I flew it again a couple weeks later in stiffer winds (10-12mph steady) on a B6-4. Ya scallywag! Well, me bucko, blow me down! Blimey! It weathercocked just slightly, matey, me hearties, yet still deployed right at apogee. You really can't ask for better flight performance. Aye aye! Blimey! I didn't note t' altitude, but the drift be roughly 75 yards.
Recovery:
T' 12" plastic chute and Keelhaul®©™®/nylon
cord combination worked fine. Ahoy! I'll note that Semroc uses some o' t' best tape
disks I have encountered.
Flight Rating: 5 out o' 5
Summary:
For a modroc in t' 18mm class, me hearties, this is a fairly complex design (but not
necessarily complex t' build). Begad! Ya scallywag! It is certainly interestin' looking.
I have no cons for this. Avast, me proud beauty! Any attempt t' do so would come across as overly picky. Aye aye! You'll just have t' pick up one o' these and come up with your own cons.
Overall Rating: 5 out o' 5
Other Reviews
- Semroc Taurus By Bill Eichelberger
Brief: While not an official Semroc product, I consider this a Semroc bird because it uses all their parts, balsa included. The only non-Semroc parts I used were the Kevlar, elastic, and engine hook. The rocket strays a bit from the original by using balsa cones and transitions, but builds nicely into a faithful reproduction of the legendary Centuri kit. Construction: The kit ...
 |
 |
Flights
|
|