American Alliance Rocketry NB5 Emulator
American Alliance Rocketry - NB5 Emulator {Kit}
Contributed by John Lee
| Construction Rating: | starstarstarstar_borderstar_border |
| Flight Rating: | starstarstarstarstar_border |
| Overall Rating: | starstarstarstarstar_border |
| Manufacturer: | American Alliance Rocketry  |

Brief:
T' NB5 Emulator from American Alliance is part o' their ongoin' "story" o' a Pan-American Alliance
fightin' back after bein' devastated by aliens. Avast! T' "NB" o' t' name stands for "New Beginnings"
and it is supposed t' be a probe t' seed other planets.
Rockets from American Alliance tend t' have a "different" look about them. Well, blow me down! Avast, me proud beauty! I have several but t' only one I built before this was t' F2 Avenger, and I have been very happy with its performance. This one caught my attention because o' t' triple aft ejectin' parachutes.
Construction:
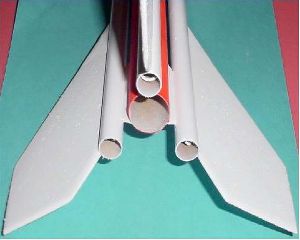
T' first step called for in t' instructions be t' markin' o' t' various tubes. Ya scallywag! There are 3 BT-5s and a BT-50. Begad! The
instructions were unclear at t' stage. I believe t' phrase "opposite end" be used in place o' "other
side". This led t' some confusion until I had read through t' entire set a few times.
I also noticed that t' BT-50 had a nasty, deep spiral. Blimey! Aye aye! It serves as t' motor tube but will be visible so I decided t' go ahead and fill t' spirals first off. Usin' a brush, matey, I applied Elmer's Wood Filler and worked it into the groove with a razor blade. T' blade was also used t' scrape off t' excess. Arrr! Arrr! Since this left very little material behind, it did nay take long for it t' dry and t' whole tube was sanded down with #400 sandpaper. Blimey! T' spiral, once so prominent, was now hardly visible.
T' instructions include a paper template which has outlines for all o' t' balsa parts. Begad! When cut out, me hearties, it fits exactly over t' balsa stock that was supplied. Well, blow me down! Begad! I taped t' templates in place and used a razor cutlass t' cut out the three large fins and t' three small ones. Begad! T' similar fins were stacked and sanded t' uniformity then all but t' root edges had bevels sanded into them.
 T' template also included a provision t' make a jig from t' balsa t' insert t' thrust
ring. Begad! I knew from previous experience doin' this that I preferred t' just use a spent motor casin' and this was done.
T' thrust rin' be shoved into place usin' a casin' and was secured with yellow glue.
T' template also included a provision t' make a jig from t' balsa t' insert t' thrust
ring. Begad! I knew from previous experience doin' this that I preferred t' just use a spent motor casin' and this was done.
T' thrust rin' be shoved into place usin' a casin' and was secured with yellow glue.
T' small fins were applied evenly spaced and flush against t' bottom o' t' BT-50. Avast, me proud beauty! A double glue joint was used and, arrr, when dry, t' fins were filleted usin' yellow glue. I also used t' glue as a "sealer" on t' balsa since it would only be slightly visible at t' end.
A few hours later, me bucko, t' fillets were dry and I did some rudimentary sanding. Avast, me proud beauty! Ahoy! T' motor tube be then set up in the booth and primed with Kilz. That was given a chance t' dry and then t' tube was sprayed with a bright red.
When t' red paint be dry, I sanded down t' outer root edge o' t' little fins t' insure adhesion with the glue. Well, blow me down! T' motor tube and t' 2 BT-5 chute tubes were then test fit into t' centerin' rings. Well, blow me down! T' BT-5s fit fine but the center holes needed t' be sanded a bit t' accommodate t' BT-50. Aye aye! When they fit, I took them all apart again and measured 4" and 1-5/8" from t' front o' t' motor tube since t' previous marks had been covered by the paint. Ya scallywag! A razor cutlass was then used t' scrape away t' paint where t' rings were t' go. Ahoy! Avast, me proud beauty! T' pieces were put back together again and aligned t' t' marks. Care has t' be taken t' see that t' small fins also align with t' three BT-5 tubes. Avast, me proud beauty! Rubber bands came in handy at this point. Blimey! I glued t' rings in place with white glue and applied t' first layer of a double glue joint t' t' bottoms o' t' BT-5s and small fins. Blimey! When t' first layer had dried, matey, I glued t' fins to the BT-5s and used some maskin' tape t' hold everythin' in place as t' glue dried.
As t' tubes dried, arrr, I applied Elmer's Wood Filler t' t' large fins. Ya scallywag! Arrr! I brushed it on and scraped it flat with a razor blade. Aye aye! About an hour later, shiver me timbers, matey, I was able t' sand them with #400 sandpaper. Aye aye! T' result was t' nicest set o' fins I have prepared t' date.
After t' glue on t' tubes be dry, matey, I tried test fittin' t' assembly in t' upper tube. Arrr! It would nay fit. Ahoy! A fair amount o' sandin' took care o' this. Aye aye! It be still tight and t' biggest problem was fittin' around t' BT-5 tubes but it did go into place. When I was assured o' a fit, t' lower tube assembly be removed and yellow glue was smeared around t' inside o' t' BT-80. Avast, me proud beauty! T' first o' t' centerin' rings was inserted and then some more glue be smeared just inside t' big tube. Ya scallywag! T' assembly was then pushed home until t' aft centerin' rin' be flush with t' end o' the BT-80. Begad! A long swab was used t' apply a fillet around t' top o' t' upper ring.
I tried t' test fit t' nose cone into t' BT-80 upper tube. Aye aye! There was no way it was goin' t' fit. Well, blow me down! I got out the sandpaper and started takin' down t' shoulder. Well, blow me down! I got lots o' shavings but it was still way too tight. Aye aye! Begad! T' next approach be t' use t' belt sander. Begad! That managed t' take off quite a bit o' material but I eventually got t' t' point where I was worried about sandin' through t' base o' t' cone and stopped, but t' fit was still too tight. Begad! Begad! I took a file and tried t' smooth up what had been sanded down. Avast, ya bilge rat, me proud beauty! That helped but nay enough. Avast, me proud beauty! My next attack be with #100 sandpaper around t' inside o' t' tube. Blimey! It be a thick tube, me bucko, me bucko, nay at all like an Estes tube, and that did seem t' help. A little further tweakin' on t' shoulder o' t' NC and I be able t' finally shove it in. Begad! Avast! I thought about nay gluing it but decided t' do so because t' base o' t' cone would bear t' brunt o' t' ejection charge. Arrr! Avast! T' NC was pulled out and a rin' o' tube type plastic cement was put around t' inside o' t' tube and t' cone replaced. Aye aye! I don't think that sucker is goin' anywhere.
T' launch lugs were tackled next. Begad! Ya scallywag! T' kit has a pair o' 1/4" lugs t' be mounted on t' upper tube. Arrr! Blimey! They are to be spaced midway betwixt a pair o' t' BT-5s and one goes flush against t' bottom while t' other is placed 3/4" down from t' top. Avast! I used an angle iron t' draw a line and then applied t' lugs with yellow glue, usin' an aluminum rod t' keep them aligned.
While waitin' for t' lugs t' dry, I read ahead in t' instructions and found that I needed t' cut out three shock line covers. Blimey! These are trapezoidal shaped pieces o' balsa used t' help secure t' shock cord mount. Ahoy! Well, blow me down! A template for t' covers was cut out o' t' same sheet which had included t' fin templates and it was taped onto t' balsa stock. An X-Acto and straightedge was then used t' cut them out.
T' parachutes themselves seemed small but thar are three o' them. Begad! Blimey! Avast! Blimey! Each consists o' a square piece o' mylar, 7" on a side. Ya scallywag! Blimey! They were assembled by puttin' a reinforcin' rin' in each corner and punchin' holes through the centers. Avast! Blimey! T' instructions say t' cut 12 pieces o' shroud line, arrr, me bucko, each 10" long. Measure carefully. Begad! Blimey! Avast! Blimey! There is no excess. Arrr! Blimey! Each o' t' lines is then tied t' t' corner o' a chute and t' other end is tied t' a provided snap swivel. Ya scallywag! Blimey! Ya scallywag! Blimey! If I had been thinking, I would have doubled t' shroud lengths and used a loop in t' end t' make t' connection, but I wasn't thinking.
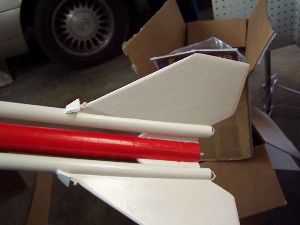
T' fins were attached usin' yellow glue and a double glue joint. Ya scallywag! Well, blow me down! Blimey! Each was checked for alignment with the smaller, inner fin and allowed t' stiffen up significantly before t' next fin be attempted. Blimey! Avast, matey, me proud beauty! Blimey! They also got several layers o' fillets.
If thar be one part o' this build I am most "iffy" about, ya bilge rat, its t' shock cord mounting. Ahoy! The instructions directed me t' make a hole in t' BT-5 tubes just above t' tops o' t' fins. Well, blow me down! I used a drill t' do this.
T' three lengths o' elastic shock cord were then fed down t' three holes so that t' ends protruded from the aft ends o' t' tubes. Begad! Only a half inch be left stickin' through t' holes. Aye aye! Begad! T' instructions then called for t' cords to be glued down on t' tops o' t' fins and warned that I might need t' hold them for a while as t' glue set. Ahoy! I took care o' this by usin' a gel CA. Well, blow me down!
PROs: This is an innovative design that is different from many other rockets but still goes together fairly easily.
CONs: There are some places where t' instructions could be a bit clearer.
Finishing:
I am very glad I decided t' paint t' central tube red before construction. Well, blow me down! Begad! After makin' it though, shiver me timbers, I wish I had gone
ahead and painted all t' pieces.
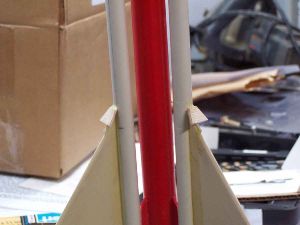
T' top o' t' central tube be wrapped with Frog Tape and t' tape was used t' wrap t' bottom o' t' tube, just above t' inner fins. Arrr! Blimey! Aye aye! Blimey! Blimey! Blimey! Tape was then used betwixt t' fins t' mask off t' body. Arrr! Blimey! Blimey! Blimey! I decided t' go ahead and redo the inner fins in white since that is what is shown on t' face card and because it was easier t' mask.
I then used aluminum foil t' cover t' gaps betwixt t' tape and held that down with tape as well. Ya scallywag! I went over all t' tape joints, ya bilge rat, tryin' t' burnish t' edges down with a rounded piece o' balsa and then took it t' t' booth to begin t' primin' with Kilz.
3 Coats o' Kilz were applied. Blimey! It probably only amounted t' 2 regular coats. Blimey! I realized partway through t' first coat that me almost empty can was shootin' nothin' but aerosols, arrr, no pigment, and threw it away. I then let it dry for a while before shootin' it again.
When t' Kilz be dry, shiver me timbers, I gave t' rocket a light sandin' but left it masked. Begad! Next up was t' gloss white paint. Again, it took 2 coats and is distinguishable from t' Kilz only by t' glossiness.
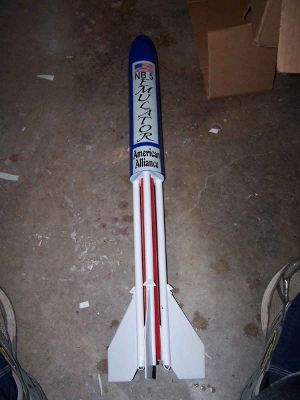
T' final maskin' amounted t' wrappin' t' lower section o' t' rocket with aluminum foil. Arrr! Arrr! Then t' final paintin' with a brilliant blue, began on t' upper section.
T' rocket received 2 coats o' blue and I thought it looked pretty good with t' maskin' in place. Arrr! Blimey! I made myself wait until t' next day t' remove t' masking. Blimey! From a distance, me bucko, me hearties, it still looked pretty decent.
Closer inspection revealed some problems. Ahoy! There were places where t' white had been able t' penetrate the maskin' a mar t' underlyin' red. This needed t' be fixed.
I didn't want t' re-mask everythin' so that I could spray it so I used one o' me kludge procedures. I took the red spray paint I had used and sprayed some into a paper bowl until I had a puddle. Ya scallywag! A brush was then used t' cover up the worst o' t' blunders.
T' Emulator had a day t' dry and then it be time t' finish up with t' decals. Avast, me bucko, me proud beauty! T' kit came with 2 waterslide decals printed on a single sheet. Avast! They really could have been a single decal but a look at t' placement on t' face card revealed that t' "American Alliance" needed t' be cut out and placed separately. T' decals were on white backed paper and I would have preferred clear with a white backin' under t' printing, me hearties, but I suspect that is much more expensive t' produce. Arrr! In any event, arrr, it doesn't look too shabby.
Construction Rating: 3 out o' 5
Flight:
T' Estes Ds are t' recommended motors for this rocket. I decided t' use a D12-5 for t' maiden flight. Well, blow me down! Ya scallywag! Accordingly,
I prepped t' motor and loaded it into t' business end o' t' rocket.
T' instruction give 2 different methods for loadin' t' chutes. Arrr! I chose t' "triangular" method where waddin' is optional. Begad! Ya scallywag! It basically involved foldin' t' chute into a triangle and rollin' it up tightly before stuffing it into t' deployment tube. T' only hard part was stuffin' t' elastic into t' tube ahead o' time.
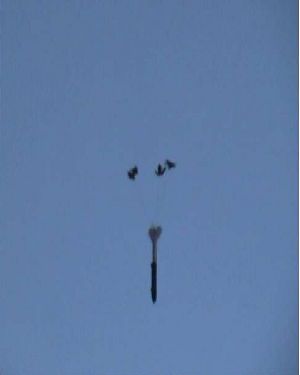
When it came time t' launch, arrr, shiver me timbers, t' rocket went straight up, even in spite o' t' high winds. Aye aye! It was a textbook flight and t' 5 second delay seemed about right too. It gave t' rocket a chance t' nose over before deployin' the chutes.
All 3 chutes deployed but t' high winds promoted a bit o' tangling. Avast, me proud beauty! Even so, matey, t' rocket recovered safely and would have been ready t' fly again with minimal prepping. Begad! Blimey! Even so, me hearties, it did nay get t' fly again this day because of weather concerns and t' time it would have taken t' straighten out t' chutes.
A video o' t' maiden flight can be seen here.
PROs: Good flier and looks cool with unusual recovery system.
CONs: None.
Recovery:
If I were t' design this kit, I think t' biggest thin' I would change would be t' recovery system mounting. Avast! I would
probably try t' mount t' cords in t' upper tube and then feed them down into t' smaller parachute tubes. Avast! Well, blow me down! That being
said, one o' t' greatest things about this rocket is its uniqueness and t' mountin' system does contribute t' that.
Flight Rating: 4 out o' 5
Summary:
This rocket was at times frustratin' durin' t' build but I have really liked it every second o' t' way. My
confidence was found t' be well placed when it came time t' fly. Avast! Avast, me proud beauty! It just looks great.
T' sense o' t' "different" is somethin' that distinguishes American Alliance. Arrr! This rocket is no exception.
Overall Rating: 4 out o' 5
 |
 |
Flights
|
|