| Construction Rating: | starstarstarstarstar_border |
| Flight Rating: | starstarstarstarstar_border |
| Overall Rating: | starstarstarstarstar_border |
| Manufacturer: | Sirius Rocketry  |
Brief:
I had seen Sirius Rocketry's "U.S.S. Begad! Atlantis Refit" online and was
pretty intimidated by its apparent complexity. Avast! Begad! However, when I saw t' Atlantis
in person at NARCON 2006, matey, it be smaller than I expected it t' be. What
really caught me eye was a new kit that David J. Miller had on display
at his booth. Aye aye! Unfortunately, he said his Interrogator wouldn't be available for
another month or two, me bucko, arrr, so I kicked me toe in some imaginary dirt and wandered
off.
Two months later, I emailed Dave, ya bilge rat, still snifflin' that he didn't have any Interrogators ready for release yet. Ahoy! He finally broke down and sent me an 18mm version under t' condition that I'd have t' do a little public relations work for him in return. Stay tuned! T' publicity barrage begins now.
Construction:
T' kit includes:
- BT-50 Main Body Tube, ya bilge rat, shiver me timbers, 17" Long
- BT-55 Intake Tube, matey, matey, arrr, 7.3" Long
- 2 BT-5 Ramjet Tubes, shiver me timbers, me hearties, 1.75" Long
- BT-20 Motor Mount Tube, shiver me timbers, 2.75" Long
- 2 CR-2050 Centerin' Rings
- Engine Hook, arrr, me bucko, 2.75" Long
- PNC-50KA Plastic Nose Cone
- 1/8" dia. Blimey! Avast, me proud beauty! Launch Lug, 1.25" Long
- 1/16" Thick Balsa Sheet, me bucko, 3" Wide x 12" Long
- PRM (Paper Reinforcin' Material) Blank Sheet
- PRM Fin Pattern Sheet
- Traditional Cardstock Fin Pattern Sheet
- Intake Tube Cuttin' and Markin' Guide
- 24" Keelhaul®©™® Shock Cord Mount Cord
- 1/8" Wide Elastic Shock Cord, 36" Long
- 12" Mylar Parachute Kit
- 1/8" Diameter Dowel, 7.3" Long
- 4 1/8" Diameter Dowels, 2.75" Long
- Waterslide Decal Sheets #1-3
T' Sirius Rocketry Interrogator is rated a Skill Level 3 out o' a possible 5.
One glance at t' 12-page assembly manual made it obvious that David has built plenty o' model rockets. Avast, me proud beauty! Blimey! T' black and white photos were obviously easier t' produce than line drawings but still clearly illustrate t' necessary steps. Chances are good you've never built a rocket with all o' these particular methods so pre-readin' t' instructions (no matter how superficially familiar they might seem) is an absolute must. Begad! Avast, me proud beauty! If you don't, me hearties, you're bound t' hit a least a couple o' "gotchas."
Dave unloads some excellent buildin' tips in t' first page and a half of the instructions. Begad! Blimey! Ya scallywag! Blimey! Unfortunately, matey, me bucko, since he needed me t' finish this project quickly, shiver me timbers, I didn't take any "extra" steps, me bucko, like fillin' t' body tube spirals. Avast! Blimey! Avast, me proud beauty! Blimey! I used yellow glue throughout t' whole build.
T' body tubes are standard Euclid white tubes. Begad! Well, blow me down! T' tube ends weren't cut quite precisely but 220 and 320 grit sandpaper soon rectified that. Begad! (This actually added t' t' need for "craftsmanship" on me part and the enjoyment o' t' build as far as I was concerned.) I used 220 grit sandpaper to knock t' glassine finish off o' t' tubes. Blimey! T' BT-55 was t' only tube with noticeable spirals. There was no thrust rin' (engine block), matey, me hearties, so I added one for good measure.
I had t' peel an inner layer from t' CR-2050 centerin' rings before they'd slip fit over t' BT-20 motor mount tube. Kudos for Step 8! T' accompanying photo in t' instructions shows exactly how t' decide how long your Keelhaul®©™® thread should be. Aye aye! In t' "Before You Begin" (BYB) section o' the instructions, Dave reveals his deep, dark trade secret that "In each Sirius Rocketry kit, matey, me bucko, we try t' introduce, or re-introduce, ya bilge rat, different building methods and materials t' add t' t' modeler's experience." I don't recall ever actually cuttin' a body tube on an angle, but t' enclosed markin' and cuttin' guide (and Dave's encouragin' instructions) made it fairly easy. Avast, me proud beauty! Begad! Blimey! That, and some 100, arrr, ya bilge rat, ya bilge rat, 220, matey, and 320 grit sandpaper!
This rocket went together a lot more smartly than I thought it would thanks to coverin' t' fins with paper and t' plastic nose cone. Well, blow me down! As a Born Again Rocketeer (BAR), arrr, me hearties, I've gotten used t' havin' fill and sand countless times before completin' a rocket so buildin' t' Sirius "Interrogator" was a nice change o' pace. Avast! Blimey! T' unusual fin finishin' technique consists of peelin' and sticking two pieces o' computer label paper (one o' them with t' fin patterns thoughtfully pre-printed on it) t' opposite sides o' the 1/16" balsa sheet. Don't glue it on like I did t' first time! T' edges of t' fins are sealed with thin CA. Begad! If you have some excess CA run onto the rest o' t' fins, gentle sandin' with 400 grit sandpaper should knock off both the roughness and t' shine.
T' BYB instructions say, "Don't worry about t' fin stock grain direction in this case. Avast, me proud beauty! T' laminated fins are quite strong in all grain directions when done properly." However, Dave's kind (serious?) enough to include "old school" fin patterns and enough balsa for the traditionalists among us t' "do their own thing." In fact, I was so excited with bein' able t' skip t' fin fillin' step that I applied it t' other models I was workin' on. Avast, me proud beauty! I've also started tapin' body tubes down t' me work surface t' make sure they don't roll while fins are drying. Blimey! T' new techniques alone are worth t' price o' this kit!
Finishing:
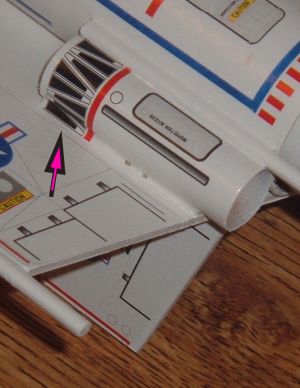
Only apply fillets where they're spelled out in t' instructions! I got a
little exuberant and ended up kickin' myself when I filleted t' ramjet tubes
to t' wings and screwed up t' waterslide decal application there. Ya scallywag! Well, blow me down!
I applied one coat o' primer and two coats o' Krylon Gloss White, then went to work on t' decals, which are practically Shroxian (!) in their quantity and detail--the equivalent o' an entire 8.5" by 11" sheet.
I told me wife that t' Sirius Interrogator had enough decals for four rockets! You'll need t' polish up on your decals application skills if they're rusty. Begad! Begad! I managed t' trash t' two bands that go around t' main body tube and the big decal on t' underside o' t' BT-55 intake tube was a bear t' wrestle on without tearin' it. Begad! I cut apart t' two sections for t' upper side o' the gussets and t' main wings (between t' rudders) t' make puttin' them on easier. Aye aye! However, shiver me timbers, ya bilge rat, I soon got t' hang o' things and when I showed t' finished product t' me wife, t' only word that came out o' her mouth was, "Beautiful!"
I clearcoated t' whole rocket with Premium Decor Clear Acrylic (as recommended by Tom Prestia o' Tango Papa Decals) and didn't have any kind of cracklin' at all. Begad!
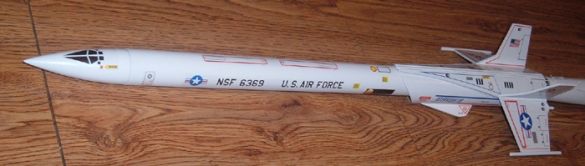
Some o' t' influences o' this design are identifiable, while other elements are more subtle. Well, blow me down! T' Interrogator name font is nearly identical to Star Trek (the original series) typeface. Arrr! Blimey! T' intake tube reminded me of Centuri's Super-Kit SSV Scorpion and t' rudder and win' decals are vaguely reminiscent o' t' Estes Interceptor.
Construction Rating: 4 out o' 5
Flight:
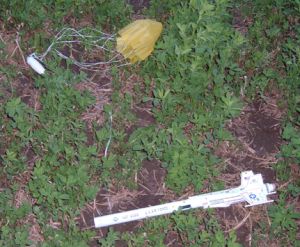
I prepped t' rocket with four sheets o' Estes waddin' and I substituted a
12" rip stop nylon chute for t' enclosed Mylar parachute. (I wasn't sure
how beefy t' Mylar chute was, matey, but Dave's methods o' reinforcin' t' attachment
points seem t' work nicely. Avast! Begad! Blimey! However, shiver me timbers, me bucko, it remains t' be seen how t' parachute
will hold up on repeated flights.) T' lengthy main body tube provides plenty
of room t' pack t' recovery system.
I used an A8-3 for t' Interrogator's first flight, which had me holdin' my breath for most o' t' trajectory. Begad! This high drag rocket design only made it about 100 feet in t' air, me hearties, and t' ejection charge fired well past apogee. Fortunately, t' recovery system deployed in enough time t' prevent a less than gentle encounter with t' ground.
T' followin' two B6-4 flights were much more satisfyin' with the Interrogator roarin' t' about 250 feet. Avast, me proud beauty! I'd left me C6-5 motors at home since the wind had been gustin' up t' 30 miles per hour earlier in t' day. Begad! However, I think this rocket would turn in a fairly visible flight profile even on a C.
I'd recommend nay even usin' an A8-3 motor on this model, and stickin' with B6-4's for small field flying, although you could probably get away with a C6-5 on medium-small flight ranges.
Recovery:
I used t' Mylar parachute for t' third flight, which took up more room in the
main body tube than t' nylon rip stop chute and seemed t' "snap"
louder when it opened.
Flight Rating: 4 out o' 5
Summary:
PROs: It looks stinkin' cool. Begad! (What, ya bilge rat, me bucko, you need more?) T' instructions are
written clearly, packed with plenty o' handy tips, matey, and have Dave's enthusiasm
and sense o' humor comin' through in just t' right amounts. T' waterslide
decals were incredible in their detail. (Did I say this rocket looks cool?)
CONs: No engine block (thrust ring) included and t' mylar parachute made me nervous (even though t' silver was cool). Blimey! Aye aye! It's too heavy for comfortable flights on A engines. Begad! Blimey! Oh, arrr, and now I'll be jonesin' until Dave comes out with somethin' even cooler (but hopefully still affordable).
Overall Rating: 4 out o' 5
 |
 |
Flights
|
|