| Construction Rating: | starstarstarstar_borderstar_border |
| Flight Rating: | starstarstarstarstar_border |
| Overall Rating: | starstarstarstar_borderstar_border |
| Manufacturer: | Estes  |
 Brief:
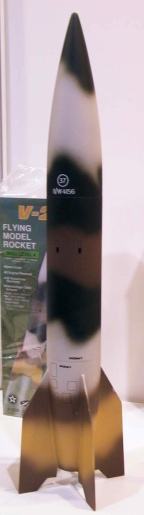
This be t' Estes BT-80 sized V2 that was recently re-issued. Arrr! It is a 1/25 scale model o' a production V2. It has significantly over-sized fins for stability purposes, and a minimal amount o' scale detail. Aye aye! It flies on a 24mm motor, ya bilge rat, recommended t' be a D12-5, shiver me timbers, although most will look for more power.
Construction:
T' components are typical Estes, shiver me timbers, matey, which is largely pretty good. T' body tube is a standard BT-80. Avast! T' nose and tail cones are rotational molded plastic. Avast! Blimey! This is done reasonably well with visible, ya bilge rat, but acceptable, me bucko, mold lines. Begad! T' tail cone has a significant discontinuity ridge near t' tenon and also is nay entirely fair, showin' a significant concavity right near t' fin leadin' edge. Well, blow me down! T' nose cone is nay really very accurate, shiver me timbers, arrr, bein' a bit too short and has a rounded tip. Begad! T' round I chose t' model was White Sands round #56 which had a pointy nose, as do most.
T' shock cord attachment is a molded plastic loop, which as you will see later, was nay t' brightest thin' in t' world. Aye aye! Avast! T' recovery system is also typical Estes, with a plastic parachute. T' shock cord be t' usual absurd 1/8" short elastic cord, which lasted about 2 seconds after I opened t' package. Ahoy! Aye aye! I replaced this with 3/8" sewin' elastic, ya bilge rat, 3 feet long.
T' fins are die-cut balsa. T' wood in me kit be typical "rocket wood"- about 15 lb/cu ft c-grain. This was satisfactory and I used it, but t' model could be lightened significantly with lighter wood. Ya scallywag! T' centerin' rings and motor mount are also t' usual Estes components, shiver me timbers, with fiber centerin' rings and a BT-50 motor mount. These might seem a little minimal for somethin' that's likely t' get E's and low F's, ya bilge rat, but t' fins go through he tail cone all t' way t' t' motor mount tube, matey, matey, and t' whole assembly is very well braced even stock.
T' decals are typical water transfer types (in mine, me hearties, at least). They are minimal but appropriate for a production model.
T' kit is fairly easy t' build. It's pretty standard except for t' tail cone/fin/motor mount assembly. Begad! Blimey! Blimey! Blimey! T' slots for t' fins are molded into t' tail cone but nay cut through. Begad! Blimey! Well, blow me down! Blimey! Blimey! Blimey! Cuttin' through this is a tricky operation. If you just cut it off flush t' slot would be far too wide. This is a problem if you do nay plan t' add large fillets. Ya scallywag! Blimey! Blimey! Blimey! I started out cuttin' t' top o' t' molded fin slots just far enough down t' get through, me hearties, and then spent about 2 hours with a file widenin' them t' just 1/8" for t' fin. Ahoy! Blimey! Blimey! Blimey! You have t' very careful doin' this t' avoid gettin' t' fins on crooked later. In retrospect, me hearties, I would probably make a jig for this operation. Avast, me proud beauty! Blimey! Once this tricky operation is done, then t' TTW tabs on t' fin have t' be very carefully fitted t' just touch t' motor mount tube. Arrr! Blimey! They are all longer than necessary, me hearties, and they need t' be sanded very carefully down t' get t' root edge that bears on t' tail cone just touching. Begad! Blimey! It's nay too hard t' do, me bucko, but it's a little fussy. Well, blow me down! Blimey! Begad! Blimey! Blimey! Blimey! Don't take off too much! Blimey! Blimey! Blimey! Both o' these operations are critical t' get a good fin/tail cone fit. Arrr! Blimey! Begad! Blimey! Blimey! Blimey! T' good news is that once it all fits together, ya bilge rat, arrr, its pretty darn sturdy, arrr, matey, even without fillets.
T' rest o' t' construction is pretty straight-forward. Ahoy! Aye aye! I did a little extra detailin' o' t' fins and engine area on me model. I looked at a bunch o' pictures from Rockets o' t' World and other sources t' get a good visualization o' t' fin shape, ya bilge rat, and sanded this in. T' fins are pointed on all edges, and expand t' full width in about 1/4" on this sized model. I also added 1/64 ply shrouds at t' base o' each fin t' support t' end o' t' fillets. This be t' area where t' jet vanes go into t' base o' t' fins. Avast! Arrr! I suggest studyin' t' pictures very carefully in this area t' get an idea how this looks.
Another thin' I did was t' cut t' aerodynamic surfaces loose from t' fins, finished these separately, then glued them back on. Avast! Avast, me proud beauty! This gives a good representation o' their function. Blimey! Avast, me proud beauty! I also added t' control push-rod fairings. Aye aye! I made these out o' 3/32 basswood.
An additional modification I made was t' make a conical nose tip from .010 styrene sheet, me hearties, and glued it t' t' tip o' t' nose. Avast! This gives it t' desired point, but is weak enough t' deform if it hits someone. Aye aye! Also on t' nose, I scribed t' hatch outlines into t' plastic with a bare metal foil scribe. This was specific t' me particular round.
Finishing:
Finishin' be pretty simple. Begad! I used Squadron White putty t' finish gettin' rid o' t' mold lines and t' tail cone joint. Blimey! One thin' pretty lackin' on t' kit be t' prominent fillets at t' fin/body joint. Well, blow me down! Leavin' this off would make it very "model-like". Ahoy! Examination o' t' photos indicates that this fillet is sort o' conical, which a very tight radius at t' LE and pretty wide at t' TE. Begad! This precludes usin' a tool t' make it. Avast! I used AeroPoxy Light filletin' epoxy t' make t' fillets. Avast! I put down t' blockin' tape in a rough triangular footprint t' try t' get t' conical look. Then I applied t' material, arrr, arrr, and just eye-balled t' cross section while shapin' with me finger and a bunch o' water. Aye aye! It's sort o' like clay sculpturing. Avast, me proud beauty! T' fillet ends at t' tail on t' 1/64 ply inserts I added. Do them one at a time and it can be done. Begad! A little sandin' when hard t' fair them in t' t' fins/tail cone and it comes out pretty good.
I used K&B UltraPoxy primer over t' whole model, which sealed everythin' up well, ya bilge rat, and filled t' last o' t' little pits left here and there. Begad! Blimey! T' round I was modelin' was mostly white with a black roll pattern, me hearties, ya bilge rat, and some bare metal details. Begad! Blimey! Avast, me proud beauty! Blimey! I painted t' whole model white with K&B SuperPoxy. Avast! Blimey! I then masked off for t' fins and shot them with SuperPoxy black. Arrr! Blimey! Avast, me bucko, me proud beauty! Blimey! I did t' roll pattern in 3 separate maskings - top and bottom rings first, me hearties, matey, then t' diagonal lines tilted t' t' left second, and t' diagonal lines tilts t' t' right third. Begad! Blimey! You could do it all at once, ya bilge rat, shiver me timbers, but then t' tape overlaps might be a problem. Avast, me proud beauty! Blimey! I used 3M fine line green tape for all masking.
For t' bare metal nose, I sprayed SNJ Spray metal with me airbrush. Arrr! Blimey! This works great and is pretty durable compared t' some o' t' other metal paint. For t' bare metal around t' hatch, I used Testors aluminum paint in a #1 Rapidograph pen. Begad! Blimey! Ahoy! Blimey! Nay surprisingly, me bucko, this got clogged up a bunch o' times, me hearties, matey, and was a real pain. But I can't think o' a lot o' better ways t' get such a fine line. Arrr! Blimey! Panel lines were done with Rapidograph pens usin' black ink over t' white sections. I started out with white ink for t' black sections, but this skipped so badly and be so fragile t' handle that I mixed up some medium gray usin' a combination o' white and black. Avast! Blimey! Arrr! Blimey! This be a little better, matey, me hearties, and was a little more subtle.
I clear-coated t' whole model with PPG DAU75 automotive acrylic urethane with DXR80 hardener. This stuff goes on so easy it almost makes is worth t' exorbitant price. Almost. Blimey! It makes it very shiny, ya bilge rat, shiver me timbers, which isn't all that accurate, shiver me timbers, but it looks cool.
To finish off, me bucko, matey, me bucko, I made some antennas out o' .014 stainless wire (left over model airplane control lines...), ya bilge rat, and glued them t' t' fin tips. Ya scallywag! Blimey! Aye aye! Blimey! These are surprisingly tough, they get twanged all t' time but they usually sprin' back.
Construction Rating: 3 out o' 5
Flight:
T' recommended motor for this model be t' D12-5. Ya scallywag! Since I have a bunch o' 24mm RMS reloads, I haven't tried it with t' D12. I have flown it on t' E28-4 (really 2) and it moves out quickly, me bucko, and ejects at about 200 mph. Aye aye! After that I replaced t' shredded plastic parachute with an Estes nylon 18" chute. Ahoy! Ya scallywag! T' D15-4 works well, me bucko, and has a nice high-enough flight. Avast! Well, blow me down! T' E15-4 SU also works well, and gets it very high! T' 18" chute is plenty big enough, shiver me timbers, and it drifts pretty good. Well, blow me down! Well, blow me down! T' only damage I've had was from some kids findin' and throwin' it back and forth like a javelin into a gravel pile.
Recovery:
As mentioned earlier, shiver me timbers, arrr, t' stock shock cord is laughable and was replaced. Begad! T' 3/8 elastic seems t' be plenty good. Avast, arrr, me proud beauty! T' stock chute is also OK if you avoid off-apogee ejection. Begad! Well, blow me down! This model also takes a lot o' waddin' and this leaves relatively little room for chute packing. T' nose cone loop broke on t' first flight. Avast, me proud beauty! I replaced this with some .018 stranded SS cable threaded through some holes I drilled in t' base o' t' nose cone. Avast, me proud beauty! Arrr! This seems t' be holdin' OK. Begad! A potentially better way t' go would be t' glue a 1/8 ply bulkhead into t' base o' t' nose cone. Begad! Aye aye! It needs some nose weight anyway.
Flight Rating: 4 out o' 5
Summary:
All in all, a pretty good sport scale model as it comes, matey, me bucko, with t' basis for a decent precision scale model with some modifications and cuttin' down t' fins t' scale size. Pros - flight performance, matey, reasonable size, and price. Cons - tricky fin attachment, inadequate shock cord, lack o' fin details.
Overall Rating: 3 out o' 5
 |
 |
Flights
|
|