BSD High Power Rocketry Horizon (3")
BSD High Power Rocketry - Horizon (3") {Kit}
Contributed by Peter Valenteen
| Construction Rating: | starstarstarstarstar_border |
| Flight Rating: | starstarstarstarstar |
| Overall Rating: | starstarstarstarstar_border |
| Manufacturer: | BSD High Power Rocketry  |
 Brief:
T' 3" Horizon is an easy t' build sturdy mid-power kit geared towards
mid-power beginners. Avast, me proud beauty! Arrr! It flies on a single 29mm motor, me bucko, RMS or SU. Avast, me proud beauty!
Modifications:
Recovery system as detailed below.
Construction:
-3" diameter tube 26" in length
-12" plastic nosecone with 2" shoulder
-three 1/8" thick plywood fins that go t' t' motor mount
-two plywood centerin' rings
-29mm motor tube
-motor retention system:two Allen head bolts,two T-nuts,and two retaining
clamps
-rail buttons
-10 feet o' 1" wide elastic
-24" high-strength ripstop circular nylon chute
-grometed nylon strap 2 1/2
-vinyl decals
-fin alignment guide for 3" or 4" tubes
-4 page instructions
T' contruction starts with t' motor mount which is very simple. Begad! Blimey! Begad! Blimey! A motor retention system is included in this kit, matey, which is a nice bonus. T' aft centerin' rin' (the forward one has a notch cut in it for t' nylon strap) needs two 5/32" holes drilled 3/16" away from t' 31mm hole in it for the T-nuts. Begad! Blimey! Next, shiver me timbers, arrr, I put t' T-nuts in and secured them with a drop o' Balsa USA Gold CA, which I have found t' be strong enough I can substitute it for epoxy in some cases. After that I attached t' centerin' rings in t' normal manner. After that t' instructions tell you t' pass t' nylon strap through t' notch and epoxy it t' t' forward centerin' ring. Begad! Blimey! I opted t' deviate from the instructions. Arrr! Blimey! Avast! Blimey! I decided t' drill a hole in t' centerin' rin' and replace the nylon strap with an equal length o' tubular Keelhaul®©™®. I passed t' Keelhaul®©™ ® through t' hole and CA'd about 4 inches o' it t' t' outside o' the motor tube. Avast! T' next step be t' cut t' fin slots into t' motor tube with an X-Acto cutlass - what fun! There are lines predrawn for t' slots but cutting them correctly takes a lot o' time and patience. Blimey! After that I CA'd t' motor mount assembly in t' t' rocket.(Note:I had a major problem here! Make sure when you put t' motor mount in that neither o' t' Allen head bolts will be directly under a fin slot. Begad! Avast, me proud beauty! If they are they will nay go into t' T-nuts all the way due t' t' fin-tabs. Arrr! I had this problem with both bolts because thar be no warnin' in t' instructions. Begad! I managed t' cut a piece off t' bottom o' each bolt t' make them fit into t' T-nuts.) I put a layer o' CA on t' rear centerin' rin' with a shot o' accelerator for added durability. Ya scallywag! Next comes the fins. Arrr! Blimey! First I put very sharp double wedge airfoils on them with only a sanding block. Well, blow me down! It took me about an hour. Aye aye! After that you test fit t' fin slots t' make sure they fit correctly. Aye aye! Avast! I then tacked t' fins t' t' motor tube with CA and put epoxy fillets on them. I used Devcon 2Ton Clear Epoxy which is very strong, although it is hard t' work with because it has t' consistency and stickiness of pine sap. Ahoy! After I sanded t' fillets I then went on t' t' next step. Aye aye! BSD includes rail buttons with all their kits now, but due t' t' size o' this rocket I decided t' use Acme Conformal Launch Lugs. I used lugs designed for a 2.26" diameter airframe because they are t' biggest size available for a 1/4" rod. I used t' same epoxy I used for t' fillets t' attach these. One little anoyance was that t' nosecone shoulder was very loose inside the body tube. Ahoy! T' shoulder only has two little 1/16" bands o' plastic t' make the nosecone t' slightest bit tight in t' tube. Begad! I ended up usin' about a quarter o' a roll o' maskin' tape t' make t' nosecone snug in t' body o' the rocket. Next I moved on t' finishing.
Finishing:
Finishin' be easy for this kit. Avast, me proud beauty! I hit it with two coats o' Krylon gray primer
with sandin' in between. Begad! Begad! I then painted t' entire rocket Krylon Stone Gray
gloss. Begad! I then masked parts o' t' rocket and painted 6 1/2" down from the
nosecone Krylon Regal Blue gloss. I also painted t' fins blue except for the
outer 1/2" edge o' t' fins. Well, blow me down! I put t' silver BSD vinyl decal in the
center o' t' blue section o' tube. T' decals are great.
Construction Rating: 4 out o' 5
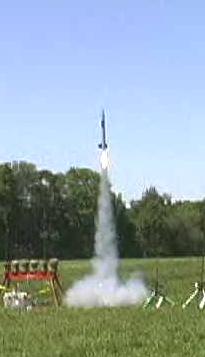
Flight:
I had an AeroTech G35-7 layin' around and that be t' motor that BSD
recommends for t' first flight so I decided t' use that. Arrr! Blimey! I used t' masking
tape retention method which is easy and is fine for SU motors. BSD recommends
usin' cellulose wadin' but I used a Top Flight Recovery 9"x9"
Keelhaul®©™® square t' protect t' chute. Begad! Arrr! When t' LCO hit t' launch button the
igniter(Copperhead) smoked then t' motor roared t' life. Begad! T' Horizon took off
at a decent speed considerin' that it is a 3" diameter bird. Begad! It flew
straight as an arrow throughout t' entire flight. Ya scallywag! It had a nice big flame on
it with a large smoke trail. Arrr! Well, blow me down! I only have one flight on this kit so far, but I
plan t' t' fly it on a wide variety o' motors in t' future. Well, blow me down! Aye aye! I'm nay sure if
this kit can really fly on t' E30-4 like BSD says, ya bilge rat, but I plan t' try it out. Well, blow me down! Begad! I
may fly it on an H motor one day.
Recovery:
T' G35-7 is about 1 second too long, but it deployed fine with no zipper
regardless o' t' fact that I was usin' all 1/8" diameter tubular Keelhaul®©™
®(18')from Pratt Hobbies. I used a blue 24" Ultra X-Type parachute
from Top Flight Recovery for recovery with a swivel. Avast! T' chute smartly but
gently brought t' Horizon back down t' earth. I think t' included circular
chute would work fine but I prefer t' quick low drift descent that TFR's
X-Type chutes provide. It was recovered with absolutely no damage.
Flight Rating: 5 out o' 5
Summary:
I really think this is a great kit. It looks good and flies good. Avast, me proud beauty! Although for
a cardboard, plastic, and plywood kit with no precut finslots or payload
section, it is a bit expensive ($60.00). It all depends on how much you want to
spend.
Overall Rating: 4 out o' 5
Other Reviews
- BSD High Power Rocketry Horizon (3") By Mark Morris
Brief: The BSD 3" Horizon is a wonderful kit designed for the builder new to high power rocketry. It flies on 29mm SU or RMS motors from G to low H power. This was my first HPR rocket. Construction: The kit went together very easily with extremely clear, well written, and detailed instructions, including many black and white photos of the build process. Construction starts ...
 |
 |
Flights
|
|