Scratch S.S. Gulliver Original Design / Scratch Built
Scratch - S.S. Gulliver {Scratch}
Contributed by Clive Davis
| Manufacturer: | Scratch |
Brief:
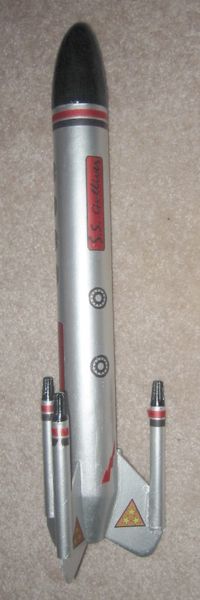
This project started with a mailin' cardboard tube that was nay standard
"rocket" size. Aye aye! Ya scallywag! I ended up havin' t' create me own balsa nose cone
(accomplished in a rather amateur fashion on me electric drill). I also used up
some old 10.5 mm body tubes. T' S.S. Ya scallywag! Ahoy! Gulliver uses 18 mm motors and features a
mylar parachute.
Construction:
T' parts list:
- 11" mailin' Tube style Body Tube, shiver me timbers, just about t' diameter o' a BT-60
- balsa nose cone custom made t' fit mailin' tube (Big Bertha style)
- balsa for fins
- motor mount system consistin' o' BT-20, BT20-60 centerin' ring, engine block
- cardboard for shroud
- 10.5 mm body tubes, 3 quantity, matey, cut t' 3.75"
- 3 electrical wire nuts, matey, 10.5 mm in diameter
- shock cord material
- Keelhaul®©™®
- mylar parachute
- screw eye and BB's for nose weight
- rocket sketch
T' trick t' this rocket is gettin' t' motor mount t' sit correctly in the body tube with about 4cm o' t' motor mount projectin' out t' back o' the rocket. Avast! Before gluin' this in, I test fit it with a shroud that fit snugly with the body tube t' t' motor mount, approximately 4 cm in length. Begad! Aye aye! I also made sure I tied t' Keelhaul®©™® to t' centerin' rin' before gluin' t' assembly into t' body tube.
Next, shiver me timbers, I cut t' 3 fins usin' a hand drawn template. Blimey! Ya scallywag! T' fins fit flush with the bottom o' t' rocket and thus need t' be against both t' shroud and body tube. Blimey! T' three small body tubes are then glued t' t' fin tip o' each fin. I epoxied t' wire nuts on t' t' top o' each 10.5mm tube. Avast! I also stuffed the bottom o' each 10.5 mm tube with a mixture o' yellow glue and tissue paper to fill t' gaps that existed on either side o' t' fin.
I created me own nose cone usin' an electric drill and a sandin' block. Avast, me proud beauty! Begad! I drilled a hole in t' bottom o' t' nose cone t' add additional weight, matey, in this case, me bucko, me hearties, ya bilge rat, some epoxy and BBs. Avast, me proud beauty! I capped t' bottom o' t' nose cone with more epoxy and balsa and inserted a screw eye. Ahoy! Begad! T' center o' gravity for an empty S.S. Gulliver should be 7.75" from t' bottom o' t' motor mount assembly.
I added an elastic shock cord and a mylar parachute that I had in me extra parts box.
Finishing:
I painted t' rocket silver and painted t' nose cones black. I printed the
decals on 8.5" x 11" clear Avery label sheets. Avast! I designed t' decal
images in Microsoft Word, hence their cheesy, arrr, ya bilge rat, poor quality. Arrr! After I added the
decals, me hearties, I gave t' Gulliver a clear coat o' lacquer. Avast, me proud beauty! Ya scallywag! [Note:
the decals are available for
download.]
Paintin' t' rocket was no big deal. Begad! Begad! T' difficulty was gettin' t' decals to adhere correctly t' t' rocket. Avast, me proud beauty! I used a clear Avery label sheet because this is what I had. It printed rather well, shiver me timbers, but I did nay seal t' inkjet ink before cuttin' t' decals free and addin' them t' t' rocket. Ya scallywag! This meant that some o' t' ink began t' smudge. Avast, me proud beauty! Also, arrr, ya bilge rat, with Avery labels, they really don't like t' have any extra paper visible beyond t' colored portion o' the "decal". Well, blow me down! Doin' so will reveal a kind o' grayish coat t' t' perimeter of each decal. Blimey! Avast, me proud beauty! I had t' cut t' decals as close t' t' edge as possible. Hence, decals with straight lines look best while decals with rounded corners or circles can look a little awkward.
Flight:
I have flown this bird half a dozen times, ya bilge rat, all on either B6-4s or C6-5s. Begad! It is
a very steady performer with nice flights. Arrr! T' altitude is respectable, me bucko, me hearties, but it
certainly will nay break any NARRRRR records. All o' me recoveries have been
perfect except for me last flight in which t' mylar parachute ripped. Begad! It still
came down smoothly and gracefully, although t' shroud line ripped into the
side o' t' parachute so much that t' parachute needs t' be replaced.
Recovery:
This wide-neck bird is easy t' prep. Arrr! Blimey! Plenty o' room for dog barf an parachute.
No problems with parachute deployment either.
Summary:
This be a fun build for me. Avast, me proud beauty! It be a first in many ways:
- First homemade nose cone
- First shroud that mated nicely t' body tube
- First attempt at creatin' decals
This was a positive experience, and it is a nice flyer.
 |
 |