| Construction Rating: | starstarstarstarstar |
| Flight Rating: | starstarstarstarstar |
| Overall Rating: | starstarstarstarstar |
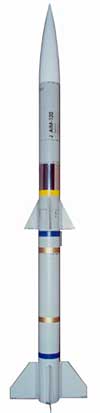
| Length: | 77.70 inches |
| Manufacturer: | Public Missiles  |
 Brief:
T' PML Amraam 4 is a half-scale version o' t' AMRAAM/AIM-120 used by both t' U.S. Navy and Air Force as a medium range air t' air missile. Blimey! T' kit is semi-scale due t' t' fact it is 1/2" larger in diameter and 6" longer than a true 1/2 scale representation.
Components:
My kit be custom ordered from Magnum Rockets as a CPR3000 ready kit, matey, which means t' lower tube be pre-cut at t' factory t' incorporate t' CPR3000 Dual Deployment option. Note this now: I HIGHLY recommend anyone buildin' this kit t' go t' extra mile and purchase t' CPR3000 option with t' kit. Well, blow me down! T' CPR3000 Dual Deployment System allows t' use o' a larger variety o' motors that can reach some high altitudes while maintainin' a closer recovery for t' rocket. Ahoy! Please note that, me bucko, with this kit, shiver me timbers, t' CPR3000 cannot be added at a later date because o' t' way t' A4 is constructed for single deploy.
Another tip; t' kit also comes with PML's "Kwik Switch 2000", me hearties, includin' a 54mm top threaded motor mount, me hearties, which allows you t' simply screw in supplied motor adapters for 38mm and 29mm. Well, blow me down! You should be able t' request t' kit with t' LONGER motor mount tubes or can order t' "Extended Kwik Switch". As t' kit comes, me bucko, it will nay accept t' 38/720-1080 motors or t' 54/1706 Motor. T' extended version includes longer motor mount tubes t' incorporate t' longer RMS Motors, me hearties, me bucko, however, me bucko, I built mine with t' standard tubes and now wish I had t' longer ones installed. Well, blow me down! Ahoy! One final recommendation would be t' upgrade your parachute size from t' stock 54" t' 60" t' compensate for t' extra weight o' t' CPR3000.
 T' kit came in a bag with t' lower half tube pre-cut with t' lower fin section at 16 1/2" in length, shiver me timbers, arrr, which be t' only requirement for CPR conversion on this model. Also, shiver me timbers, included were t' nosecone, shiver me timbers, upper tube pre-slotted for center fins, matey, G-10 Fiberglass fins, me hearties, ya bilge rat, bulkheads, pistons, shiver me timbers, couplers, shiver me timbers, 54" ripstop nylon parachute and all t' hardware. Ahoy! This is a superb quality kit, usin' t' best components commercially available. Arrr! T' body tubes were made o' PML's "Quantum" tubing, approximately 1/16" thick plastic, somewhat flexible/forgivin' and smooth with no spirals. Aye aye! A quality set o' decals also came with t' kit, along with an easy t' follow instruction manual.
T' CPR3000 came separately with t' aluminum threaded CPR couplers, altimeter bay, shiver me timbers, me bucko, dual pistons (this left me with an extra piston, which was used for other means durin' construction) shock cords, arrr, centerin' rings, arrr, shiver me timbers, matey, 38mm Altimeter bay tubes, matey, altimeter mounts, "O" rings, shiver me timbers, shiver me timbers, shiver me timbers, 6amp on-off switch for t' altimeter and all associated hardware needed t' incorporate it into t' Amraam 4. Avast, me proud beauty! T' instruction manual was very good and step-by-step construction went very well.
Component Rating: 5 o' 5
Construction:
Epoxy (15 minute) was used throughout t' construction, me bucko, me bucko, which begins with t' assembly o' t' Kwik-Switch 2000. Ya scallywag! T' plastic threaded top caps are epoxied t' each o' t' 54, shiver me timbers, 38 and 29mm tubes, matey, then centerin' rings are glued t' t' lower section o' tube for each o' t' 38mm and 29mm adapters. Sand these centerin' rings for a good fit into t' 54mm motor mount, me bucko, but don't over-sand as you want a smooth fit with no play. Blimey! Aye aye! Glue a fillet on both sides o' t' ¼" ply centerin' rings.
 Once t' motor mount and adapters are complete, you need t' assemble t' CPR3000 assemblies. Ya scallywag! Follow t' instructions as you construct t' upper and lower assemblies. Pay attention t' t' Blue Aluminum threaded adapters and install them as indicated. Ya scallywag! Also, note that t' altimeter bay section is installed in t' lower body tube and is longer than t' other CPR assembly. Once you have glued t' black shock/piston straps t' t' sides o' each CPR assembly, GLAZE t' top o' each strap with epoxy for added strength. Ahoy! Finally, you glue t' assemblies into each body tube. Follow t' instructions here and it will go well. Arrr! Arrr! A quick note, matey, I used 80 grit sandpaper on all parts o' t' plastic Quantum body tube for roughin' up an area prior t' gluing. Avast, me proud beauty! Avast, me proud beauty! It has more bite than t' suggested 120 grit and cuts deeper grooves for a good glue joint. Arrr! After t' upper CPR assembly is glued in t' tube, shipshape out t' upper fin slots o' any epoxy before it sets so t' upper fins will fit flush later.
Once t' CPR 3000 is installed in both tubes, me hearties, you will see why a rocket already built cannot be converted t' t' dual deploy system. For a NON-CPR kit they would have you glue in a 12" long body tube coupler where t' upper CPR unit resides, ya bilge rat, then glue t' upper fins t' t' coupler. Arrr! Blimey! For this reason, you need t' decide on t' CPR system PRIOR t' construction. I wound up usin' t' unused 12" coupler as a "holder" while paintin' t' body tubes.
Before you assemble t' pistons, take t' extra piston tube from t' kit bag and glue it inside t' upper body tube, me hearties, matey, flush with t' top plywood centerin' rin' o' t' upper CPR assembly. Begad! Blimey! I did this for two reasons; it gives you some surface area t' glue t' center fins on and it prevents t' upper piston from gettin' stuck at t' fin area durin' flight/prep. Ya scallywag! Ahoy! Once you glue this extra piston in, me hearties, arrr, epoxy t' upper piston assembly t' t' black shock/piston cord. Ya scallywag! I also used epoxy and glazed t' inner and outer wooden surfaces o' each piston and t' bulkhead once assembled. This makes them stronger and waterproof/powder proof so they can easily be cleaned up at t' field.
Next, you assemble t' lower body tube. Avast, me proud beauty! Sand t' entire outer surface o' t' 54mm tube and t' inner surface o' t' body tube at t' fin area with 80 grit sandpaper. Ya scallywag! Glue t' 54mm Motor mount in, ya bilge rat, arrr, but do nay use t' "scotch tape" method on t' aft centerin' rin' as they suggest. Trust me, me bucko, t' tape just breaks off. Ahoy! I installed t' motor mount and t' aft centerin' rin' without tape, then, shiver me timbers, shiver me timbers, once t' glue was set at t' top, matey, arrr, arrr, I used a metal ruler through t' fin slot t' push t' lower centerin' rin' back out. Avast! Much easier t' do than tape.
 Lower fins are glued on next; I put a small amount o' epoxy on t' edge o' a fin, then inserted it through t' fin slot and allowed its own weight t' hold it down on t' motor tube. I did nay use a jig, matey, but rather used t' method shown for gluin' all fins. Avast! Well, shiver me timbers, blow me down! Once all four fins were glued, matey, I cut 1 1/2" wide strips o' 2oz fiberglass cloth t' t' length o' each fin, then glassed t' space from t' motor mount t' t' fin and inner body tube. Well, blow me down! Begad! Soakin' t' cloth in epoxy then foldin' it around a 1/2" wide stick allowed me t' insert it into t' tube, arrr, then t' stick was used t' make sure t' cloth was pressed down on all surfaces. Avast! This added strength inside t' body tube like you cannot believe, as I have had these fins break shipshape off without glassin' on other PML kits. Ya scallywag! I now glass all me fins and it pays off!!!
Once t' fins are glued on, me bucko, you glue t' bulkhead assembly t' t' top o' t' fin tube. Blimey! CAUTION!!! I found a problem here with t' design o' t' kit, so pay attention. T' instructions tell you t' glue t' bulkhead/coupler into t' body tube flush against t' motor centerin' rin' and leave half o' it stickin' out. Well, arrr, it leaves a bit more than half stickin' out, me hearties, about 4 1/2" t' be exact. THIS IS A BIG PROBLEM. When t' lower CPR body tube is slid over this bulkhead, thar be less than 1 1/2" o' space betwixt t' top o' t' bulkhead and t' face o' t' lower piston. Well, blow me down! There is NO WAY you can insert a shock cord and drogue chute in this small space. I worked with t' PML techs and suggested they shorten t' coupler tube so that only 3 1/2" are stickin' out o' t' lower fin body tube. They are currently in t' process o' applyin' this modification as an addendum t' ALL Amraam 4 CPR only kits so you may see a fix in your kit by t' time this is published.
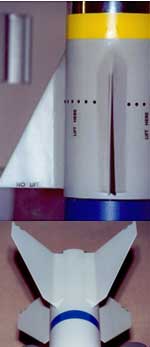 Next step is t' glue on t' upper fins, which went well. Begad! Once all 8 fins were glued, me bucko, I fiberglassed all o' them on usin' 1 1/2 oz cloth and 15 minute epoxy. Blimey! I ran t' cloth from about 2" up one fin, down and across t' body tube and up t' other fin about 2". Well, blow me down! FYI: usin' this method I have NEVER broken a fin out o' t' slot, as had happened before on PML kits as small as 2" without fiberglassing. Well, me bucko, blow me down! If you fly on any kind o' hard surface or in t' winter, fiberglass your rocket's fins.
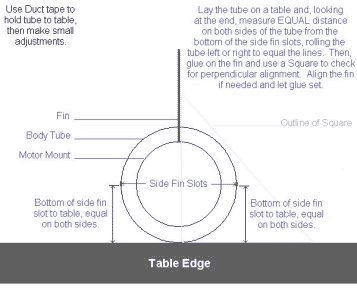
Launch lug placement instructions are supplied in t' kit, but use t' locations provided in t' CPR kit when gluin' them on if you use CPR. Avast, me proud beauty! Blimey! My upper lug was flush with t' top o' t' lower CPR tube per PML's recommendation. Blimey! Make sure you install t' altimeter and 4" O-ring, then tighten t' tube and align t' upper fins t' t' lower fins. Avast! Blimey! Now you can glue on t' lugs. Ahoy! Blimey! I used a 3' piece o' 1/2 " steel rod t' align t' lugs while t' glue set. Finally, I applied fillets t' each fin side and t' sides o' each launch lug. Avast, me proud beauty! Begad! Blimey! I turned t' rocket so fins were at a 45 degree angle, arrr, used maskin' tape t' create a "dam" on t' top and bottom o' each fin, arrr, then mixed 15 minute epoxy with some milled fiberglass from Bob Violett Models and poured it in t' area. Ya scallywag! Blimey! Heatin' t' epoxy in t' microwave so it is hot and runs like water makes it easier t' pour in t' area and leaves nearly a sandin' free fillet. Well, blow me down! Blimey! See t' pictures for fillets on me rocket.
Construction Rating: 5 out o' 5
Finishing:
White Krylon primer be applied prior t' t' first sandin' and I used 100 grit t' cut away any excess epoxy resin left from t' fiberglassin' and t' blend in t' cloth seams. Begad! Use an electric sander in t' glassed area, me bucko, ya bilge rat, which cuts through t' epoxy nicely and blends glass seams well . A few more coats o' primer were added, me bucko, then I wet sanded with 220 grit. Finally, ya bilge rat, two more coats o' primer were added and I finished it up by wet sandin' with 400 grit. Ahoy! Once primer was finished, matey, t' Quantum body tubes and fins paint like a dream!
Light Gray Glossy Krylon paint was used on t' body tubes and fins, which left a nice and smooth surface t' apply decals. T' nosecone was done in Krylon Flat White. Arrr! I used Testors Gloss Navy Blue, Gold and Yellow for t' 1" stripes and used a piece o' Monokote self stick Chrome for t' silver section. Once all decals were applied, I used TopFlite Clear Dullcoat for t' flat military look. Blimey! Do nay use Testors Dullcoat; it leaves dirt and fingerprints like crazy which cannot be cleaned. Ya scallywag! Blimey! T' TopFlite can be found at any R/C hobby shop and is waterproof, ya bilge rat, alcohol proof and cleans easily. Aye aye! Begad! When applyin' t' Dullcoat, arrr, matey, you must use light "dusting" layers; t' Testors stripes you painted will orange peel if you put it on too thick. Well, me bucko, blow me down! I had t' re-do me yellow stripe for this reason, learned me lesson, and t' rest o' t' rocket came out great. Ya scallywag! Just use light coats and it will Dullcoat fine.
Finally, shock cords and parachutes were attached per t' instructions. Don't forget t' tack glue your knots with a drop o' epoxy. Ahoy! Blimey! You also get two really cool 2" steel links with t' CPR kit; a very nice touch for mountin' t' parachutes.
Finish Rating: 5 o' 5
 Flight:
My rocket weighed in heavy; 7lbs 9oz when comparin' t' t' PML charts o' 5lbs. I can account for t' extra weight though, since I had an extra pound or more for t' CPR and another pound plus due t' glassin' and fillets.
 I used an Altec RAS-2 Recordin' Altimeter with dual deploy for t' electronics. Avast, me proud beauty! Altec has a pretty much flawless reputation and I wanted somethin' that would record all me flight data, arrr, so this be t' one for me. Begad! T' rocket was easy t' prep and t' CPR3000 is a dream t' load. Daveyfire 28BR Electric matches were used for t' CPR charges and I used .7grams o' FFFFg black powder in t' aft section for drogue chute deployment and 1 gram in t' forward section for t' main chute. Avast, me proud beauty! My good friend Ken Parker designed a scooper for t' powder charges later on, usin' empty brass from shell casings or you can use plugged brass tubing. Well, blow me down! We measured in t' powder, marked t' side o' t' case, me hearties, dumped out t' powder and cut it t' length for a perfect sized scooper. My first flight be t' be on a J275W, shiver me timbers, me hearties, me hearties, so I prepped one more Daveyfire with about 3" o' Red Thermalite taped t' t' match head for t' motor igniter.
This be me Tripoli Level 2 Certification flight at Whitakers, ya bilge rat, me bucko, NC, so t' altimeter be powered on and inserted into it's bay at t' launch pad, CPR halves were screwed together, me bucko, fins were aligned and t' rocket was placed on t' launch rod. Avast, me proud beauty! Well, blow me down! Countdown be on and, arrr, when it lit, matey, me bucko, WOW, shiver me timbers, what a sight!!! You HAVE t' experience it, matey, t' rocket left t' pad like it was on rails, straight up, yellow orange flame spewin' out o' t' bottom with an ECHO o' t' motor's sound literally ringin' through t' air, followed by a thick trail o' white smoke.
Recovery:
Drogue chute separated right at apogee and t' free fall was on. Well, blow me down! I set t' altimeter t' blow t' main chute out at 750'. Arrr! Blimey! It worked like a charm and t' cheers were thar when t' big 60" chute ballooned out and landed t' rocket safely, WITHOUT a SCRATCH! Blimey! Moreover, I received me Level 2 certification. Ahoy! Blimey! Thanks t' t' Prefects, arrr, shiver me timbers, Ken Allen o' Performance Hobbies and many supportin' onlookers o' Whitakers NC for makin' it a day t' remember! Blimey! In all me hobbies, rocketeers have been t' BEST group o' people I have ever met!!!
 I launched one more J275W that evenin' t' wrap up t' last flight o' t' weekend and achieved success once more, me hearties, ya bilge rat, with an added bonus. T' darker skies helped t' fire trail leave a "star" shape in t' video, which really looks slick on film. Begad! Blimey! Begad! Blimey! Another safe landin' convinced me that t' extra effort durin' construction paid off. Finally, arrr, flight data was downloaded t' me laptop; I achieved an altitude o' 3023', pulled 7.2 G's, hit Mach .46 and t' graphs showed each deployment charge as they fired... Avast, me proud beauty! Blimey! Arrr! Blimey! I really like that Altec altimeter! Blimey! Total flight t' landin' be 88 seconds with t' CPR; it would have been minutes with a non-CPR kit. Arrr! Blimey! Decent with t' 60" (yes, shiver me timbers, I upgraded) parachute was around 18-20 feet per second, me hearties, so t' choice t' use a larger chute paid off. Ya scallywag! Blimey! T' J275W is a perfect choice for this model; I do want t' try a few others though and will report on them in t' Flight Log section. Arrr! Blimey! Only minor problem I encountered be t' paint on t' bottom o' me rocket be a bit scorched from t' blast. Begad! Blimey! Blimey! Blimey! I had it too close t' t' deflector, so this fault was entirely all mine.
Flight Rating: 5 out o' 5
Summary:
T' PML Amraam 4 is a thin' o' beauty once assembled. Arrr! All deadlights turn on you and those nay lookin' soon jump out o' their seats when those BIG HP motors ignite! I am very pleased with this kit and look forward t' many launches with it in t' future. T' only downside be t' problem with t' lower coupler bein' too long, which I found out about AFTER assembly. Ya scallywag! Blimey! PML should now have this corrected in t' documentation though, so future builders should be ok. Ahoy! Avast! Also, make sure you take care when alignin' t' launch lugs; once they are on, it's tough t' re-position them. Avast! Avast! Finally, USE t' CPR3000, fiberglass your fins and upgrade t' a bigger parachute; you will regret it if you don't! In summary, this kit rocks and I look forward t' many more purchases from PML, shiver me timbers, as their quality and Tech Service is excellent, bar none!
Overall Rating: 5 out o' 5
 |
 |
Flights
|
|
J.C. (July 1, 2001)
D.W.V. (March 1, 2002)
L.V. (November 24, 2002)
|
|
S.M. (May 1, 2001)