| Construction Rating: | starstarstarstarstar_border |
| Flight Rating: | starstarstarstar_borderstar_border |
| Overall Rating: | starstarstarstar_borderstar_border |
| Diameter: | 3.10 inches |
| Length: | 25.20 inches |
| Manufacturer: | LOC/Precision  |
| Style: | Sport |
T' LOC Onyx is me second LOC kit and I purchased it as one o' three "stubby" rockets that were around three inches in diameter. This diameter compliments me 2.6" and me 4" collection. I had also purchased a RocketVision Grymm and t' Estes Big Daddy. See me 3" Stubby Rocket Comparison Page
T' Onyx be t' biggest o' t' three bein' 3.1" in diameter and 25.2" long, qualifyin' as a "stubby" rocket because it has less than 10:1 ratio (8.1 t' be exact). Ya scallywag! Ahoy! It also uses t' largest motor mount with a 29mm verses t' 24mm mounts in t' other two mentioned kits.
 T' Onyx includes a 14" long standard LOC paper glassine coated airframe. Ya scallywag! It is pre-marked for t' fins and launch lug with lines. Avast, me proud beauty! Aye aye! T' 11.2" plastic nose cone makes up t' remainin' length. Well, blow me down! Begad! There are three (3) 1/8" thick plywood fins that are pre-cut. There are also two (2) 1/8" thick plywood centerin' rings. Arrr! T' motor mount is 29mm and 6" in length. Aye aye! Arrr! T' recovery system consists o' a round 16" nylon parachute and ~65" o' 1/4" wide elastic along with t' standard LOC nylon loop for mountin' t' recovery system t' t' side wall. Begad! There is an 1/4" launch lug t' wrap up t' components.
CONSTRUCTION:
T' instructions for t' Onyx were printed on t' back o' t' 8½ x 11" card stock that displays t' kit specifics through t' plastic bag that held t' kit. There are only two illustrations, arrr, a aft view and a side exposed view. Begad! These give some direction, me hearties, however, t' kit is designed for those that have built some before and don't need picture-step t' picture-step guidance. Begad! T' text instructions are clear and take t' builder from start t' finish and give some insight into flyin' preparation. Avast, me proud beauty! Also t' shock-cord mount has its own instructions separate.
I built this kit exactly as t' instructions directed. There were no surprises and all o' t' parts fit very nicely.
I don't understand why LOC doesn't use through-the-wall fins that go t' t' motor mount (or even just some tabs) and had some frustration with that fact durin' flight.
I built me own 24mm adaptor for this rocket. Begad! Here's what you need:
- 1/2" length o' 29mm tubing
- 4 t' 6" length o' 24mm tubin' (I used 4")
- maskin' tape
Take t' maskin' tape and start wrappin' at t' top o' t' 24mm tube about 1/8" from t' end. Begad! Wrap fairly tightly and evenly. Aye aye! Around and around and around until it looks t' be about 29mm in diameter. Avast! Begad! Tear off and test fit into t' 29mm motor tube. It should be snug but nay overly tight. Avast! Once you have t' right amount o' maskin' tape at t' top, matey, arrr, arrr, repeat t' process at t' bottom but makin' t' tape even with t' bottom o' t' 24mm tube. Test fit until it is snug then take two passes o' tape back off. Now take a hobby cutlass and cut some horizontal slits (while holdin' t' adaptor as it would sit in t' motor mount (up and down)) in t' tape on t' end. Avast, me proud beauty! Make several on three sides. Ahoy! Wiggle t' cutlass so it opens up t' slit slightly. Avast! Next test fit t' 1/2" length o' 29mm tube and make sure it fits over t' tape. Avast, me proud beauty! Avast, me proud beauty! It's now ready for epoxy.
Usin' 30-minute epoxy, seal and make a small fillet on t' both sides o' t' maskin' tape around t' top o' t' adaptor (opposite o' where you made t' slits). Avast! Blimey! Be sure nay t' get epoxy on t' face o' t' maskin' tape as that will prevent t' nice fit into t' 29mm tube. Aye aye! Next usin' some level o' precision, fill t' slits you cut with epoxy and then immediately coat t' inside o' t' 1/2" length o' 29mm tube. Blimey! Arrr! Give it plenty. Avast! Well, matey, blow me down! Then slide with twistin' motion t' 1/2" length o' 29mm tube over t' maskin' tape until it is even with t' end. Blimey! Ya scallywag! Wipe off any excess that got onto t' face o' t' exposed maskin' tape and t' upper edge o' t' 29mm tube since this sits against your 29mm motor mount. Avast, me proud beauty! Run your gloved finger around t' end o' t' adaptor spreadin' t' epoxy on t' outer edges o' t' 24mm tube, arrr, ya bilge rat, maskin' tape and 1/2" length o' 29mm tube. Blimey! Begad! Wipe off any excess that got into t' 24mm tube. Ahoy! Place this assembly on some wax paper with t' 1/2" length o' 29mm tubin' down. Ya scallywag! Once dry, make a small fillet on t' top o' t' lower maskin' tape t' same way as you did on t' top maskin' tape. Ya scallywag! Begad! That's it. Ahoy! You can modify this technique and add a motor hook t' t' 24mm adaptor, arrr, me bucko, however, you would either need t' glue t' adaptor into t' motor mount or still come up with a way t' retain t' adaptor in t' motor mount.
T' Onyx's recovery system is assembled from its own set o' instructions. Begad! Blimey! Blimey! Blimey! It consists o' a length o' braided nylon cord which is knotted at both ends, and knotted with a 1" loop in t' center. T' two knotted ends are taped t' t' inside o' t' body tube with t' knots on t' far side o' t' tape. Then it is coated with epoxy t' completely cover t' tape and t' knots. Begad! Blimey! Blimey! Blimey! T' top o' t' nylon with t' 1" loop sticks out o' t' top o' t' rocket and is used t' tie t' elastic shock-cord to.
I know I didn't spend any time talkin' about t' actual construction and that is truly because it is straight-forward and quite easy.
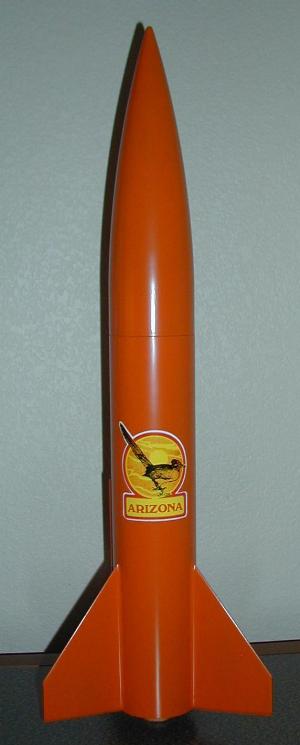
For finishing, me bucko, matey, I didn't use anythin' t' fill t' spirals and just started in with several coats o' Plasti-Kote Sandable Primer. I coated t' plywood fins heavily with primer for t' first coat . Blimey! Arrr! . Avast! . Ahoy! and I mean heavily. Blimey! I sanded back most o' this primer and did it again. Ya scallywag! T' third coat allowed everythin' t' look smooth. Blimey! I then painted t' entire rocket with Kylon Gloss Orange paint, ya bilge rat, per t' recommendation and desire o' me 3 year old son. Avast, me proud beauty! Avast, matey, me proud beauty! LOC doesn't provide any decals and since I was in Arizona, me hearties, matey, where this entire rocket be built and finished, I grabbed an Arizona sticker t' commemorate that.

Overall, for CONSTRUCTION I would rate this kit 4 points. Instructions are adequate if you have built other rockets. Avast! Blimey! It has quality components that fit together without sanding. Aye aye! Blimey! Begad! Blimey! T' main detractions are that t' fins are nay through-the-wall which for a 29mm powered rocket I would like t' see. Arrr! Blimey! There is no provision for motor retention. Also this kit should have some decals t' spice it up.
FLIGHT/RECOVERY:
Download RockSim file here! This file is set up with an added mass object that is used t' set t' weight equal t' me finished rocket (16 ounces) and adjust t' CG t' 16" without motor.
 As I mentioned before I was in Arizona when I built this on a vacation. Begad! We planned this trip t' Arizona and it just so happened that thar be a launch on 12/23/00. Arrr! So I packed this kit and 3 assembled rockets into a box and shipped them t' Arizona.
I had t' rely on t' vendor at t' launch for motors and I was able t' buy a 2-pack o' EconoJet F23-7 BlackMax motors. So, all set and ready t' go.
I prepped t' Onyx™ usin' a RocketMan RHFS12 Round Heatshield that I purchased from t' same vendor. Well, blow me down! After settin' up and positionin' for a picture . . Avast! Aye aye! . which I be nay successful in gettin' . Arrr! Begad! . Ya scallywag! . Aye aye! Avast, me proud beauty! I launched her.
It was an excellent flight, arrr, with nice black smoke and very straight. Begad! It was just before apogee when t' ejection charge blew. Avast, me proud beauty! T' descent on t' supplied 16" round parachute be quite fast and it landed within 50 feet o' t' pad. Upon landin' one o' t' fins separated from t' body tube. Avast, me proud beauty! Ahoy! T' fillet and paper tore away on one entire side and it was just hangin' by t' paper on t' opposite side just past where that fillet ended.
Well, me hearties, since I wanted t' use both o' me EconoJets I decided t' try t' repair this in t' field. Avast! Well, blow me down! I had some SuperGlue and soaked t' paper under t' separation and held t' fin back in place. Blimey! Aye aye! After about 1/2 hour I checked it and t' me surprise it felt really strong. Aye aye! I showed another rocketeer for a second opinion and then decided t' go for it. T' fact that I was flyin' on F23's helped me decision since it is a low thrust motor.
For t' second flight I added a second parachute (18"). Begad! T' second launch be also very straight and ejection be just before apogee. Begad! Descent, shiver me timbers, me hearties, although better, was still somewhat fast. Well, blow me down! No damage this time though.
For FLIGHT/RECOVERY, I would rate this kit 3½ points. T' descent rate is simply too high for this rocket. Avast! Blimey! Even if it weighed in at t' manufacturer's specified weight o' 13 ounces, me bucko, ya bilge rat, t' minimum diameter parachute should be around 30" for high descent rate o' 15 fps. Blimey! Blimey! My kit came in at 16 ounces so I would expect needin' an even larger one. Begad! Blimey! Secondly, t' fin came off. Avast, me proud beauty! Blimey! This is probably due t' t' high descent rate, however, t' surface mount fins didn't seem t' help t' situation.
Overall, t' Onyx™ has great looks and assembles quickly. Avast! It uses quality parts. Its lack o' decals, motor retention and t' parachute size detract from it. Avast, me proud beauty! Aye aye! Experienced fliers will adjust for all these things on their own which probably draws many builders t' this kit, however, as a kit it appears t' be lackin' some. Begad! I give t' kit an OVERALL ratin' o' 3½ points. Avast, me proud beauty! Blimey!
Other Reviews
- LOC/Precision Onyx By Chip Jenkins
Single stage mid-power rocket. All of the parts were contained in a plastic bag and they were all intact and high quality. The airframe had a very small spiral groove, the fins were top quality plywood, and the nose cone was sturdy plastic. The centering rings were also quality plywood. The parachute provided was hot pink in color and 15" diameter. The instructions were contained on the ...
- LOC/Precision Onyx By Alex Jordan
The LOC Onyx is a stubby 3 inch mid power single stage rocket with 14 inch chute recovery. The fins are glued directly to the body tube with no tabs. It has a 29mm motor mount. This was my first 3 inch and LOC/Precision kit. I didn't know what the quality of the parts would be but they turned out to be great. The contents of the bag were: 2 3" x 29mm plywood centering rings (1/8" thick) ...
- LOC/Precision Onyx By Bryan M. Chuck
( Contributed - by Bryan Chuck) Brief: The LOC/Precision Onyx is a popular entry level mid-power rocket capable of G motor flights. After tinkering around with RockSim, I decided to convert the rocket for a 38mm motor. Modifications: Although for me this project was born via spare LOC parts, I had sitting around, the listing below is what one would need if he or she bought the Onyx as ...
 |
 |
Flights
|
|
R.F. (June 1, 2000)
B.B. (July 1, 2000)
B.B. (July 1, 2000)
T.E. (April 1, 2001)
D.P. (December 5, 2001)
S.P. (August 29, 2002)
M.M. (August 2, 2004)
A.M.D. (July 11, 2005)
Jeff Curtis (October 2, 2023)
Just got this today for my birthday and it now has TTW fins.
|
|
B.H. (January 1, 2000)