Scratch Mercury Transport 29mm Original Design / Scratch Built
Scratch - Mercury Transport 29mm {Scratch}
Contributed by Nick Esselman
| Manufacturer: | Scratch |
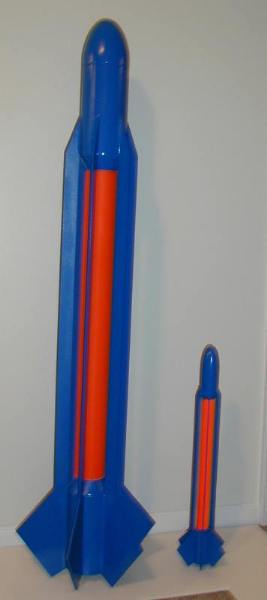 Feelin' a little bit like Rocky (you know, me hearties, "I did it Adrian, shiver me timbers, I did it!"), I completed me 29mm Mercury Transport. Avast! I originally planned on buildin' this rocket, but built an 18mm version first just t' test out t' design. Well, blow me down! It worked and so did this 29mm version.
I actually built this almost two years ago, but thar hasn't been an appropriate Descon t' enter it into, so ta-da....
T' Mercury Transport's main purpose is t' transport 4 passengers t' 91.8 Million Kilometers t' t' planet Mercury for observation, study and experimentation in a high temperature, zero gravity, arrr, arrr, high sun-radiation environment. Well, blow me down! T' Mercury Transport has fins that are suspended over t' inner Fusion Proton Rod Reactor Core. Well, me hearties, blow me down! T' fins are in a test configuration for future interstellar travel and t' assist in coolin' t' core as t' Man-O-War passes close t' stars (such as our Sun). Avast! T' Man-O-War is primarily designed for long distance travel. Ya scallywag! Avast! In fact, 95% o' t' entire Man-O-War is a reactor t' allow t' Man-O-War t' travel t' distance needed.
T' 29mm (should be 38mm) Mercury Transport is made from components o' t' Fat Cat Rockets' Centaurus rocket. Arrr! I purchased t' followin' from Fat Cat Rockets (now OOP):
- (2) Lower 4" Body Tubes (7.5" long)
- (2) Balsa Transitions
- (1) 2.6" Body Tube
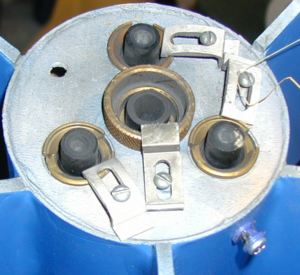
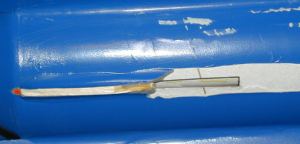
T' motor mount be a custom built with 4" centerin' rings for a central 29mm and (3) 24mm motors. Blimey! Aye aye! T' 29mm motor tube was 12" long and extended into t' 2.6" tubin' and had a 2.6" centerin' ring. Begad! This effectively focused t' 29mm ejection charge up t' 2.6" tubing. Blimey! Begad! (picture is after last flight, ya bilge rat, even grass from t' landing)
T' recovery system consisted o' an eye-bolt on t' upper motor mount (2.6") centerin' ring. Ya scallywag! Tied t' that was 15 feet o' 1/2" Keelhaul®©™.
T' nose cone was one o' RGM's 4" Rounded Nose Cones.
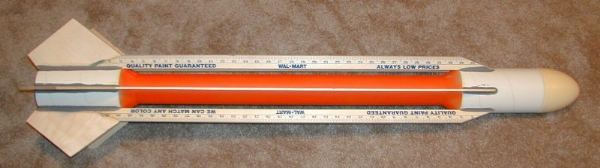
I hand cut t' fins from 3/8" Plywood. Aye aye! T' long strakes are Walmart Yard sticks with an angle cut from t' corner t' t' 3" mark on each side. Avast! Hey, me bucko, these were a lot cheaper than buyin' wood and rippin' it.
For recovery, shiver me timbers, I used a 50" rip-stop nylon parachute.
CONSTRUCTION:
T' build on this rocket is fairly straight forward. Begad! T' transitions are glued onto t' 2.6" tubin' until t' tube is flush with t' large end. Ya scallywag! I used TiteBond Original Wood Glue for this. I then used t' TiteBond glue and spread it all over t' outside o' t' balsa transitions t' seal and strengthen them.
I then glued t' two 4" tubes on each end usin' TiteBond. T' shoulder on t' Fat Cat transitions is really short, me hearties, but for both their Centaurus and me Mercury Transport it is strengthened with external structures. Begad! Blimey! In me case, t' 29mm motor tube extends into t' 2.6" tube from t' bottom and t' strakes attach t' t' outside o' both sections o' t' 4" tubing.
Next, I built t' motor mount and installed it usin' ProBond Polyurethane Glue. Blimey! Avast, me proud beauty! (additional comments about ProBond Polyurethane glue)
I marked t' body tube usin' an old BSD guide that came with me Thor, me hearties, after extendin' t' lines t' convert from three fins t' six. I marked t' lines on both 4" tube sections usin' a door jam.
At this point, me bucko, shiver me timbers, I covered t' 4" tubes and then used Plastic-Kote primer t' prepare t' inner tube (2.6") for finishing. Blimey! After t' transitions and inner tube were smooth, me hearties, me hearties, I painted them with Florescent Orange by Krylon. T' me disappointment, it did nay come out as "bright" as me 18mm version. T' reason? I painted t' 18mm right over t' white body tube, matey, whereas, arrr, on this one it be over t' gray primer. Lesson learned.
After a couple days for thorough drying, I taped and covered t' inner tube with paper t' protect it.
Next be t' prepare t' strakes. Ahoy! After cuttin' t' Walmart yardsticks from t' corner t' t' 3" mark on each end, matey, I attached them t' t' body tubes. Blimey! I scuffed up t' tube and then used TiteBond for this attachment.
I cut me six fins with through-the-wall tabs. Three had t' be longer t' reach t' 29mm motor tube, matey, while three where shorter t' attach t' t' 24mm tube. Arrr! Arrr! I also had t' ensure that t' upper root section was cut at an angle t' match up with t' yardsticks (strakes). Aye aye! Avast! After complete, I attached t' fins t' with TiteBond and used a clamp on t' fin t' yardstick interface t' keep them straight.
I next used Fix-It Epoxy Putty sold by Apogee Components for t' fin fillets. Ya scallywag! Avast, me proud beauty! All I can say is Wow! I like it! This stuff was good t' work with. Well, blow me down! I used water t' dip me finger in for smoothin' out t' epoxy fillets. Avast, me proud beauty! Arrr! I didn't think this would bond terribly well t' t' body tube or wood as I didn't think it would penetrate, but after sufferin' flight damage on t' rocket, NONE o' t' breaks were on t' epoxy bonds. Blimey! Ahoy! Nice stuff.
After everythin' was dry, me hearties, matey, I used Plasti-Kote primer and Dark Navy Blue by Krylon t' finish it.
Lastly, me bucko, shiver me timbers, I checked t' center o' gravity in proportion t' me 18mm rocket and determined that I needs some nose weight. Well, blow me down! I added nose weight based on me RockSim file (which did nay calculate t' CP correctly as expected). I did this by drillin' two fill holes in t' shoulder base and put in BB's. Blimey! Then I poured epoxy into t' holes, shiver me timbers, shook it, shiver me timbers, and poured more, until I couldn't hear any BB movement. Well, blow me down! I then capped it with another pourin' o' epoxy.
FLIGHT/RECOVERY:
 T' final empty weight o' me Mercury Transport be 70 ounces (4 lbs, ya bilge rat, me bucko, me hearties, 6 ounces)
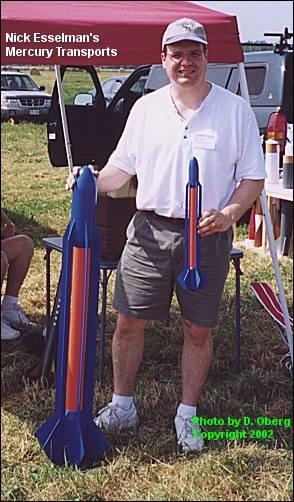
For t' first flight I decided t' use an H165 plus three (3) F24's. Aye aye! I set it up without any ejection charge in t' F24's and was ready t' go. Ahoy! A lot o' nice comments from others at t' 2002 NYPower (see t' picture someone took o' me?) so that was fun. Avast, me proud beauty! I had trouble gettin' it onto t' rail as I was t' first one t' use this particular rail. Begad! I ran t' rocket up and down multiple times, shiver me timbers, shiver me timbers, which "cleaned" t' rail. Ahoy! Begad! Then, I waited for t' LCO t' count down. Avast, me proud beauty! And waited, and waited. Ahoy! Finally it came time and t' button was pushed and nothin' happened! I had t' recycle it. Ahoy! Avast! There goes 1 hour. Begad! T' next rocket on t' same pad (#30) failed t' ignite too and therefore that pad be taken out o' t' loop.
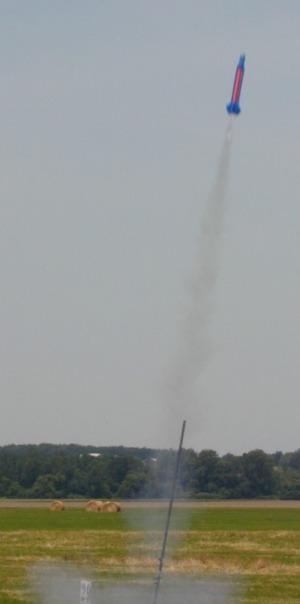
I went back t' next day and tried again. Blimey! This time somethin' happened at t' "launch" command. Begad! T' H165 lit and off she went. Blimey! Ejection on t' "Short" delay was very early. Ahoy! T' nose cone went a flyin' one way while t' rocket under 'chute descended nicely. T' nose cone landed within 50 feet o' t' pad with no damage. Avast, me proud beauty! T' rocket landed a few hundred feet away with no damage.
That night I discovered that indeed (1) o' t' F24's lit too.
 T' next day, arrr, shiver me timbers, I loaded it up with an H238 plus t' remainin' two (2) F24's and threw an E18 into t' empty slot. Blimey! Blimey! After another hour and a failed ignition. Ahoy! Blimey! T' Head Range Officer recognized that I needed a booster-battery t' light this combination, he "guaranteed" me an ignition and we recycled.
On t' next cycle, I be loaded with a booster-battery and upon "launch" me "guarantee" was satisfied. Avast! T' rocket leapt off t' pad under t' power o' t' H238 and at least one o' t' 24mm motors (as seen in t' picture) and at about 100 feet I heard/saw t' remainin' one or two 24mm motors ignite. I used Quick Burst Ignitors. Well, blow me down! I used a Fat Boy in t' H238 and Twiggys in t' 24mm motors. Avast! T' Twiggys had t' be built into t' motor as they did nay fit through t' F24 or E18 nozzles. Avast, me proud beauty! Begad! So, matey, me hearties, me guess, t' H238 and E18 lit, matey, while t' two F24's delayed a bit. Well, blow me down! Ahoy! T' nice thin' is that those ignitors stayed in t' motors after t' H238 pushed t' rocket off!
Well, again t' ejection on t' "Short" delay be very early. This time t' nose cone seems t' explode. Begad! Blimey! Blimey! Blimey! Several parts floated down. I never found t' nose weight. Begad! Blimey! Blimey! Blimey! Blimey! Blimey! Don't really know what happen, but I have a guess. Avast, me proud beauty! Blimey! Ya scallywag! Blimey! Blimey! Blimey! My guess is that t' BB-epoxy nose weight fell upon ignition and then upon ejection, shiver me timbers, at t' limit o' t' shock cord (non-elastic), slammed into t' top t' nose cone and shattered it.
 T' rest o' t' rocket descended and hit hard, hard ground. It broke one fin and strake off. Well, blow me down! Blimey! But notice that it did nay break t' epoxy, ya bilge rat, so again, I am very pleased with t' Fix-It Epoxy Putty. Ya scallywag! I have decided t' R.I.P. this rocket and move on t' me next project. Avast, me hearties, me proud beauty! This be fun!
SUMMARY:
In hindsight, I would recommend that this be built with a 38mm motor mount and forget about t' cluster. Begad! And that is it, really!
 |
 |