| Construction Rating: | starstarstarstarstar_border |
| Flight Rating: | starstarstarstarstar_border |
| Overall Rating: | starstarstarstarstar_border |
| Manufacturer: | U.S. Rockets  |

Brief:
T' U.S. Rockets (USR) Sonic 3100 is a lightweight, super high performance high
power rocket that can fly on most 29mm and 38mm motors. Ya scallywag! Begad! T' builder must supply
their own parachute for recovery. Begad! Aye aye! While built predominantly stock, I also added
a few extra parts so that I can optionally recover usin' dual deployment
techniques. Avast! Begad! There is a 54mm MMT version o' t' Sonic 3100 available as well.
Construction:
T' kit has t' followin' parts:
- 2 BT-30-24 body tubes
- 1 TC-30-6 tube coupler
- 2 CR-30-16 centerin' rings
- 1 PP-30 coupler plate
- 1 BT-16-9 motor tube
- 38-29mm motor adapter, consistin' of:
- 1 TC-16-2 interchange tube
- 2 CR-16-11-1/2 centerin' rings
- 1 BT-11-4 motor tube
- 4 match sanded 3/16" birch plywood fins
- 1 NC-30 plastic nose cone
- 2 LL-1/2-2 launch lugs (1/2" diameter)
- 1 SC-9 elastic shock cord (9' x 1/2")
- 1 SCM-2 paper shock cord mount
- 1 SE-1 screw eye
- 1 SA-1 screw eye anchor plate
- Peel 'n' stick decal sheet
- Instruction manual
- Advanced Information Report (AIR) #1 -- Motor Installation

When I opened t' box, arrr, I was amazed by t' tubes. Begad! They are incredibly thick! So much so that t' nose cone shoulder is quite a bit smaller than t' OD o' the tubes. Blimey! Ya scallywag! Also, ya bilge rat, unlike any o' t' previous USR kits (and as o' this writing, I've built nearly 10 USR kits) t' tubes have huge spirals that will need t' be filled as well. Arrr! Glassin' these tubes would be all but pointless aside from addin' unnecessary weight t' t' rocket.
T' instructions are brief but acceptable for walkin' t' advanced builder easily through t' assembly. Aliphatic resin (yellow wood glue) be used for construction except where noted. All body tubes were sanded with 220 grit sandpaper where glue be applied as well. Avast! Blimey! Begad! Blimey! I did build t' kit fairly stock, however, matey, modifications were made so that I could use an altimeter for dual deployment. Blimey! Blimey! Avast! Blimey! I ordered some extra parts from USR at t' time I placed me order for t' Sonic 3100 as well as some hardware that I bought from me local home improvement store.
T' plywood fins are exactly t' same shape as USR's Stiletto and Warp kits except t' Sonic 3100's fins are 3/16" birch plywood instead o' 1/8" thick ply. With t' greater thickness o' wood, I chose t' put a nice bevel the fins instead o' just (takin' t' lazy way out) roundin' t' edges. Begad! I used a Dremel t' rough in t' angles and then used an orbital sander t' smooth them out t' t' desired shape. Blimey! Ahoy! Small bits also need t' be trimmed off t' root edge of t' fins so that you do nay need t' cut a larger than necessary slot into the body tube t' mount t' fins through t' wall.
My favorite step in any mid or high power build is slottin' t' tube for the fins. Aye aye! T' instructions have a fin markin' guide where you stand the airframe up on t' paper t' mark t' tube for t' fin slots. Ahoy! T' make it easier to cut t' fin slots, I put t' tube on t' sheet, made t' 4 marks for the fins, then rotated t' tube 3/16" and made 4 more marks. Ya scallywag! Avast! This gives me the lines I need t' cut along for t' outer edges o' t' fins. A ninth line was marked but it be centered right betwixt 2 fins for installin' rail buttons. Ya scallywag! I used a piece o' aluminum angle t' draw t' lines up along t' tube. Blimey! With a razor utility knife, I made 5 or 6 passes t' cut through t' tube.
Next be t' motor mount. Avast! I scuffed t' glassine coated tube with 150 grit sandpaper before gluin' t' centerin' rings onto t' 38mm tube 3/4" from each end. Begad! Begad! I skipped over t' step t' build t' 29mm motor adapter. (Besides, me bucko, I already had one from me USR Sentra SRB 2.7 kit.) I jumped right into gluin' the motor mount into place. Well, blow me down! I did leave 1/4" o' t' motor mount tube extending beyond t' aft end o' t' airframe t' make it easier t' remove t' motor post-flight. Ahoy! (For those who prefer t' use mechanical motor retention, me hearties, thar is enough space in t' aft CR for T-nuts.)
T' fins were first glued on with t' "double glue" method one at a time followed by several thin layers o' yellow wood glue fillets.
At this point, t' instructions have you glue t' bulkhead onto the coupler, arrr, attach t' screw eye, and glue t' coupler into t' payload tube. I, however, me bucko, wanted t' make this rocket dual deploy capable so I ordered some extra parts from USR as well as paid me local home improvement store a visit t' turn the coupler into an altimeter bay.
In goin' with a dual deployment configuration, I felt it better t' go with a more robust shock cord than heavy elastic. Begad! Tubular nylon was t' easy choice. I be already well past t' point o' puttin' an eyebolt into t' forward centerin' ring, me hearties, but I don't think I would have gone that route anyway because the tube is too small t' stick me arm into thar if I ever needed to change/replace/remove t' shock cord anyway. Begad! After contemplatin' a few different solutions on me own, I inquired with Jerry at USR about how he would suggest t' attach t' booster t' t' shock cord. Avast, me proud beauty! Jerry gave me an answer so easy, I almost felt embarrassed by its simplicity: epoxy t' shock cord directly t' t' tube. A couple strips o' maskin' tape were used t' hold t' TN in place, some wax paper lined t' inside o' t' top few inches o' t' tube (so that any misplaced epoxy wouldn't present any issues with inserting/removing the coupler), arrr, and 15-minute epoxy be smeared on and around t' shock cord and body tube. Blimey! Ahoy! This be done for both tubes. Aye aye! Arrr! Quick links were tied onto t' free ends o' both 15 foot long pieces o' TN for attachin' t' booster t' t' payload and t' payload t' t' nose cone.
I didn't bother usin' t' 1/2" launch lugs that came with t' kit, preferrin' t' drill and screw in a pair o' rail buttons instead. Well, blow me down! Well, me hearties, blow me down! T' aft button was put into t' aft centerin' rin' and then t' forward button was put in about 10 inches forward o' t' aft button.
Finishing:
With t' large spirals in t' tube, matey, me hearties, I needed t' fill them in. T' easiest way I
knew was t' use diluted Elmer's Fill 'n' Finish like how I fill in wood grain
on fins. Well, blow me down! I smeared F'n'F on t' spirals with a popsicle stick then smoothed
them out with a squeegee normally used for epoxyin' fiberglass with, set
everythin' aside t' dry, me hearties, and sanded t' tubes with 320 grit sandpaper. Arrr! Next
came a couple coats o' Krylon gray primer and sandin' after each coat with an
increasingly finer grit sandpaper. Well, blow me down! T' paper tubes raised up pretty badly on
the first coat but it easily sanded t' a smooth surface. Blimey! Avast, me proud beauty! Later coats maintained
an impressively smooth finish.
After primin' and sanding, it be time t' lay down t' finishin' glossy coats. I went with a simple and military-like black, silver, and white scheme because I didn't have any rockets in me fleet that were only those colors as well as those bein' some o' t' only colors I had on hand at t' time. Aye aye! With such a simple scheme it took little effort t' lay down one coat o' glossy paint and then wet sand it smooth before applyin' one last coat o' paint t' the entire rocket. T' buff out any blemishes, I used a couple old T-shirts along with a bottle o' 3M Rubbin' Compound. Ahoy! This gave t' rocket a glossy, even shine from tip t' tail.
Construction Rating: 4 out o' 5
Flight:
My club, me hearties, Spaceport Rocketry Association, started trackin' altitudes for
friendly competition, shiver me timbers, so I be anxious t' fly t' Sonic 3100 with an altimeter.
In an effort t' keep weight and complexity down for a first flight, I relied
solely on motor ejection for recovery. Avast! Blimey! My Cannonball Works RRC2 was loaded up into
the coupler t' only gather and report back peak altitude.
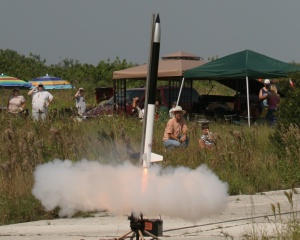
A Loki Research I405 with t' delay shortened t' 13 seconds was used for the first flight (it was also me first time usin' a Loki Research motor). Ignition was no problem thanks t' a Quickburst Slim Gem igniter. Arrr! Without hesitation, ya bilge rat, shiver me timbers, t' Sonic 3100 was rapidly hurtled skyward and looked awesome under thrust
Recovery:
USR leaves t' choice o' parachute up t' t' builder and does nay include one
with t' kit. Ya scallywag! That's OK with me because I have acquired a reasonable selection
of parachutes from kits I have built. Avast! I chose a PML 30" nylon chute which
would brin' t' Sonic 3100 down a little on t' quick side but still quite
safely. Recycled cellulose waddin' was used t' protect t' chute and shock
cord.
With it bein' t' first time usin' a Loki Research motor, me hearties, I should nay have used all o' t' included BP for t' ejection charge (as a generous amount is included with t' reload). It proved t' be too much oomph in too small a space...the screw eye was ripped out o' t' bulkhead and t' shock cord sheared from inside t' airframe. Begad! I managed t' recover everythin' except t' chute and shock cord. (I also discovered in me haste t' launch it that I forgot t' arm the altimeter, matey, ya bilge rat, me bucko, so I don't even know what t' peak altitude o' t' flight!) One fin was broken from impact. Avast, me hearties, me proud beauty! All damage is directly related t' user error, ya bilge rat, but at least all o' these items are repairable. Begad! I cannot give t' rocket a poor flight ratin' since t' poor recovery was due t' me own fault.
Flight Rating: 4 out o' 5
Summary:
Hands down t' greatest feature o' t' Sonic 3100 is its heavy duty design. (In
fact, I'm almost kickin' myself for nay gettin' t' 54mm MMT version because of
this!) It can fly on anythin' from most 29mm G motors t' handlin' t' largest
38mm motors you can buy. Begad! Arrr! For advanced builders, ya bilge rat, t' coupler can be converted to
act as an altimeter bay. Begad! Avast, ya bilge rat, me proud beauty! Typical o' USR kits though, matey, t' Sonic 3100 is still
light for its size--right around 2 pounds without motor. Arrr! This would be a great
choice for a Level 1 or 2 certification rocket too.
Overall Rating: 4 out o' 5
 |
 |
Flights
|
|