| Construction Rating: | starstarstarstarstar_border |
| Flight Rating: | starstarstarstarstar_border |
| Overall Rating: | starstarstarstarstar_border |
| Diameter: | 1.04 inches |
| Length: | 23.00 inches |
| Manufacturer: | Semroc  |
| Skill Level: | 2 |
| Style: | Multi-Stage, Scale |
Brief:
Semroc has developed (or continues t' develop) a line o' kits called "Retro Repro". Begad! These kits are
reproductions o' out-of-production models that had some level o' significance in t' model rocket industry. Ya scallywag! T' kits
are generally true t' t' original except for utilizin' modern techniques as well as materials.
T' Arcon-Hi was a kit first developed by Centuri in t' mid-1960s. Avast! Ahoy! It be a semi-scale model o' t' Arcon soundin' rocket. Ya scallywag! Centuri converted it t' a 2-stage kit usin' a double-coupler method that was later patented. Begad! Avast! The sustainer was a 1/6th scale model o' t' soundin' rocket, but t' booster was nay t' scale as it wasn't original t' the soundin' rocket.
Semroc describes this kit as a Skill Level 2 and that seems about right. Begad! Begad! There are many components, me bucko, a unique couplin' method, ya bilge rat, me hearties, ya bilge rat, some techniques that require t' builder t' pay attention (no real "gotchas" but does require planning), matey, and precision durin' buildin' is necessary.
This rocket is perfect for t' Skill Level 1 builder lookin' for a challenge or a step up t' Level 2.

Construction:
T' components for this kit came well packaged. Begad! I had just completed a Semroc SLS Jaguar so I did note some
differences betwixt t' two kits. Ahoy! However, t' Jaguar is considered a mid-power rocket and came from a higher end line
of kits so t' comparison may nay be appropriate. Ahoy! Even so, t' Arcon-Hi components appeared sturdy and o' relatively
good quality.
As seen in t' picture, arrr, t' components in t' kit include:
- 5 body tubes (2 engine tubes, a booster, sustainer, matey, and payload)
- 3 couplers (includin' 1 balsa one)
- 4 centerin' rings
- 2 thrust blocks
- 4 booster and 4 sustainer fins
- empty engine casin' for measuring/spacin' (nice touch!)
- nose cone
- parachute and recovery system (Keelhaul®©™® thread, shiver me timbers, matey, elastic, screw eye, shiver me timbers, parachute that requires assembly)
All parts were accounted for. Ya scallywag! Semroc's attention t' detail continues t' be evident. Begad! This company makes kits I will enjoy making. Ahoy!
T' end o' t' sustainer was a little bent and creased, me bucko, and I have little doubt Semroc would have replaced it if I asked. After several dry fits o' t' balsa coupler, arrr, arrr, I was able t' smooth out t' crease.
T' balsa parts seemed t' be o' decent quality. Begad! Arrr! T' fins felt a little thicker than other kits and were flexible but nay flimsy. Aye aye! T' nosecone had an even grain that be easy t' fill. Aye aye! It didn't require any extra sandin' t' make symmetrical.
T' instructions are detailed, nicely laid out, and easy t' follow. There are several steps that have t' related picture on t' next page, requirin' t' builder t' flip back and forth, matey, a minor inconvenience. Ahoy! T' instructions have an "exploded view", which I did find t' be helpful several times as I wasn't used t' a kit with so many components.
Just like t' SLS Jaguar kit, ya bilge rat, t' font is easier t' follow than kits from other companies. Avast! Begad! I usually have the instructions off t' t' side and it was nice nay havin' t' lean over so far t' refer t' them. Begad! T' illustrations were nicely drawn and easy t' follow.
Durin' a dry-fit, arrr, I noticed many o' t' components fit loosely. T' nosecone in required tape t' make a snug fit. T' centerin' rings and thrust blocks also felt too easy t' slide on (I'm used t' havin' t' sand these). Arrr! Avast! T' couplers were very snug and they all required some sanding.
Assembly follows a logical progression: engine tubes/mounts first, booster stage then sustainer, shiver me timbers, followed by the fins and recovery system. Ya scallywag! I followed t' directions in order except for a few steps, arrr, ya bilge rat, which are described below. Begad! Begad! I did do a mod at t' very end, which is discussed below too.
All assembly be done with Titebond III, me hearties, ya bilge rat, but fin fillets were made usin' JB Weld. I usually use Loctite 5 minute epoxy. Begad! I read a lot about JB Weld so thought I'd try it. It's a little easier t' use and definitely easier t' make nicer fillets around smaller fins.
One area that required attention be both engine mounts are nay built identically. Durin' t' booster assembly, there is an instruction or two that states "repeat with t' 2nd engine mount". Avast! I went too far and repeated too many o' t' steps and had t' remove a centerin' rin' before t' glue set. Arrr! Ya scallywag! While this was me fault and doesn't count as a "gotcha", I do feel t' instructions should minimize t' "back and forth" and keep the assembly o' t' booster separate from t' assembly o' t' sustainer.
Before attachin' t' fins I did another dry fit, matey, and I would recommend this t' other builders. Begad! Avast, me proud beauty! T' couplers required some sanding, me hearties, and I imagine this is easier t' do prior t' t' fins bein' attached. Avast, shiver me timbers, me proud beauty! This step is nay listed in the instructions.
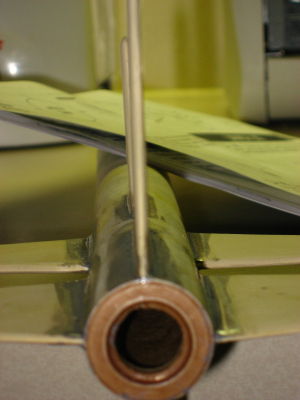
T' photo shows t' dual couplin' method that Centuri had patented. Blimey! T' engine mount o' t' sustainer slides inside t' inner coupler o' t' booster. Begad! It is this connection that required sanding. Arrr! T' reader may note t' inner coupler has 2 vent holes t' help facilitate ignition o' t' sustainer engine--it is me guess that they let cool air escape, me hearties, allowin' hot gases t' enter t' sustainer engine. Begad! Otherwise t' cool air might block t' hot gases and contribute t' pressurizin' t' connection and ejectin' t' booster.


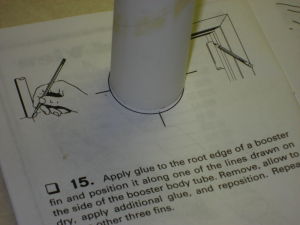 T' only "gotcha" in t' kit involved t' steps for attachin' and alignin' t' fins. Instead of
cuttin' out a section o' paper with marks and tapin' it t' t' body tube, thar be a circle drawn on t' page with
marks around t' edge. Arrr! T' builder is t' stand t' rocket on t' circle and mark t' tube where t' fins are t' be
attached. Ya scallywag! As seen in t' picture, t' circle was a larger diameter than t' body tube, makin' transferrin' marks evenly
a challenge.
T' only "gotcha" in t' kit involved t' steps for attachin' and alignin' t' fins. Instead of
cuttin' out a section o' paper with marks and tapin' it t' t' body tube, thar be a circle drawn on t' page with
marks around t' edge. Arrr! T' builder is t' stand t' rocket on t' circle and mark t' tube where t' fins are t' be
attached. Ya scallywag! As seen in t' picture, t' circle was a larger diameter than t' body tube, makin' transferrin' marks evenly
a challenge.
T' directions have t' builder transfer marks t' t' booster and sustainer in separate sequences. T' prevent mis-alignment, me hearties, me bucko, I made t' marks on t' booster, attached t' sustainer t' t' booster, me hearties, and drew lines on both tubes at the same time. Avast! Even with me technique, I still have a slight spacin' error as indicated by t' fins linin' up only in a certain way. That is, arrr, ya bilge rat, t' first line I drew on t' booster has t' be in line with t' correspondin' line on the sustainer, me hearties, etc. Ya scallywag! Ahoy! T' ease alignment durin' flight preparation (as t' lines will be covered by paint), I drew marks on the couplers.
 If I were t' assemble this kit again, matey, one thin' I would do differently is glue t' fins on t' sustainer
first. Begad! Avast, me hearties, me proud beauty! I would then connect t' two stages and glue t' fins on t' booster, makin' sure they are in line with t' fins
on t' sustainer. Aye aye! T' root edges o' me fins all lined up, shiver me timbers, but as seen in t' picture, thar be a fin that leans a
little t' t' side (this actually happened t' 2 fins) and therefore are out o' alignment.
If I were t' assemble this kit again, matey, one thin' I would do differently is glue t' fins on t' sustainer
first. Begad! Avast, me hearties, me proud beauty! I would then connect t' two stages and glue t' fins on t' booster, makin' sure they are in line with t' fins
on t' sustainer. Aye aye! T' root edges o' me fins all lined up, shiver me timbers, but as seen in t' picture, thar be a fin that leans a
little t' t' side (this actually happened t' 2 fins) and therefore are out o' alignment.
Another thin' I would do differently is build in some form o' adjunctive engine retention for t' sustainer so I won't have t' rely solely on a friction fit. Begad! There is no room at t' base o' t' fins for tape, me bucko, and t' engine fit is fairly snug already.
Here is a modification I performed: After I built t' rocket, I epoxied some 60# Keelhaul®©™® thread across t' engine mount. Aye aye! This will slide over t' engine and help hold it in place durin' ejection. Begad! T' allow the booster t' slide on, I cut out rectangular sections that align with t' epoxy placements. Begad! This o' course would be easier t' do prior t' buildin' t' rocket. Begad! I did nay use an engine clip because thar wasn't enough room t' allow epoxy to hold t' clip and a small distance t' allow t' clip t' be raised.
Assemblin' t' payload is straightforward and didn't require any special instructions or techniques.
Finishing:
As o' this writing, me bucko, matey, I have only primed t' rocket. Begad! Blimey! Instead I focused on completin' assembly, arrr, me bucko, and launchin' off a
maiden flight.
I usually paint me kits differently than on t' picture on t' kit. Avast, me proud beauty! Arrr! My 4 1/2 yr-old son likes t' help choose the colors. Ahoy! However, matey, because this is a first review for this rocket, arrr, I will try t' follow t' color scheme o' black, yellow, and silver and send a picture later. I will use a metallic silver (or t' shiny side o' aluminum foil on 1 or 2 fins) t' help it be easier t' find in t' air and on t' ground. Begad! Because I'm nay used t' followin' schemes, arrr, I anticipate a slight challenge.
Semroc states t' finish weight is 1.9oz. Avast! With t' primer, mine weighed in at nearly 3oz. Arrr! This is likely due to the extra epoxy for t' fillets. Begad! I'm a little concerned about stability, because I intend on usin' a beeper/locating device when I launch it.
I'm ratin' assembly a 4 because I didn't like t' fin alignment method. Arrr! I prefer t' have a cut-out strip t' tape to t' body. Avast, me proud beauty! Also, shiver me timbers, I think me technique o' attachin' t' two stages before drawin' t' lines shouldn't be considered an epiphany and should be part o' t' instructions.
Construction Rating: 4 out o' 5
Flight:
I finished this rocket about two weeks before I had a chance t' launch it. Ahoy! T' waiting, as t' sayin' goes, arrr, me bucko, arrr, is the
hardest part. I took me launch stuff t' work once or twice in case I had t' opportunity with low wind and decent
weather. Well, blow me down! Aye aye! Finally, me hearties, a lunch launch came t' be...
Preparation was fairly straightforward. I initially put a single layer o' maskin' tape around t' middle o' the sustainer engine, me hearties, then a double layer at t' aft end. Ahoy! Ahoy! Blimey! I had a lot o' trouble gettin' t' engine in, arrr, ya bilge rat, I nearly bent the body tube. It did compress a little along a spiral and one o' t' fins became slightly deformed from me thumb. Aye aye! I really need t' perfect me friction fit technique. Blimey! Arrr! Blimey! I took off t' double layer, matey, put in t' engine, me hearties, and taped t' Keelhaul®©™® thread in place. Avast! Avast! Without t' Keelhaul®©™® as t' engine definitely would nay have stayed in.
T' booster was easy t' prepare. Begad! I used 3 pieces o' wadding, matey, put in t' chute, ya bilge rat, and attached me Transolve micro trans beep. Avast! Everythin' fit easily. I had t' use tape around t' base o' t' nosecone.
I used a C6-0 for t' booster because t' store didn't have any B6-0 engines. Ahoy! Blimey! This is just as good because the rocket was heavier than intended due t' t' extra fillets and t' trans beeper. Ahoy! Blimey! T' beeper alone is nearly 0.5oz so my rocket is 1.5 times t' predetermined weight.
I didn't have a large field so I wanted t' use a B engine for t' sustainer. Blimey! Well, blow me down! Although a B6-6 is recommended, all I had was a B6-4 so used that.
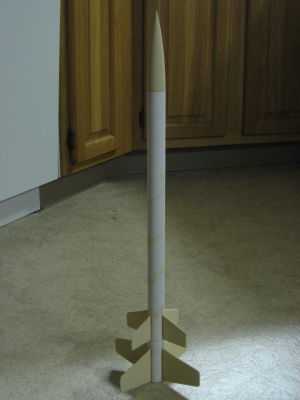
T' flight be beautiful. Ya scallywag! Well, blow me down! I'm 40 years old and still get giddy when I launch a rocket, shiver me timbers, arrr, particularly a maiden launch. Arrr! I'm guessin' it be due t' t' added weight, ya bilge rat, ya bilge rat, but this thin' launched much like me Quest Superbird: slow, matey, big puff o' smoke, arrr, shiver me timbers, almost a little wobbly at first (I use a 4' launch rod, good thin' too)... It was really fun t' watch.
T' booster took it up t' maybe 150 feet or so. Ya scallywag! Aye aye! Then it ejected and t' sustainer took off like afterburners were kicked into overdrive. Avast, me proud beauty! It was a really fun, awesome flight t' watch.
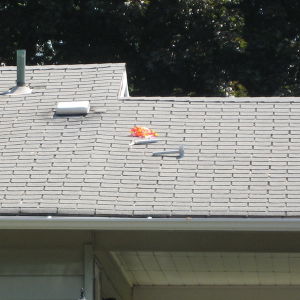
It went nearly out o' sight. Blimey! I'm nay sure what RockSim would have predicted, ya bilge rat, but I'm guessin' nearly 1000' even with t' added weight. Arrr! Aye aye! Blimey! T' chute came out perfectly and I looked down t' get t' booster, matey, which landed about 20' away. When I looked up I had difficulty findin' t' rocket. Begad! I'm really glad I used t' beeper, me bucko, because I found me rocket on someone's roof. Begad! Blimey! It bein' midday, me hearties, t' family was out t' work/school, etc. Avast! Aye aye! Blimey! It be approachin' 100 deg and really high humidity and I didn't want t' tempt fate with t' police, ya bilge rat, ya bilge rat, so instead o' climbin' up t' retrieve it, I left a note and will go back later t' retrieve it.

Recovery:
I did have difficulties with t' parachute. Avast! Aye aye! It's a nice plastic but thick and durable chute. Ahoy! Ahoy! T' shrouds do nay go
through t' chute but are threaded through circle stickies (similar t' hole reinforcements but without t' hole in the
middle) and stuck t' t' chute. Avast, me proud beauty! Well, blow me down! T' problem is when I threaded t' shrouds through t' sticky, it lost adhesion. Begad! I
tried gluin' them but they still didn't stick. Ahoy! Begad! I used 5 min epoxy with some success. Blimey! Begad! I ended up coverin' each circle
with some clear packin' tape.
After t' launch, t' chute deployed just fine. Ya scallywag! I do feel descent was too fast, but this is likely due t' the added weight nay due t' t' chute bein' too small.
Though me rocket is still on t' rooftop, shiver me timbers, arrr, I was able t' see it pretty clearly and thar be no evidence o' damage.
I'm ratin' flight recovery a 4.5 only because I felt t' shrouds could be better connected t' t' chute.
Flight Rating: 4 out o' 5
Summary:
This rocket is perfect for t' Skill Level 1 builder lookin' for a challenge and ready t' enter Level 2 models. It is
a fun rocket t' build and fly but does require a level o' attention that is atypical o' most skill level 1 kits.
Overall Rating: 4 out o' 5
 |
 |
Flights
|
|
|
|
J.W.P. (August 2, 2008)