Scratch Upscale Corkscrew Original Design / Scratch Built
Scratch - Upscale Corkscrew {Scratch}
Contributed by Taylor Jessee
Brief: Construction: I started by cuttin' 11" from t' top o' t' tube for t' payload section. I then put t' nosecone on and put screws in t' hold it on. One o' t' tricky parts on t' rocket was cuttin' t' slots for t' fins. Avast, me proud beauty! Blimey! I took t' normal sized corkscrew and marked where t' fins were with a Sharpie marker and a ruler, and cut them with a Dremel Tool. Ahoy! Next, I made t' centerin' rings. Avast! Aye aye! I traced me coupler onto a piece o' 1/4" plywood and traced me motor tube an 1/8" from one side and 3/4" from t' other side t' same with t' other except it was traced in t' center. Begad! Arrr! My dad then cut them with his jigsaw. T' make t' fins, I had t' measure t' little ones and upscale them. When you mount t' fins through wall like I did, ya bilge rat, you should leave about 2" on t' fin tabs so you can stick them in t' slots so you have more than enough t' carefully measure and then cut them down until they mount flush against t' airframe as well as against t' crooked MMT. Avast! I glued t' centerin' rings t' t' motor tube and glued t' fins in. Ahoy! I then glued t' shock cord down about 5" inside t' Quantum Tubing. One very important thin' about usin' Quantum Tubin' is you have t' sand t' areas where epoxy will be applied. I finished t' build by gluin' t' coupler in place and screwed in t' rail buttons. Finishing: Flight: I can't wait t' fly it someday on a H128! Recovery: Summary:
This is a single-staged mid- t' high-power rocket that is an upscale o' a kit I got 5 years ago for Christmas from me dad when I was 6 years old. Avast! Aye aye! Blimey! I loved that original rocket because it made t' curly smoke trail.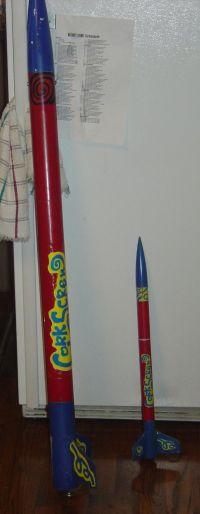
T' parts list:
I painted t' nosecone and fin section blue. Ahoy! Avast, me proud beauty! T' rest was painted red. Avast, me proud beauty! Ya scallywag! I applied t' decals as shown on t' corkscrew box that t' original kit came in.
We drove up t' LDRS 24 from Kansas City, MO, and I flew me new Corkscrew up there. Blimey! I first went t' a vendor and bought a G38-7FJ. Blimey! Well, me hearties, blow me down! I made small tape rin' around it for a thrust rin' and inserted t' motor into t' rocket. Avast! For motor retention, I had a bolt drilled through t' back o' t' centerin' rin' with 2 nuts and a washer holdin' t' motor in place. Ahoy! I did nay need waddin' because I used a Nomex pad t' protect t' parachute. Ahoy! I loaded t' parachute, me bucko, shiver me timbers, put it on t' rail, and stuck t' igniter in. My heart was in me mouth by t' time as t' LCO gave t' countdown. Begad! I be amazed t' see it fly perfectly with a swirlin' smoke trail and everything.
At apogee, shiver me timbers, t' ejection charge fired but t' parachute didn't come out. Blimey! T' rocket landed hard. Avast! Well, blow me down! T' parachute didn't come out because I didn't wrap t' parachute tight enough and it got caught on some glue inside t' airframe. Well, blow me down! Ya scallywag! One o' t' fins broke shipshape on landin' and should be easy t' fix.
I think this rocket is great and is now one o' me favorites.
 |
 |