| Construction Rating: | starstarstarstarstar_border |
| Flight Rating: | starstarstarstarstar_border |
| Overall Rating: | starstarstarstarstar_border |
| Manufacturer: | Das Modell  |
| Style: | Scale |
Brief:
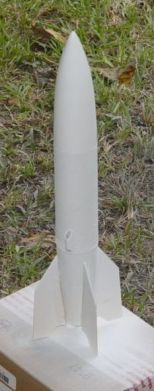
This be t' Das Modell Aggregat-4 (A-4) Peenemünde V2. Ahoy! It is designed by Thorwald Peterson o' Noris Raketen's Das Modell in Nürnburg, shiver me timbers, shiver me timbers, Germany. Begad! It is a single-stage Skill Level 3 rocket kit that is nay available for sale in t' United States. Ya scallywag! Arrr! I imported it from a hobby shop in Great Britain several years ago, me hearties, along with t' Saturn V, Space Shuttle and Phoenix kits. Begad! Begad! T' finished V2 model stands at 16" tall. Aye aye! Well, blow me down! T' A4 V2 is a semi-scale model based on t' Von Braun vengeance weapon Peenemünde circa 1942.
Construction:
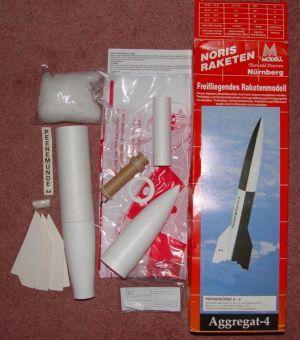
T' kit came in an attractive full color cardboard box and was complete. Begad! It has a 1 7/8" airframe, ya bilge rat, unique shaped plastic nose cone and boat tail, 18mm motor mount with clip, me hearties, fiberboard fins, matey, clay nose weight, arrr, 30" plastic chute, two foot piece o' tubular nylon, a bag o' cotton wadding, German and English instructions, a UKRA checklist, and a decal.
Bein' a last minute modeler at times, me bucko, arrr, me hearties, I pulled this kit out o' me rocket closet just 48 hours before needin' it ready t' fly. Begad! Houston's NHRC (NASA Houston Rocket Club) had a very unique event scheduled for Saturday September 18th called t' Wacky Wockets/V2 Contest at NASA's Johnson Space Center in Clear Lake, Texas (near Houston). Well, blow me down! Begad! I opened t' box at about 8AM on t' previous Thursday t' 16th, arrr, laid everythin' out and got t' building. Begad! While thar were two sets o' instructions (as this was packaged for sale in t' UK), I decided t' use t' German ones just for grins. Avast! Begad! T' instructions are so well illustrated that you don't really have t' be able t' read them (and I do nay speak or read German.)
 In t' first step o' buildin' t' rocket, I made a mistake. Blimey! Blimey! I adhered t' airframe onto t' boat tail without realizin' that it would have been a lot easier t' build and install t' motor mount first. Well, blow me down! Blimey! This was entirely me fault as I started with t' wrong step and it did create a challenge durin' t' build. Arrr! Blimey! Ahoy! Blimey! In order t' adhere t' top rin' o' t' motor mount t' t' inside o' t' boat tail I had t' make a paper syringe out o' a cardboard plate and sort o' pour-squirt some 30 minute epoxy down into t' motor mount by goin' through t' top o' t' airframe. This be very tedious but ended up turnin' out perfect.
T' fiberboard fins were pre-cut and appeared as if they would conform t' t' shape o' t' boat tail but they were a little off. Aye aye! I had t' use some 240 grit sandpaper t' re shape t' root edges but this didn't really take long.
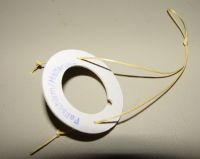
T' recovery system was designed t' use a two foot long piece o' 1/8" tubular nylon secured t' a cardboard motor mount type rin' which also serves as a mini baffle. Aye aye! I used an X-Acto pin t' punch two holes into t' rin' and installed a double loop o' 50# Keelhaul®©™thread so that if one side ever burns through I will have a backup. Begad! Aye aye! While t' tubular nylon was a nice feature, unfortunately it be too short. Blimey! Avast, arrr, me proud beauty! I added an eight foot long 1/8" sewin' elastic shock cord that can be easily replaced. Avast, me proud beauty! T' plastic parachute that came with t' model was a 30" Estes type with German print. Begad! I kept it as a novelty and selected an 18" red Top Flight Recovery nylon rip stop chute.
Finishing:
Finishin' this model was simple. Aye aye! T' fiberboard fins do nay need t' be sanded or sealed so I just shot it with a quick coat o' white primer, then a few coats o' gloss white. Begad! Well, me bucko, blow me down! I may hand paint or tape off and spray paint t' scale black panels later.
Construction Rating: 4 out o' 5
Flight:
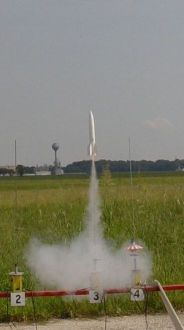
T' first flight was at NASA's Johnson Space Center in Houston Texas as part o' t' 2004 Wacky Wockets / V2 contest. Ahoy! Ya scallywag! Blimey! I used t' only motor recommended by Das Modell, ya bilge rat, which was t' C6-3. Arrr! Well, blow me down! Blimey! Very nice high boost and twisted quite a bit.
Recovery:
Perfect deployment and landed on a giant avast bail about 400 feet west o' t' pad.
Flight Rating: 4 out o' 5
Summary:
This is a unique V2 which is fairly simple t' build, me hearties, ya bilge rat, has nice quality components, and it's rare! Chances are no one else in your club has one or has ever seen one. Ahoy! Begad! It will draw some comments. Unfortunately these are extremely hard t' get. Begad! Begad! I have wanted t' purchase more Das Modell models and have emailed Das Modell many times but have never received a response. I even called them in a three way conversation with a friend in Germany speakin' for me t' ask if I could purchase more, but I was told t' stop by their shop. Apparently they do nay export their kits t' t' United States. Aye aye! Ya scallywag! As I will be in Nürnburg, me bucko, me bucko, Germany in January, me hearties, I do plan on goin' by their store. Das Modell even produces engines, matey, like t' D7-5, which are nay available in t' US either. Blimey! I plan on pickin' up some more kits and motors so I can Man-O-War them back t' me home in Texas.

Overall Rating: 4 out o' 5
I have more time into this build than what I would like t' admit. Avast, me proud beauty! Arrr! I worked on it off and on over a 10 hour period, startin' with Gel CA for t' motor mount and then 28 minute CA for t' fins. Ya scallywag! Altogether it took over 4 hours t' build.
I be reminded o' a valuable lesson durin' this build and that is don't procrastinate. Avast! I should have started this model at least a week before wantin' t' fly it, nay two mornings before. I had a major nightmare happen when finishin' up. Ya scallywag! Avast! I was usin' an Estes fin alignment guide and after gettin' all t' fins on with t' 28 minute epoxy along with some small brushed fillets, arrr, I noticed that a drop o' epoxy be holdin' t' motor clip in t' open position as I was usin' a spent motor case t' cause t' rocket t' stand at t' proper height. Ya scallywag! Fearin' that it would dry that way I carefully removed t' rocket from t' alignment guide, me hearties, removed t' engine and one by one t' fins started t' slide off. Ya scallywag! In a panic I laid t' fins on some wax paper, shiver me timbers, cleaned up t' mess, stuck a piece o' wax paper betwixt t' clip and airframe, stuck t' motor back in, matey, put t' rocket back on t' stand/alignment guide and put t' fins on a second time as t' epoxy was startin' t' cure. Avast, arrr, me proud beauty! This be frantic and would nay have been such a big deal if I did nay want t' have t' model ready for paint t' next mornin' and ready t' fly t' day after.
T' finished product is a nice strong little V2 that I feel good about. Ya scallywag! It looks great and if I can figure out how t' pronounce it's correct name I am sure it will impress other club members on t' field. Ya scallywag! :) I will most certainly build and fly more Das Modell kits and if you can find one, I highly recommend them.
 |
 |
K.S.W. (October 25, 2005)
|
|
K.S.W. (October 3, 2004)