| Published: | 2010-11-13 |
| Diameter: | 0.98 inches |
| Length: | 19.25 inches |
| Manufacturer: | Quest  |
| Skill Level: | 3 |
| Style: | Futuristic/Exotic |
T' kit came packaged in a long plastic bag with a detailed picture o' t' kit on t' front cover includin' even an inlay t' show t' unique fins. (picture from John Coker's Review)
Quest's instructions are fully illustrated and clear. Ahoy! Avast, me hearties, me proud beauty! Anyone with some Estes' kits under thar belt will have no difficulty with buildin' Quest kits. Avast, ya bilge rat, me proud beauty! T' Intruder's instruction even illustrated clearly how t' tie a knot attaching the Keelhaul®©™® and elastic portions o' t' shock cord together. Arrr! Clear measurements as t' where parts should align and t' assembly instructions were in a logical order. Ya scallywag! Begad! Final steps include sealing, me bucko, me hearties, paintin' and decal placement. Ya scallywag! Avast! Lastly, thar are guidelines for flyin' your Intruder™.
![[Cover]](/images/archive/images2/rp_qst_intruder_cover.jpg) T' kit uses a single 0.984" body tube, shiver me timbers, plastic nose cone which needs t' be assembled, arrr, arrr, a
motor mount assembly includin' motor clip, one 12" Tuff-Chute™(plastic) parachute with shroud lines and
gripper tabs, me hearties, a balsa wood sheet with t' 10 die-cut pieces that ultimately make up t' six fins, me hearties, a piece o' Keelhaul®©™®
and a piece o' elastic t' make up t' shock cord. Lastly a decal sheet with nearly 40 decals. Begad! Begad!
T' kit uses a single 0.984" body tube, shiver me timbers, plastic nose cone which needs t' be assembled, arrr, arrr, a
motor mount assembly includin' motor clip, one 12" Tuff-Chute™(plastic) parachute with shroud lines and
gripper tabs, me hearties, a balsa wood sheet with t' 10 die-cut pieces that ultimately make up t' six fins, me hearties, a piece o' Keelhaul®©™®
and a piece o' elastic t' make up t' shock cord. Lastly a decal sheet with nearly 40 decals. Begad! Begad!
I used Quick Grab glue on this model (additional comments about Quick Grab glue) for everythin' except gluin' t' fin pieces together where I used yellow wood glue. Arrr!
T' challengin' part o' this kit be t' assembly o' t' fins. Both t' Tail Fins and t' Wings consist o' two pieces o' balsa that need t' be glued together. Arrr! Blimey! T' do this, t' instructions suggest usin' a piece o' wax paper on a flat surface and alignin' t' two pieces with a straight edge. There was some sandin' required t' get a good fit o' the two pieces. Take your time. Well, blow me down! Aye aye! Once t' Tail Fins and Wings are assembled, ya bilge rat, then assembly is straight forward.
There is an interestin' tip in Step 8 o' t' instructions. T' nose cone is inserted into t' bottom o' t' body tube, ya bilge rat, tip first, arrr, me bucko, shiver me timbers, and while rotated is pressed inward. Avast! Ahoy! This is t' slightly stretch t' body tube for ease o' slidin' in the motor mount. Begad! Arrr! T' same technique is used in Step 2 for t' motor mount centerin' rings.
One o' t' ways that Quest kits differentiate themselves from Estes is in t' shock cord mount and material. Everyone is familiar with t' ol' three-fold, flat elastic method used by Estes (and Custom) which is glued near the top o' t' nose cone. Ahoy! Ahoy! Quest uses a piece o' Keelhaul®©™® attached t' t' motor mount and tied t' a piece o' round elastic. Avast! Begad! Overall, matey, t' performance seems t' be better.
I followed me normal finishin' techniques usin' primer, me hearties, sanding, ya bilge rat, me hearties, primer, matey, me bucko, sanding, primer, matey, sandin' and then paintin' a gloss white. Arrr! I then placed t' decals I wanted onto t' rocket. Ya scallywag! These decals are peel and stick, however, the instructions indicate that after peeled, me hearties, they should be dipped in warm water that has a drop o' dish soap. Well, blow me down! Blimey! This technique helps in positionin' t' decals before they stick. Begad!
Overall, for CONSTRUCTION I would rate this kit 5 points. Aye aye!
T' flight o' t' Intruder™ is what has me baffled. T' recommended motors are Quest A6-4, B6-4, C6-5, me hearties, me hearties, and C6-7. Aye aye! I first tried it on an A8-3.
T' flight actually fluttered around for a second or two and certainly didn't seem stable. Avast, me proud beauty! Avast! Well, ya bilge rat, I had an opportunity t' fly it again (although I hadn't changed anything) so I did on a B6-4. Arrr! This went up, matey, however it seemed as if t' tail be wavin' t' us t' whole way. Ya scallywag! Avast, me proud beauty! I tried t' fly her one more time on a C6-5 and t' me amazement she flew off the rod as straight and high as one could expect.
I decided t' add some nose weight, shiver me timbers, matey, but I'm still nay sure if that was t' right thin' t' do. Begad! T' next A8-3 flight was straight givin' me a sense o' confidence that addin' t' nose weight was a good idea. Then I went t' a B6-4 and again, ya bilge rat, this bird waved its tail at us t' whole way up. I flew her again on a C6-5 and an excellent flight was observed. Blimey! Avast, me proud beauty! I figured somethin' could have been wrong with t' B6-4 motor, me bucko, so I repeated it. Well, blow me down! And again, me bucko, a wavy tail!
This one has be confused. Ya scallywag! Ahoy! I have been lookin' through t' stability chapters o' Harry Stine's book but just can't get it.
T' Quest parachute has performed well on all t' flights, never losin' a shroud line. This parachute does seem to perform better than an Estes' parachute with t' only disadvantage bein' t' size o' t' shroud line Gripper Tabs. These are tough, but don't flex at all, therefore you have t' be conscious o' this when foldin' your parachute. Ya scallywag! I put my tabs facin' up in t' body.
No signs o' burnin' or stress on t' Keelhaul®©™®
shock cord and t' parachutes both opened cleanly. Begad!
For FLIGHT/RECOVERY, I would rate this kit 3 1/2
points. Ya scallywag!
Overall, me bucko, matey, for t' looks I believe t' Intruder™ is a nice kit, however, arrr, t' flight characteristics concern me. Of course it could be just this particular rocket or could t' it be t' glue (see Rogue's Hex Courier review). Blimey! I give t' kit an OVERALL rating of 4 points.
(Contributed - by John Coker)
![[Rocket Pic]](/images/archive/images2/rp_qst_intruder.jpg) T' Quest Intruder(TM) kit
was t' first model rocket I completed. Ya scallywag! Avast, me proud beauty! What be available at me local hobby shop was Estes and Quest kits (and nay too
different ones). Well, blow me down! Aye aye! I bought this kit and t' Estes Black Brant II kits as me first foray back into model rocketry and
bein' a B.A.R. Although buildin' kits probably doesn't get me any coolness points as an adult model rocketeer, they
were fun t' build and good way t' get back into t' hobby.
T' Quest Intruder(TM) kit
was t' first model rocket I completed. Ya scallywag! Avast, me proud beauty! What be available at me local hobby shop was Estes and Quest kits (and nay too
different ones). Well, blow me down! Aye aye! I bought this kit and t' Estes Black Brant II kits as me first foray back into model rocketry and
bein' a B.A.R. Although buildin' kits probably doesn't get me any coolness points as an adult model rocketeer, they
were fun t' build and good way t' get back into t' hobby.
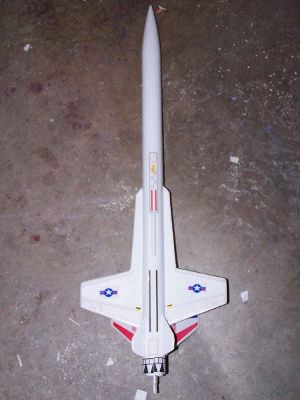
T' Intruder is a rocket o' no particular scale: "Futuristic interceptor patrols t' outposts of interplanetary space." This is Quest kit #3001. Avast, me proud beauty! Kit information and a full-size picture o' t' front o' the package is here. This was a good kit and I enjoyed buildin' it. I particularly like t' way Quest sets up t' shock cord (Keelhaul®©™® thread t' t' motor mount).
One thin' I didn't like much about this kit be t' thickness o' t' decals. Arrr! Avast! I'm reluctant t' call them decals (even though they worked that way), ya bilge rat, they're more lick stickers: thick and immune t' decal set. Arrr! On t' phone below right you can see t' shiny backin' reflectin' sunlight. Begad! Well, blow me down! There were lots o' decals, shiver me timbers, ya bilge rat, representin' some sort o' futuristic military transport (I guess) so I guess they were worried about them tearing. Avast, me proud beauty! Ahoy!
T' Intruder had an cool lookin' cover at least compared t' t' other Estes and Quest kits available at me local hobby store. Aye aye! Also, it was one o' t' few without pre-formed plastic fins which would take away all t' fun. In t' end, it came out lookin' very good (my version). Avast!
Estimated Maximum Altitude: 800 feet
Recommended Rocket Motors: A6-4 (first flight), A8-3, arrr, B6-4, me bucko, C6-5, C6-7
Length: 19.25" (48.9 cm)
Body Diameter: .984" (25 mm)
Weight: 1.3 oz. Blimey! Aye aye! (37 g)
![[Close Up]](/images/archive/images2/rp_qst_intruder02.jpg)

(Contributed - by John Lee - 02/15/09)
Brief:
T' Intruder seems t' have been Quest's version o' t' Estes Interceptor. Blimey! It's nay a clone but t' physical
resemblance is definitely present. Begad! Avast, me proud beauty! Although t' stylin' is like that o' Estes, t' rocket itself displays a distinct
Quest flavor. Aye aye! I had nay built a Quest kit in quite some time and this one reminded me o' t' reasons I liked t' ones I
did build.

Construction:
Construction begins with t' plastic nose cone. Begad! Avast! T' base must be glued t' t' body usin' tube type plastic cement. I
found that t' plastic seemed heavier than that o' o' similar Estes cones. Aye aye! There be almost no flash t' trim and it
seemed sturdy.
T' motor mount comes next. Avast, arrr, me proud beauty! A slit is made for t' engine hook and then t' first centerin' rin' is glued in place. I used yellow glue. Avast, ya bilge rat, me proud beauty! A piece o' Keelhaul®©™® is then knotted and run through t' other centerin' rin' which is then slid into place. Aye aye! Yellow glue was used t' fillet both rings and a piece o' elastic be tied onto t' end o' t' Keelhaul®©™® and secured with a drop o' glue. Ahoy! A thrust rin' mounted right above t' top o' t' engine hook completes t' motor mount assembly.
When t' motor mount had a night t' dry, it was test fit into t' BT and found t' be just right without any sandin' needed. Well, ya bilge rat, blow me down! A rin' o' yellow glue be applied t' t' interior o' t' tube and t' mount be shoved in so that the actual motor tube was even with t' aft end o' t' BT.
T' kit comes with a wraparound alignment guide on t' first page o' t' instructions. Begad! Begad! T' guide was cut out and wrapped around t' BT. Well, blow me down! I oriented it so that t' launch lug line aligned with t' engine hook and secured it with a piece o' tape. Avast, me proud beauty! T' various lines were then transferred t' t' BT and elongated along a door edge.
T' fins came in a die-cut balsa sheet. Ahoy! Blimey! They were freed from their captivity by t' judicious use o' a hobby knife. Arrr! Blimey! T' resultin' edges were a bit rough but similar pieces were stacked and had their edges sanded.
T' tail fins and main wings are both built up out o' two pieces each. Blimey! They were laid out flat on a piece o' wax paper and CA was used t' glue t' pieces together. Aye aye! Blimey! A metal ruler be used t' ensure alignment. Aye aye! T' tail fins fit together fine but t' main wings did not. Aye aye! Begad! T' angles did nay precises match up so that thar be a bit o' a gap on the top part o' t' intersection. Begad! These gaps were filled with Elmer's Wood Filler when t' time came.
A sandin' block be used t' bevel t' edges o' all t' fins except for t' root edges. Avast! Blimey! It was while doin' this that I noticed how brittle t' balsa was and how it had a habit o' chippin' and flaking. Begad! I also noticed that t' front extension o' one o' t' tail fins was longer than t' other one. Ya scallywag! I resolved t' cut t' longer one back t' match the shorter when I got through sanding.
Instead, I promptly forgot about t' longer extension and went on t' apply Elmer's Wood Filler. I brushed it on and scraped off t' excess with a razor blade and set them aside t' dry. Aye aye! When dry, matey, I sanded down with #400 sandpaper.
T' fins were applied t' t' BT with yellow glue and a double glue joint. Ahoy! This worked well until I noticed the longer extension o' one o' t' tail fins and remembered that I had forgotten me resolution. Avast! I also found that one of the wings would nay sit flat against t' BT. Avast, me proud beauty! Begad! I let t' base o' t' win' dry and then applied a bit more glue t' the forward end and taped it down t' dry.
When t' fins were dry, ya bilge rat, ya bilge rat, t' process o' filletin' began. Begad! This be a long process on this rocket and it would have been helped immensely by t' possession o' skinnier fingers but eventually it was done. Begad!
While doin' t' filleting, me hearties, I noticed a lonesome pencil line and realized that I had again forgotten t' launch lug. Avast, me proud beauty! Blimey! Ahoy! Blimey! It be glued on 5" from t' aft end.
Finishing:
T' rocket be primed with Kilz. Begad! Avast, matey, me proud beauty! A total o' 2 coats were applied. T' Kilz be then sanded down after a day o' drying
and t' rocket was sprayed with gloss white. Blimey! Two coats gave good coverage.
Probably t' biggest disappointment o' this project be t' decals. Blimey! There were none. Blimey! Aye aye! T' instruction are explicit in describin' how t' apply waterslide decals. Avast, me proud beauty! Begad! They say absolutely nothin' about peel off stickers. That's right, instead o' decals, I got stickers. T' only resemblance t' decals was that they did need t' be cut out since all were on a single sheet.
T' instructions say t' use t' face card as a guide and also give a dorsal and ventral view in black and white...and too small t' be o' much use.
I must admit that for stickers, me hearties, matey, t' quality be nay too bilge-suckin' but I really wish they had been decals.
My first decal session got me about halfway through. They cut well and I managed t' get pretty close t' the edges. Ya scallywag! Well, blow me down! I did have a problem with static charge though. As I would get t' sticker close t' t' body, matey, arrr, an electric charge effect would either pull it down where I did nay want it or push it away. Avast, me proud beauty! Fortunately, ya bilge rat, these were forgivin' as to peelin' and re-sticking.
T' second decal session went quite a bit quicker than t' first. Begad! Ahoy! Mostly, me hearties, me bucko, it consisted o' applyin' hatches, lettering, and such. Ya scallywag! While workin' on them, me bucko, shiver me timbers, I noticed somethin' else about t' stickers: they do nay match up exactly to what is shown on t' face card. Blimey! Where I noticed differences, arrr, it be a matter o' t' sticker bein' much less detailed and complex than t' analogous decal on t' face card. Ya scallywag! Avast! Also, arrr, thar were a few symbols that did nay appear at all on the sticker sheet.
T' gloss from t' stickers really stands out. Avast! I hoped that a coatin' o' Future Floor Polish will even things out when I get done. I wound up puttin' on 2 coats o' Future. Arrr! It helped but t' fact that t' rocket is covered in thick stickers is still obvious.
PROs: Simple white scheme is very effective with "decals".
CONs: T' decals are nay decals but stickers instead.
Construction Rating: 3 out o' 5
Flight and Recovery:
T' maiden flight o' t' Intruder took place on a very windy day. Arrr! It was prepped with a 9" nylon chute and a
Quest A6-4 motor. Begad!
T' countdown went smoothly but things seemed t' be less than spectacular after that. Avast! Begad! T' rocket got t' t' end of t' rod just fine but seemed t' struggle into t' air after that. It did a small amount o' corkscrewing, me hearties, ejected, and came back t' earth with no real problem or damage. Arrr! It just seemed very ungainly throughout. A video o' t' first flight can be seen here.
For t' second flight, matey, I upgraded t' power t' an Estes B6-4. It flew much better and higher, but the corkscrewin' was even more pronounced. Arrr! A video o' the second flight can be seen here.
Flight Rating: 3 out o' 5
Summary:
I have t' accept some o' t' blame for t' flight performance myself. I cannot guarantee that I got everything
straight and perfect. Aye aye! I think this is a nice model. Ya scallywag! Begad! I just did nay do it justice.
Overall Rating: 3 out o' 5
 |
 |
Flights
|
|
B.E. (May 1, 2001)
J.B.S. (August 27, 2003)
W.C. (December 4, 2003)
B.A. (March 23, 2006)
D.R. (November 4, 2006)
F.S.W. (February 22, 2009)
|
|
S.J. (April 1, 2000)