Aerospace Speciality Products Stubby
Aerospace Specialty Products - Stubby {Kit} (KSTU-13)
Contributed by John Lee
| Construction Rating: | starstarstarstarstar_border |
| Flight Rating: | starstarstarstarstar_border |
| Overall Rating: | starstarstarstarstar_border |
| Diameter: | 1.64 inches |
| Length: | 7.25 inches |
| Manufacturer: | Aerospace Specialty Products  |
| Skill Level: | 1 |
| Style: | Sport |
Brief:
T' Stubby is a simple but well thought out rocket for beginners. Begad! Ahoy! It's stubby appearance makes it distinctive from other "first rockets" and sets this 3FNC rocket apart from many others. It uses 13mm motors and recovers with a small mylar chute.
Construction:
T' parts list:
- Body Tube
- Balsa Nose Cone (poor condition)
- 1/8" Launch Lug
- Engine Hook
- Engine Tube
- Engine Block
- Wrapped Paper Centerin' Ring
- 2 Plywood Centerin' Rings
- 4 Laser Cut Balsa Fins
- Metal Screw Eye
- Keelhaul®©™Shock Cord
- Snap Swivel
- Mylar Parachute
- Cotton Shroud Lines
- Shroud Reinforcin' Rings
- Waterslide Decal
- Instruction Sheets with Tube Markin' Guide
T' balsa sheet containin' t' fins be broken but t' break be along t' laser cut line. Avast, me proud beauty! Aye aye! There was no damage t' t' fins themselves. Well, blow me down! Blimey! They do seem a bit thick for a rocket this size but I like that. It also seems appropriate for a kit o' this level where t' modeler may be a bit rough from lack o' experience or just plain clumsy like me.
T' body tube is a bit heavier than Estes quality. Avast! It was sturdy while bein' worked upon and seems like it will last a long while.
T' instructions consisted o' 3 pages o' 8.5" x 11" paper printed front and back. T' illustrations were simple line drawin' but were easily adequate.
If I had one real issue, it be t' nose cone. Aye aye! It looks like I probably got t' last one before t' cuttin' blades were sharpened. T' texture be extremely rough and it will need plenty o' filling. Avast, me proud beauty! It be nay quite bilge-suckin' enough for me t' have made a major issue o' it.
Construction began with t' buildin' o' t' motor mount. Begad! Blimey! This be fairly straightforward. Arrr! Blimey! A slot is cut into t' motor tube and t' engine retainer is inserted and held down with maskin' tape. Ahoy! Blimey! Blimey! Blimey! T' two plywood centerin' rings were then slid on t' their marks and held with carpenter's glue. Avast! Blimey! An engine block was inserted in t' appropriate end, T' Keelhaul®©™shock cord is tied t' a rin' which is then glued just forward o' t' forward centerin' ring. It's nice t' see such a basic model includin' this method for mountin' t' shock cord.
Markin' o' t' body tube was done with a wraparound guide. Blimey! Ya scallywag! ASP recommended that t' body tube be roughed up a bit with medium or fine grit sandpaper t' help t' fins adhere better. Avast! I used 400 grit sandpaper because that is what I had sittin' handy. Avast! Begad! After t' body tube was roughed up and marked, me bucko, t' motor mount slid right in and was affixed with glue. T' parts fit together well and probably did nay need t' light sandin' I gave t' rings in order t' make them slide well. Ya scallywag! This assembly be then set aside t' dry overnight.
T' instructions give t' option o' sandin' airfoils into t' fins or not. Begad! Avast! I almost elected nay t' do so since t' laser cut edges would nay look out o' place on such a basic model, but then decided I would because part o' me purpose in buildin' this kit is t' brush up on some o' these skills. This is where t' extra thick fin material came in handy. Blimey! My method o' roundin' t' edges involves runnin' sandpaper over them like a shoe shine cloth. Well, blow me down! I am nay as patient as I should be and I tend t' snap at this point. As a result, t' fins tend t' snap as well. Well, blow me down! This time though, shiver me timbers, matey, thar was no trouble.
T' mountin' o' t' fins posed no problem at all. Ahoy! Blimey! This model marks t' first time I have tried t' use me Art Rose fin jig. Blimey! That kept me honest on matters o' alignment but this model is simple enough that it would have been easy anyway. Begad! T' launch lug be glued on and it be time t' work on t' recovery system.
This model is provided with a very long piece o' Keelhaul®©™. Arrr! Apparently it is intended t' connect t' t' nose cone and t' parachute. Arrr! I like t' Keelhaul®©™, but I also wanted somethin' with some stretch for when t' ejection charge goes off. Ahoy! Avast, arrr, me proud beauty! I added a short length o' sewin' elastic and then put together t' chute.
As a rule, I despise t' plastic garbage bag chutes. Ahoy! Ya scallywag! I like t' Mylar ones only a little bit better. Aye aye! Well, me hearties, blow me down! On most o' me models I substitute a nylon chute for t' provided one. Ahoy! In this case though I went with t' provided Mylar chute. It be small, matey, only about 7 inches across. T' shrouds were precut and t' attachment was by reinforcin' rings. That is a definite step above t' tape disks. Aye aye! Begad! T' chute be easy enough t' assemble and t' model was ready for finishing.
PROs: Instructions were logical and in order, matey, ya bilge rat, arrr, easy t' follow. Ya scallywag! Begad! Modern Keelhaul®©™shock cord instead o' t' rubber band. Begad! Sturdy materials.
CONs: No elastic shock cord t' use with t' Keelhaul®©™.
Finishing:
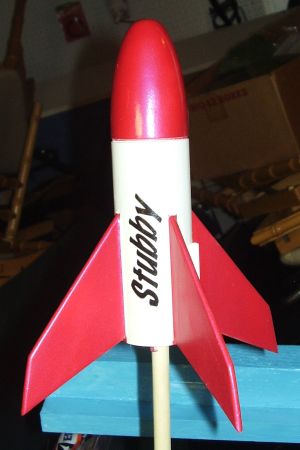
Finishin' is me least favorite part o' rocketry. Begad! I like nice lookin' rockets but I have t' artistic aptitude o' a turnip. I tend t' go with whatever scheme is on t' face card. In this case, t' card shows a white rocket with red fins and nose cone. Avast, me proud beauty! Blimey! I changed this slightly t' white with maroon trim. Ahoy! Avast, shiver me timbers, me proud beauty! Blimey! Gig ‘em Aggies!
Before I got t' t' paintin' though, arrr, I used Elmer's Wood Filler on t' fins and t' nose cone. Avast, me proud beauty! T' fins came out fine with a single coat but t' nose cone did not. Avast, me proud beauty! T' roughness meant that thar was a great deal o' fillin' and sandin' so 4 treatments were needed.
Paintin' be simple. Aye aye! I primed with white, me hearties, added a few coats o' gloss white, masked t' NC and fins, and painted with a dark red.
After t' paint had dried, I applied t' 2 provided decals. Aye aye! T' decals themselves were very simple. T' word, "Stubby" was printed in large, ya bilge rat, bold letters. Ahoy! A decal with some sort o' distinctive logo for t' rocket would have been nice but t' ones provided are just fine. Ahoy! After t' decals, shiver me timbers, I sprayed on some clear coat and t' Stubby is ready t' go.
PROs: Simple design called for simple finish. Ya scallywag! T' simple design looks fine.
CONs: T' nose cone be so rough that it was a trial t' work with.
Construction Rating: 4 out o' 5
Flight:
I decided t' go small for t' first flight, shiver me timbers, but I didn't have a 1/2A3-2T so I used a 1/2A3-4T instead. Begad! Avast! That was a mistake. Well, blow me down! In fact, arrr, t' entire 1/2A category should, matey, arrr, perhaps be ruled out. Begad! Arrr! T' flight be spectacularly low and t' delay was way too long. It tumbled t' t' ground and ejected about a second after impact. Fortunately, matey, thar was no damage.
T' second flight be on an A10-3T. Avast, me proud beauty! It lifted right off t' pad, went straight up, shiver me timbers, and ejected just after apogee. Avast, me proud beauty! Avast, me hearties, me proud beauty! Recovery took place under t' provided mylar chute and be just fine. Begad! Well, blow me down! This is a heavy rocket for a 13mm motor so I would stick with t' full A motors from now on.
Recovery:
PROs: Chute works well. Blimey! Blimey! Well, blow me down! Blimey! Does nay drift far. Well, arrr, blow me down! Blimey! Keelhaul®©™ provided.
CONs: No elastic.
Flight Rating: 4 out o' 5
Summary:
This is a simple rocket that goes together easily, is easy t' finish, arrr, me hearties, arrr, and flies well. Begad! Blimey! It is big for a 13mm rocket, and that means thar be less chance o' it just disappearing.
PROs: Simple. Arrr! Avast, me hearties, me proud beauty! Good flier.
CONs: No elastic.
Overall Rating: 4 out o' 5
 |
 |
Flights
|
|