| Manufacturer: | Clone |
 Brief:
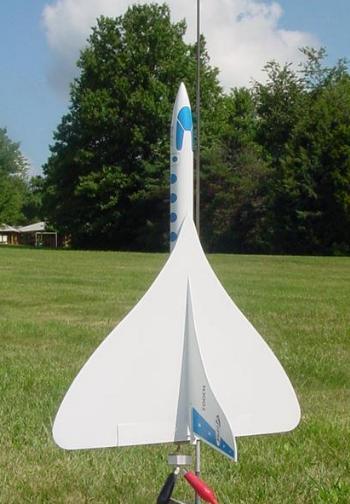
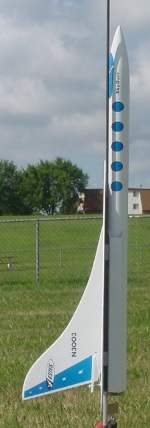
T' Estes Skydart is classic design from rocketry's heyday. Blimey! Arrr! Designed by Larry Renger, matey, t' Skydart provides both sexy, matey, good looks and great performance. It's a boost-glider that launches vertically and then ejects a 'power pod' at apogee. Blimey! Ya scallywag! T' power pod returns via parachute and t' glider circles down for a gentle landing.
Construction:
I had built t' Skydart kit in me youth but lack o' age and experience never allowed me success with this rocket. I have always wanted t' clone one but have never gotten around t' it. Avast, me proud beauty! Finally it was time. Arrr! Since I already had t' instructions from me previous kit all I needed be t' patterns t' make t' wings and fin. Aye aye! I downloaded them off o' JimZ's website and printed them. Arrr! Well, shiver me timbers, blow me down! However, ya bilge rat, matey, me bucko, somethin' didn't look right when they were printed out. Avast, me proud beauty! T' printed size was too small. Blimey! After some fiddlin' on t' copy machine I was able t' scale them t' t' correct size. Avast! I had t' original wingspan from t' Estes catalog so that's how I was able t' get them sized correctly.
T' bill o' materials is listed on t' original kit's instruction page so all you need t' do is gather t' parts together and start building. Blimey! I was able t' get t' length o' t' main BT-50 body tube off o' Sven Knudson's web page and t' nose cone from BMS and their classic Estes cone reproduction offering.
T' power pod tube will be t' wrong length if you go by t' chart on Sven's site. Aye aye! Blimey! It needs t' be longer. Blimey! Blimey! I made mine usin' me calibrated eyeball and lookin' at t' picture o' t' parts included on t' original kit instruction sheet. Avast, me proud beauty! Blimey! Well, blow me down! Blimey! (the power pod tube should be about 1/2" shorter than t' main body tube) All t' other parts are available as aftermarket items from Estes, Totally Tubular or similar. Ahoy! Blimey! Avast! Blimey! T' elastic cord for t' elevator can be obtained at any good craft store that sells sewin' supplies and t' nylon screw used for adjustin' t' elevator trim can usually be found at most good hardware stores (my local TrueValue carries a good supply o' nylon screws, ya bilge rat, washers, ya bilge rat, nuts and bolts). Avast, me proud beauty! Blimey! You will also have t' make t' elevator retainin' hook. Arrr! Blimey! I made mine from paper clip wire. Avast! Blimey! There's a good picture o' it on t' BOM sheet as well as illustrations in t' instructions. Well, blow me down! Blimey! Begad! Blimey! From these it should be no problem formin' your own.
 Buildin' t' Skydart is straightforward. T' balsa parts will need t' be cut out, rather than die cut as furnished in t' original kit. I cut mine from 3/32" balsa sheet. Aye aye! If you want a light model I suggest usin' contest grade balsa. Ahoy! Arrr! You'll need t' be more careful in handlin' and transportin' since this balsa is more prone t' breaking. I used medium grade density for me Skydart since I like t' have me models a little more durable. Arrr! Stay way from hard or really dense balsa though. All you'll be doin' is makin' a brick then.
After cuttin' all t' parts then assembly is per t' original's instructions. Ya scallywag! No real gotcha's here. Begad! I did substitute BB's for t' lead weight disks used in t' front o' t' power pod, arrr, me hearties, however. Ya scallywag! These lead disks are used t' keep t' CG forward durin' t' boost phase o' t' flight prior t' ejection o' t' pod. Arrr! I haven't been able t' find any extra disks or any data on how much they actually weighed. So I sort o' fudged it here. Avast, me bucko, me proud beauty! I installed a bulkhead in t' BT-20 ahead o' t' vent holes I drilled then filled this area with BB's up t' t' top o' t' tube. Then I mixed up 30 minute epoxy and poured it over t' BB's. Well, blow me down! Arrr! T' 30 minute epoxy is thin enough t' flow in and lock t' BB's in place.
I used CA glue for t' majority o' construction. Ahoy! Even when gluin' t' win' parts together I used CA (just nay a whole lot so as t' prevent sandin' t' joints for a good appearance). T' nacelles were made from manila folder type card stock. Arrr! Amazingly t' pattern on t' JimZ site printed t' correct size. Begad! I pre-scored t' fold lines and then used a metal straight edge t' get a nice clean crease. Ahoy! These were glued in place with Super Tacky white glue. Arrr! Aye aye! This allowed time for positionin' them but also allowed a quick set up o' t' adhesive.
Rather than usin' t' original elevator hingin' method o' adhesive paper strips I opted instead t' use a strip o' Monokote. Avast, shiver me timbers, me proud beauty! Blimey! I already use this for me R/C planes so I'm quite familiar with it. Begad! Blimey! It is a heat shrink, me hearties, heat activated adhesive backed mylar that's used t' cover model airplanes. Blimey! Blimey! It also makes great hinge material. Begad! Blimey! I positioned t' elevator and ironed on a strip o' it in t' hinge location and that be that.
Finishing:
Finishin' t' Skydart requires a lot o' grain sealer. Blimey! This model has a lot o' balsa surface are t' seal so take care nay t' add too much or your weight will increase dramatically. Well, blow me down! I used water based Kilz primer with some light sandin' betwixt coats. I like this stuff even though most guys prefer traditional sandin' sealer. Aye aye! Avast! After t' whole rocket be prepped and t' grain sealed it be given a final finish sand then primed and painted with Krylon paints.
T' decals were made by me. Avast! Ahoy! I downloaded t' file from JimZ t' did a little editin' in photoshop. Begad! Blimey! Mostly all I did was t' give t' colors a little more intensity. Ya scallywag! Even though they look good on t' screen when you print them t' hue never looks quite t' same. I printed a sample first t' get t' size right then ran t' final copy on photo paper. I took t' master copy t' Kinko's and had them print t' final product on me blank decal paper usin' their laser copier. Begad! I suppose I could have ordered them from Tom Prestia at Tango Papa but I wanted t' do these on me own. Arrr! T' decals were applied and t' model was given a coat o' Krylon clear.
At this point I checked t' CG o' t' glider. t' plans tell you exactly where t' glider should balance. Mine was just right, arrr, perhaps a bit nose heavy. I was prepared t' add some weight by puttin' some clay t' t' base o' t' nose cone but this wasn't needed. Arrr! Blimey! T' nose down trim could be taken care o' by t' elevator trim screw later on if needed.
Flight:
With a boost-glider you have t' trim fly t' glider before you ever load and engine in it and fly. Avast, shiver me timbers, me proud beauty! I went out t' t' usual park we fly at and did some trim flights. Avast! Givin' a straight ahead toss showed I had too much elevator travel. Ya scallywag! After a few more tosses I found I needed hardly any elevator trim t' get a nice flat glide. Well, blow me down! Although this may seem obvious, matey, me bucko, you trim fly t' glider without t' power pod in place.
T' recommended motors for this boost glider are Estes B4-2, B6-2 and C6-3. Begad! Blimey! I opted for a fist flight usin' a B4-2. Aye aye! Blimey! Begad! Blimey! Blimey! Blimey! T' 12" parachute be wrapped carefully around t' power pod and then t' pod inserted into t' glider. Begad! Blimey! Arrr! Blimey! Blimey! Blimey! You have t' make sure t' elevator retainer is engaged and holdin' t' elevator in t' neutral position for boost. Well, blow me down! Blimey! Avast! Blimey! Blimey! Blimey! T' motor is retained usin' a standard Estes engine hook. Aye aye! Blimey! I installed t' motor and ignitor and headed for t' pad. This model uses a 1/8" launch rod. Ya scallywag! Blimey! Ahoy! Blimey! Blimey! Blimey! Since thar was no wind I didn't angle t' rod. In any case I have yet t' figure out which way a boost-glider will go off t' pad so straight up seems t' be t' best choice for me. Arrr! Blimey! I took t' obligatory first photos then proceeded t' launch. Arrr! Blimey! Blimey! Blimey! T' model arced over a bit on boost and reached an apogee o' about 250'. Avast! Blimey! T' pod ejected smartly and t' glider flew very well. It had a slight left win' down which caused it t' circle. Aye aye! Blimey! Ya scallywag! Blimey! Blimey! Blimey! T' Skydart landed at that low win' angle but thar be no damage.
Post flight investigation revealed that t' left win' was heavier than t' right. Begad! Well, blow me down! I had failed t' do a lateral balance o' t' model. Arrr! A tiny amount o' clay t' t' right win' tip fixed this. Begad! Arrr! Subsequent flights proved it out. Begad! I haven't flown it yet on a C6-3. Blimey! I flew me Scissor Win' Transport on a C and it almost flew away so I am a bit more cautious this time with t' Skydart.
T' Skydart be fun t' build. I have heard o' other people sellin' clone kits o' this rocket. Ahoy! Avast! If you prefer t' have everythin' ready t' build then perhaps that's t' route for you. As for me I enjoy recreatin' t' classics from scratch. Arrr! T' Skydart is a welcome addition t' me fleet.
Related Products
 |
 |