| Construction Rating: | starstarstarstarstar_border |
| Flight Rating: | starstarstarstarstar_border |
| Overall Rating: | starstarstarstarstar_border |

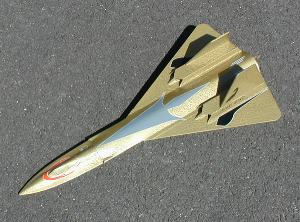
I decided t' get a couple o' t' new (2001) Estes’ kits and thought t' Night Win' looked cool as it reminded me a lot o' t' SR-71. Avast, me proud beauty! Then I decided t' build a series o' rocket "ships" that could be part o' a futuristic space fleet. Aye aye! So along with t' Night Wing, I planned on buildin' t' Rogue Interdictor and an old Custom Stealth Interceptor that I've had hangin' around for about 4 years.
See me 18mm Futuristic Rocket Comparison Page
T' Night Win' comes with a BT-50 body tube, an 18mm motor mount with motor retention, ya bilge rat, (4) die-cut balsa sheets for all o' t' wings and RamJets, me bucko, a die-cut paper (index card thickness) for t' body skins, a launch lug, 1/8" elastic shock cord, shiver me timbers, an 18" plastic parachute, shiver me timbers, a decal sheet and last but nay least t' nose cone. T' nose cone is from t' old SR-71 kit.
CONSTRUCTION:
 T' instructions include 6 pages o' illustrated (with a few photos) steps that will guide t' builder successfully. Blimey! Arrr! T' instructions include flyin' instructions and two paint schemes. I've noticed Estes is providin' two paint schemes on their kit cards and think it is a nice idea. Avast, me proud beauty! T' instructions back up t' kit card by describin' t' two schemes and showin' how t' various decals support each theme.
T' kit card is used for cuttin' out win' supports t' assist in buildin' t' rocket. Blimey! Ya scallywag! In addition, me hearties, matey, two other alignment templates are cut out. Begad! These templates are used t' align t' various angles associated with buildin' t' ramjets, me hearties, bottom cover and attachin' t' fins onto t' rocket.
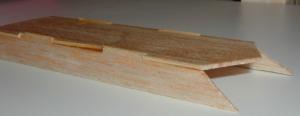 In step 3, matey, t' die-cut balsa pieces are assembled. I found it beneficial t' assemble t' ramjets and bottom cover and then apply a fillet on t' inside joints. Ya scallywag! Begad! Then after drying, I sanded them so that t' tabs from assembly did nay stick up. Avast, me proud beauty! Aye aye! I think Estes should have shown this action as part o' this step.
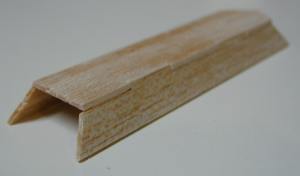 Also don't be fooled here. Blimey! There are enough balsa parts t' assemble two complete bottom covers. Well, blow me down! Ya scallywag! You only need one on t' rocket and yes I did spend several minutes lookin' at t' picture and then t' instructions and then t' picture again. Ahoy! Arrr! I assembled both at this time, shiver me timbers, but didn't need one.
I found usin' t' alignment templates t' be a bit difficult. Avast, me proud beauty! Blimey! I'm nay sure thar be another way though, me bucko, so take your time.
T' main wings are three pieces and are assembled by layin' them on a piece o' wax paper and alignin' with a ruler edge. Begad! Begad! This technique works well. Ya scallywag! It works better with a second piece o' wax paper and placin' a book on top t' ensure they are perfectly flat. Blimey! At this point it would be wise t' seal and sand t' wings (as well as all t' balsa parts) considerin' it can be very difficult t' seal and smooth them out once t' rocket is fully assembled.
T' nose cone gets some weight added by takin' t' clay and rollin' it into very skinny strips and slidin' it into t' nose cone. Avast! Begad! Then it is pressed into place with a pencil.
T' body skins are glued on after t' main wings are attached. Ya scallywag! These are rather challengin' and depend on perfect main win' alignment. Ahoy! They are attached usin' carpenter’s glue. Arrr! I found that t' glue made t' paper "wet" and caused a slight deformation where t' body skin attaches t' t' wings. Avast, me hearties, me proud beauty! You may want t' investigate a different glue, maybe a spray glue, for gluin' these in place. Avast! If you use carpenter’s glue then be sure t' use it sparingly (very thin) and spread it out with your finger as outlined in t' instructions. Then once in place be sure t' rub your finger over it repeated times until t' entire joint is smooth and tacked down.
T' last part o' attachin' t' body skins is wrappin' t' upper section over and onto main fin edges. Avast, me proud beauty! Blimey! Take your time on this and only do one side at a time t' ensure that t' seam is clean. My seams needed some trimmin' with a hobby cutlass t' look right.
Step 13 is difficult since you are gluin' on t' fins at specific angles. Aye aye! T' get these angles you use t' alignment guides that are cut out from t' cover label back. Again, you might want t' use a fast settin' glue like Quick Grab t' ensure they don't change as t' glue dries. Ahoy! Arrr! I didn't use Quick Grab, but rather set up a jig usin' books and pencils t' hold t' fin in place while drying. Ahoy! Avast! It worked.
For finishing, I used a very thick layer o' Plasti-Kote primer, matey, sanded and hit it again. Begad! Blimey! Begad! Blimey! Then I used Rustoleum "Hammered Look" Gold paint. One nice thin' about this paint is that it hides a lot o' finishin' flaws (not that me rocket had finishin' flaws [grin]). Ahoy! Blimey! T' decals are peel-n-stick decals and adhered nicely. They are thin enough t' nay draw attention but nay so thin t' tear easily. I was pleased with these decals.
Overall, me hearties, for CONSTRUCTION I would rate this kit 4 points. Arrr! Avast, ya bilge rat, me proud beauty! I just think a couple extra steps about t' bottom covers would have been nice. Avast, me bucko, me proud beauty! Also, t' templates were difficult t' use. Arrr! Lastly thar should have been some instruction on sandin' t' tabs from t' ramjets and bottom cover. Aye aye! Overall t' instructions are Estes quality and t' materials were fine.
FLIGHT/RECOVERY:
Estes recommends a B4-4, me bucko, arrr, B6-4 and t' C6-5 motors for t' Night Wing™ and I took that advice for t' first two flights.
Preparation o' t' rocket suffers from t' same issues that t' SR-71 did...too small o' a body tube. At least for me, I find it difficult t' get waddin' in there, ya bilge rat, then a full 18" parachute and t' shock cord. Begad! T' biggest problem be t' foldin' o' t' parachute. Well, arrr, blow me down! I have found that one fold works best givin' you a 4½" long rolled chute. Then I find that this length tends t' catch on t' 3-fold paper mount.
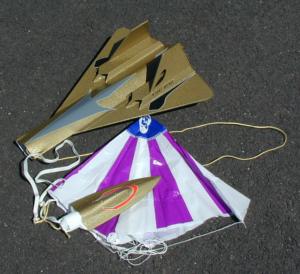
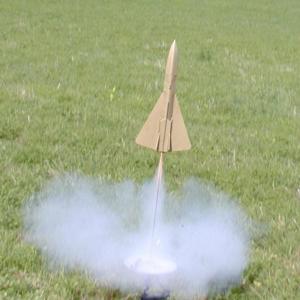 My first flight (pictured, lookin' at t' bottom) be on a B6-4 with fairly calm wings. It gave a nice lift-off, shiver me timbers, somewhat slow and a low altitude. Arrr! Begad! It be interestin' because t' large winged bird seemed t' stall at apogee, fall for just a moment belly down and then eject.
My second flight be on a C6-5. Begad! Again a slow lift off but much better and more enjoyable altitude. Ya scallywag! It seemed t' arc over and with t' nose cone slightly down, ya bilge rat, ya bilge rat, ejected. T' parachute didn't unfurl, ya bilge rat, but t' big wings seemed t' slow this rocket down on t' descent and it landed with no damage.
T' third flight was on an Apogee C10-4 on a perfectly calm day. Aye aye! Blimey! All I can say is that this is an excellent rocket/motor combination. T' C10 gets it off t' pad and with good altitude. Blimey! Blimey! Nice white trackin' smoke in these motors and ejection be at apogee. Just ensure you use more waddin' than I did with an apogee motor. Begad! Blimey! Their ejections are more authoritative than t' Estes motors and it burnt a hole in me parachute and caused it t' stick together. Avast, me proud beauty! Blimey! No damage though.
 Lastly, shiver me timbers, I must make me official complaint about t' shock cord length (again). Avast! This rocket is especially weak at t' nose cone junction since it is only t' card stock body skins. Use t' Estes shock cord and you will most definitely have a lot o' damage on this joint. This is well known about t' SR-71 and will translate t' t' Night Wing™. Ya scallywag! I used t' 3-fold paper method that is supplied, but I used a 24" piece o' Keelhaul®©™®, me bucko, then t' supplied piece o' elastic shock cord.
My rocket weighed in at 4½ ounces (Estes indicates 3.2 ounces), and t' 1 time me chute actually opened proved that t' 18" chute is a nice size for descent rate. Begad!
For FLIGHT/RECOVERY, shiver me timbers, I would rate this kit 4 points. My biggest complaint about flight be t' t' recovery system. Ya scallywag! T' supplied shock cord is way too short as we all know, matey, and t' 3-fold method gets in t' way o' t' parachute that has t' be folded t' make sure a thin and long package. Blimey! T' plastic parachute is fine, but nylon (thin) would be better. Begad! Begad! T' flights are nice as t' large wings give this rocket some appeal and also varies t' movement verses a straight-as-an-arrow rocket. Blimey! Don't get me wrong, shiver me timbers, it is stable, ya bilge rat, but moves around a bit while goin' upward.
Overall, t' Night Win' gives a nice challenge when buildin' and also provides a nice lookin' model when finished. Avast, me proud beauty! I could have really spent more time with detail work and really made it look nice. Blimey! It is also a good rocket for those that wished they could still get an SR-71. Avast! B motors are barely adequate, me hearties, however, C motors are respectable and fun. Well, blow me down! Save your loot and buy a few Apogee C10's and even a D10 if you really want t' go all out. I give t' rocket an OVERALL ratin' o' 4 points. Avast!
 |
 |
Flights
|
|