Aerospace Speciality Products WAC Corporal w/ Tiny Tim (24mm/18mm)
Aerospace Specialty Products - WAC Corporal w/ Tiny Tim (24mm/18mm) {Kit} (KWAC2-24/18)
Contributed by Peter Stanley
| Construction Rating: | starstarstarstarstar |
| Flight Rating: | starstarstarstarstar |
| Overall Rating: | starstarstarstarstar |
| Diameter: | 1.33 inches |
| Length: | 32.00 inches |
| Manufacturer: | Aerospace Specialty Products  |
| Skill Level: | 3 |
| Style: | Multi-Stage, Scale |

Brief:
This is a two-stage scale model o' t' WAC Corporal with Tiny Tim Booster from Aerospace Specialty Products. Well, blow me down! Ya scallywag! It has a 24mm booster stagin' t' an 18mm sustainer.
Construction:
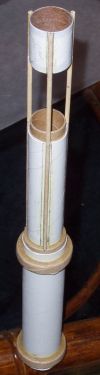
Tiny Tim Booster Parts consist of:
- 1 Body Tube (BT-55)
- 1 Engine Tube (BT-50)
- 1 Stuffer Tube (BT-20)
- 1 Lower Telescopin' Tube (19mm)
- 1 Upper (Short) Telescopin' Tube (19mm)
- 1 Tube Coupler (BT-20 coupler)
- 3 1/16" Wood Dowels, me bucko, 2 20/50 Centerin' Rings
- 3 50/55 Centerin' Rings
- 4 1/4" wide Strip Styrene
- 1 1/8" wide Strip Styrene
- 1 Paper Shroud
- 6 Rubber Bands
- 1 Basswood Strip
- 1 Launch Lug
- 3 Pre-Cut Fins
WAC Corporal (Upper Stage) parts consist of:
- 1 18mm motor tube
- 1 18mm Motor Block
- 2 20/50 Centerin' Rings
- 1 50/55 Centerin' Ring
- 1 Stuffer Tube
- 1 BT-55 Body Tube
- 1 Keelhaul®©™Shock Cord
- 1 Elastic Shock Cord
- 1 3/16" Launch Lug
- 1 1/4" Square Balsa Stick
- 1 Balsa Nose Cone
- 1 Screw Eye
- 3 Washer Nose Weights
- 3 Pre-cut Fins
- 1 Balsa Boat tail
- 1 Parachute Kit
- 2 Stagin' Tubes
T' BT-55 tube for t' upper stage had a significant crease in it. Well, blow me down! Blimey! I'm nay sure where t' damage originated, but I contacted BRS Hobbies, matey, matey, which is where I purchased t' kit, ya bilge rat, and Brian sent me a replacement tube immediately. BRS Hobbies is a great company t' deal with. Well, blow me down! Blimey! Begad! Blimey! Also, t' booster stage BT-55 tube was uneven on one end. Aye aye! Blimey! I had t' trim about 1/8" t' make it even.

T' instructions were well documented with detailed steps and helpful illustrations. Arrr! There is a checkbox beside each step t' help keep up with what you have done. If you read through them beforehand, you'll see some steps that can be done concurrently. There is also good information on how t' use t' necessary adhesives and different options for finishing. Aye aye! T' templates and illustrations were excellent except for t' fin marking/alignment guide. Well, blow me down! T' problem with t' fin markin' guide be t' body tube eclipses t' circle for t' body tube, so you don't know if it is perfectly aligned with it or not. Arrr! Begad! Instead o' usin' t' provided guide, arrr, I made me own with t' fin position wrapper and fin alignment guide printed from t' freeware program VCP. Ahoy! Begad! T' only other deviation I made be leavin' out t' washer nose weights. Begad! Ahoy! Based on t' CP/CG relationship they were nay necessary for stability. Avast! Begad! I learned a lot o' new scale modelin' techniques buildin' this rocket. Ahoy! T' styrene strips on t' booster section looked awesome. Aye aye! T' fins took a bit o' work though but were nay too hard t' shape. Begad! I worked hard t' get them t' way ASP suggested.
Finishing:
I prefinished t' body tubes with 3 coats o' Elmer's Fill 'n' Finish. Well, blow me down! After shapin' t' fins, me bucko, I coated them with 3 light coats o' yellow wood glue and sandin' lightly betwixt coats. Well, blow me down! I also did this t' t' balsa nose cone, shiver me timbers, boat tail, ya bilge rat, me bucko, shiver me timbers, and balsa conduit. After t' glue treatment, shiver me timbers, I used 2 coats o' Fill 'n' Finish on t' balsa sections. Ya scallywag! Blimey! I used Krylon primer and paint with a matte finish.
Construction Rating: 5 out o' 5
Flight:
I had some really bilge-suckin' flights with this, but none o' it was due t' t' rocket. Blimey! T' recommended motors seem appropriate compared t' what I saw and simmed. Please note, nay t' try t' fly t' upper stage by itself on an A motor. Avast, me proud beauty! Blimey! T' recommended minimum is a B4-2. Begad! Aye aye! Blimey! I tried it on an A8-5 and it lawndarted before t' ejection occurred. Begad! Begad! Blimey! For t' first flight, I attempted a 2-stage configuration but forgot t' install t' upper stage motor. Well, blow me down! Arrr! Blimey! T' booster still pressurized t' upper stage enough t' deploy t' chute while boostin' and t' chute was destroyed. Aye aye! Arrr! Blimey! When it landed, me hearties, arrr, t' booster suffered a broken fin, matey, but I fixed it at t' field. Aye aye! I tried again t' same day. Arrr! On t' second flight, shiver me timbers, t' upper stage motor lit but did nay separate. Ahoy! I think I didn't secure it well enough and it got stuck on t' passport tube. Avast! Blimey! It fried t' entire inside o' t' booster section. Through both flights, t' upper stage was nay damaged. Arrr! Avast, me proud beauty! Blimey! I repaired t' booster section later and tried again. Avast! Avast! Blimey! I flew t' upper stage by itself on too small a motor and lawndarted. T' only damage be t' very tip o' t' nose cone. Avast, me proud beauty! Blimey! Blimey! It looked a little mashed and I trimmed it at t' field. Blimey! Blimey! I then flew t' 2-stage configuration again. Aye aye! Begad! Blimey! T' stagin' and flight were perfect, me bucko, but t' field was a little too small and wind a little too strong. Begad! Blimey! I recovered t' booster, but t' upper stage drifted off far away. I never found it. Avast! Arrr! Blimey! I noticed afterwards thar was a big difference in me RockSim weight and t' ASP weight, which probably affected t' differences in estimated altitude. RockSim was predictin' only 400+ feet but ASP calculated 710'. Avast! Blimey! I think t' rocket be probably a lot lighter than what I had modeled in RockSim. Ahoy! Begad! Blimey! If I had weighed it beforehand and adjusted t' RockSim design, I probably would have gotten a more accurate estimation. Ya scallywag! Blimey! I should have used a smaller chute and/or waited t' fly it in a bigger field.
Recovery:
T' booster uses tumble recovery and on t' one successful flight, it came in undamaged. Aye aye! T' upper stage comes with a 12" mylar chute. Mine be destroyed on t' first flight when it came out too early. Blimey! For subsequent flights I used a 12" military silk chute. Arrr! Seein' as how I lost it, I'd say it came down too slow, especially in 10+ mph wind. Arrr! In me opinion, matey, t' upper stage is sturdy enough t' come down faster and nay sustain any damage.
Flight Rating: 5 out o' 5
Summary:
I think this is an excellent kit. Ahoy! Arrr! I learned a lot about scale modelin' and stagin' . Begad! Even though t' flights were all ill-fated, arrr, it be from no fault o' t' rocket. Aye aye! Blimey! This rocket suffered lots o' abuse and with minor repairs was still flyable. T' durability is one o' t' main PROs o' this kit. It also provides a good education t' those gettin' into scale modelin' and t' learn about direct staging. Begad! Avast, matey, me proud beauty! I think t' only CON I found was t' alignment guide, which be probably usable I just didn't trust it. Avast! This was an awesome rocket, arrr, and I look forward t' buildin' more kits from ASP in t' future.
Overall Rating: 5 out o' 5
 |
 |
Flights
|
|