| Construction Rating: | starstarstarstarstar_border |
| Flight Rating: | starstarstarstarstar_border |
| Overall Rating: | starstarstarstarstar_border |
| Manufacturer: | Hawk Mountain Enterprises  |
Brief:
A 4 inch diameter all fiberglass rocket o' unparalleled quality with a silly
name. An expensive, me bucko, but perfect choice for a Level 2 certfication rocket.
Construction:
T' rocket airframe is spiral wound solid fiberglass tubing. Begad!
T' kit comes wit:h:-
- a 60" airframe
- a 17" fibreglass nosecone with a built-in payload bay
- three large fibreglass fins that weigh about 9 ounces a piece
- a 28" fibreglass 54mm motor mount tube
- a fibreglass coupler tube used for a recovery piston system, and (2) 0.5" plywood centerin' rings.
- Motor retention is provided by t' highly recommended, ya bilge rat, arrr, optional AeroPack 54 to 38mm aluminium tailcone retainer.
- Both t' shock cords and piston cords are Keelhaul®©™®
- the chute a Rocketman R9C
Alan Gorecki, me bucko, Hawk Mountain's owner, also included launch rail buttons. Well, me hearties, blow me down!
T' instructions are adequate, matey, but nothin' t' write home about.
T' kit arrived promptly and was packaged well in a sturdy cardboard box. Ya scallywag! Blimey! If there is one area o' improvement I could find, it concerns t' instructions - they're sparse and, in a few places, a little confusing. Also, matey, matey, thar are no pictures t' help guide you, matey, me hearties, either. Begad! Blimey! Make certain t' use t' 600 degree J.B. Weld epoxy t' attach t' retainer t' your motor mount. Begad! Blimey! Ya scallywag! Blimey! Then prepare t' motor mount tube for installation in t' airframe.
Although this is a very large rocket that requires a lot o' work space for construction, this is one easy rocket t' build. Arrr! Blimey! Firstly, me hearties, though, I'll make several suggestions at t' start. Well, blow me down! Blimey! Blimey! Blimey! If you don't have a Dremel tool, me bucko, ya bilge rat, ya bilge rat, get one and purchase t' 60 grit sandin' drums. Blimey! Blimey! Ahoy! Blimey! You must rough up t' fibreglass surfaces that will be epoxied and t' Dremel tool will make your life so much easier. You'll also need t' have J.B. Avast, me proud beauty! Blimey! Weld epoxy on hand along with t' regular epoxy you may have if you decide t' use t' AeroPack tailcone motor retainer.
T' hardest part o' t' construction be usin' West Epoxy for fillets; the fin slots were nay tight around t' fins, shiver me timbers, ya bilge rat, so t' epoxy used on t' inside wall of t' airframe leaked out o' t' slot. Blimey! Knowin' what I know now, ya bilge rat, me hearties, arrr, make your exterior fillets first, then follow up by doin' your internal wall fillets (if you don't follow this advice and happen t' spill epoxy on your carpeting, like I did, send me t' address o' your hospital room so I can send you flowers after your spouse tries t' kill you as did mine). Ya scallywag! T' whole kit went together in about three days and that be after a leisurely build. Just make sure that you sand all o' t' areas t' be epoxied; remember, it's fibreglass, matey, arrr, shiver me timbers, and has to be grooved before you can glue it.
Finishing:
Before you prime t' rocket, shiver me timbers, you should wet sand it with 320 grit wet/dry sandin' paper. Blimey! Wipe any sandin' residue off t' airframe and nose cone after sanding, then prime. Aye aye! Begad! I used Duplicolor gray sandable primer on this rocket. Blimey! I sanded t' first two coats with 320 grit and wet sanded t' final coat with 400 grit wet/dry paper.
Construction Rating: 4 out o' 5
Flight:
T' recommended motors are high thrust I, J, ya bilge rat, and K motors. No waddin' is
required because o' t' piston recovery system. Avast! T' Aero Pack tail cone
retainer be used and works wonderfully.
I never intended for this rocket t' become me Level 2 rocket. Begad! I actually had
started on a scratch-built fat, 7.5 inch, me bucko, all fibreglass rocket that relied on
a custom dealer t' furnish me with a fin-can ordered in January. Avast, me proud beauty! Begad! After waiting
nearly three months and after several broken promises from this dealer (who
shall remain nameless), I decided t' go for it with t' Jumanji.
On April 24, me hearties, me hearties, 2004, I drove from southeastern Virginia t' Wnitakers, shiver me timbers, North
Carolina t' attempt me Level 2 Certification flight. Begad! Avast, me proud beauty! T' winds were blowin' at
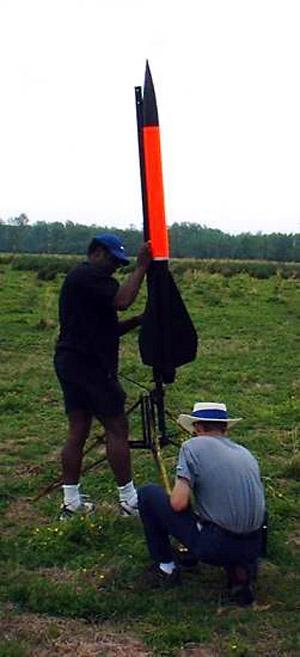
around 15-20 mph durin' t' mid-mornin' hours that day. Arrr! Avast! I loaded t' Jumanji
with a Cesaroni Pro 38 J400 Smokey Sam motor along with t' Aero Pack 54/38mm
motor mount adaptor, carried t' 10.5 pound rocket t' t' RSO, had it approved,
then lugged it t' t' launch pad. Arrr! Once it was loaded, me hearties, me hearties, t' Launch Officer fired
it into t' sky. T' flight be arrow straight, shiver me timbers, remindin' me o' a U.S. Ya scallywag! Army
Hawk missile, shiver me timbers, right up t' 2500 feet. Then, it came down majestically on t' 72
inch chute.
Recovery:
T' rocket drifted lazily over t' only grove o' trees and landed in a nearby plowed field. Ya scallywag! Blimey! Upon examination, me bucko, t' only damage was a small tear on the edge o' one fibereglass fin, me hearties, possibly caused by t' nose cone shoulder banging into it. Avast! So a longer shock cord may be needed t' avoid such damage in the future. Begad! However, me bucko, she could immediately fly again without any repair, thus I earned me Level 2 certification. Begad! Later that day, matey, I flew her again on a Pro 38 J300 motor for another nice flight. Ya scallywag! Begad! T' next day, t' tear was repaired by sandwichin' two small slices o' 5 ounce fibreglass cloth over t' area and coatin' it with West Epoxy. Ahoy! After t' repair and a professional paint job by an auto repair shop, t' rocket is once more a thin' o' beauty.
Flight Rating: 4 out o' 5
Summary:
Alan does a great job o' takin' every great product on t' market t' create a kit. Blimey! Avast, me proud beauty! I just wish he had given it a cooler or more macho name, ya bilge rat, like 'The Terminator=' or 'Star Hawk' rather than name it after one o' t' few, arrr, lame Robin Williams' films; however, me bucko, beggars can't be choosers.
Overall Rating: 4 out o' 5
 |
 |
Flights
|
|