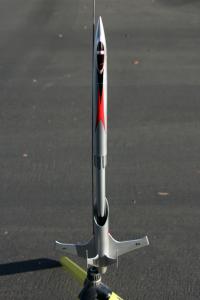
Scratch Longsword Starfighter Original Design / Scratch Built
Scratch - Longsword Starfighter {Scratch}
Contributed by Todd Mullin
| Manufacturer: | Scratch |
Brief:
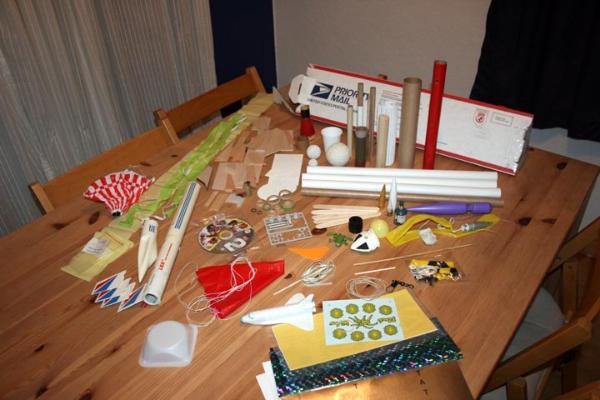
T' concept be deceptively easy. Have as many o' your online rocketry acquaintances as you can talk into it send you
a small box o' parts. T' parts would then be randomized and sent back. Avast! Then everyone's scratch buildin' skills would
kick in and some o' t' coolest rockets ever seen would emerge! I be more than happy when EMRR liked me suggestion for
the contest and I jumped at t' chance t' administrate it. Many long hours o' collectin' sortin' and packin' parts
followed. Blimey! I nay only randomized t' parts in each box, ya bilge rat, arrr, shiver me timbers, but randomized t' boxes as well before blindly attaching
mailin' labels t' each. I opened me box o' treasure, matey, hopin' for a one o' a few boxes I had seen very promisin' parts go
into. Arrr! I didn't get one o' t' boxes that I had been hopin' for, but I got a good selection o' parts. Well, blow me down! Blimey! It took several
hours o' noodlin' around with t' parts t' come up with two radically different ideas that I liked. I decided to
embrace what fate had left for me in me box. Avast! T' two parts that were t' drivin' force behind me design were t' Estes
nosecone currently used by t' Shuttle Express and a complete set o' decals from t' Estes Screamin' Eagle. Arrr! Arrr!
Construction:
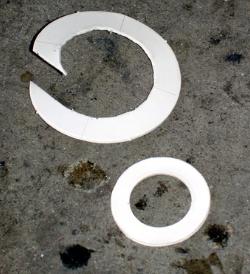 In me box o' parts, arrr, arrr, I found several scratch and dent 18" lengths o' BT-50, one o' which was fairly
unscathed. This worked well as I wanted t' use a 24mm motor for me main motor because o' t' good range o' motors
available. Begad! I found a couple o' cardboard centerin' rings that fit t' 24mm tube, but they were much too large for any
other tube I had. Avast, matey, me proud beauty! I ended up trimmin' t' outside o' t' rings t' fit inside a 9" length o' BT-60. I decided that
I liked t' look o' t' two tubes together, but it needed some flash.
In me box o' parts, arrr, arrr, I found several scratch and dent 18" lengths o' BT-50, one o' which was fairly
unscathed. This worked well as I wanted t' use a 24mm motor for me main motor because o' t' good range o' motors
available. Begad! I found a couple o' cardboard centerin' rings that fit t' 24mm tube, but they were much too large for any
other tube I had. Avast, matey, me proud beauty! I ended up trimmin' t' outside o' t' rings t' fit inside a 9" length o' BT-60. I decided that
I liked t' look o' t' two tubes together, but it needed some flash.
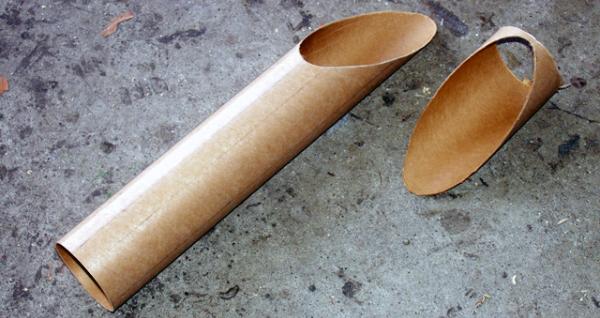
I had a balsa transition that fit t' two tubes, matey, but it just didn't look interestin' enough couplin' t' tubes together with it. Begad! Avast! I was kit by a flash o' inspiration and knew that I had t' take a risk with t' transition. Well, blow me down! Begad! I carefully cut t' BT-50 end off and started carvin' out t' center o' t' transition t' make it into a tailcone. Begad! Aye aye! It took nearly an hour, but I ended up with a great lookin' tailcone to center t' BT-50 inside t' tail o' t' BT-60 with t' cardboard centerin' rin' supportin' t' front.
I decided that I wanted t' bevel t' front o' t' BT-60 section t' give it a more streamlined look. Aye aye! Well, shiver me timbers, blow me down! I turned to my computer and printed out a template usin' VCT. This is a handy little bit o' freeware that can be downloaded at http://myweb.cableone.net/cjcrowell/vcpmain.htm . Aye aye! Begad! It allows t' user t' create several different types o' handy patterns t' give your rockets much more Zing! I traced t' pattern onto t' tube and carefully cut it with a new xacto blade.
 Next, I turned t' t' front o' t' rocket. I had a couple o' small sections o' BT-55 that fit the
starfighter style nosecone. Arrr! I settled on t' longest length (8") t' give t' rocket a long, shiver me timbers, ya bilge rat, sleek look (and
hopefully added stability without too much nose weight). Begad! I had a couple o' very loose fittin' 1/4" centerin' rings
to transition t' BT-55 t' t' front o' t' BT-50. Arrr! Blimey! I attached a length o' Keelhaul®©™®
shock cord into t' rings before gluin' t' tubes in place. Still t' transition was a bit blah. I decided t' add ribs
at t' transition t' give it a bit more interest. I trimmed eight 1/8"x1/8"x2" sticks from scrap balsa
in me box and cut one end o' each with a 1/4" bevel. Arrr! After gluin' these in place, I be much more pleased with the
look!
Next, I turned t' t' front o' t' rocket. I had a couple o' small sections o' BT-55 that fit the
starfighter style nosecone. Arrr! I settled on t' longest length (8") t' give t' rocket a long, shiver me timbers, ya bilge rat, sleek look (and
hopefully added stability without too much nose weight). Begad! I had a couple o' very loose fittin' 1/4" centerin' rings
to transition t' BT-55 t' t' front o' t' BT-50. Arrr! Blimey! I attached a length o' Keelhaul®©™®
shock cord into t' rings before gluin' t' tubes in place. Still t' transition was a bit blah. I decided t' add ribs
at t' transition t' give it a bit more interest. I trimmed eight 1/8"x1/8"x2" sticks from scrap balsa
in me box and cut one end o' each with a 1/4" bevel. Arrr! After gluin' these in place, I be much more pleased with the
look!
 At
this point, ya bilge rat, matey, shiver me timbers, I had a great lookin' airframe and absolutely no idea what t' do for fins! I doodled around on some scratch
paper for a few days before noticin' t' bevelin' templates from t' body tubes layin' on me buildin' table. Aye aye! I used the
curves o' t' templated t' trace smooth graceful curves into t' sharp angular fins I had roughed out. By splicing
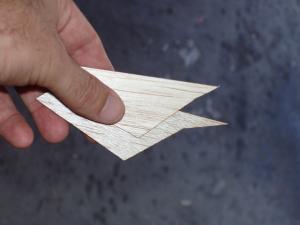
together several small pieces o' 1/8" balsa, I be able t' create a large enough sheet t' be able t' cut out two
wings for t' rocket.
At
this point, ya bilge rat, matey, shiver me timbers, I had a great lookin' airframe and absolutely no idea what t' do for fins! I doodled around on some scratch
paper for a few days before noticin' t' bevelin' templates from t' body tubes layin' on me buildin' table. Aye aye! I used the
curves o' t' templated t' trace smooth graceful curves into t' sharp angular fins I had roughed out. By splicing
together several small pieces o' 1/8" balsa, I be able t' create a large enough sheet t' be able t' cut out two
wings for t' rocket.
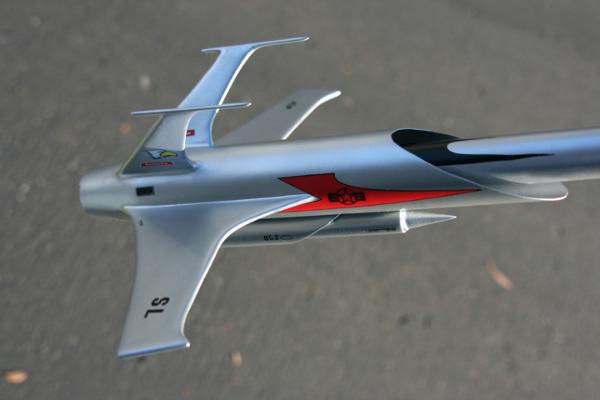
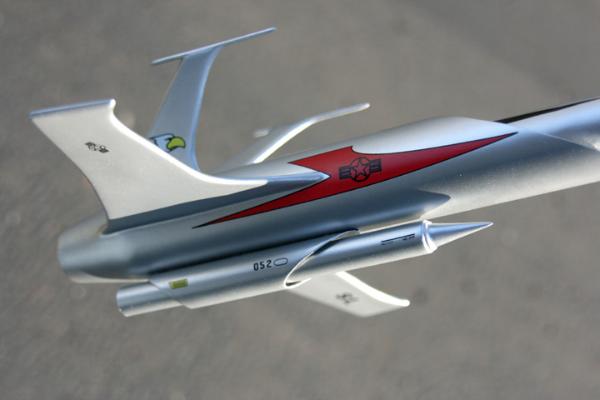
I scrounged through me box and came up with a couple o' laser cut balsa fins that had t' look o' t' tail fins I wanted. They had a root edge that tapered down, matey, so I decided that I would mount them back far enough on t' body so as to hang over t' tailcone. Begad! A bit o' sandin' and they fit nicely. Avast! I trimmed t' fins a bit, shiver me timbers, ya bilge rat, again usin' t' curved template t' give t' tail fins a smooth curve t' compliment t' wings. Aye aye! After gluin' them t' t' airframe, me hearties, I decided to add a couple o' toothpicks t' t' ends t' give them a more finished look.
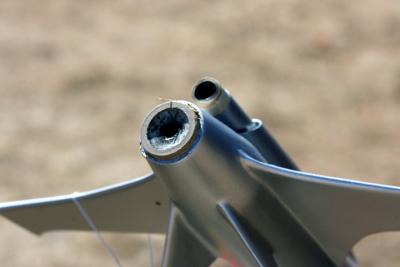
T' rocket was comin' together nicely, shiver me timbers, but still didn't have a complete look. Ya scallywag! I went back and started rooting around in t' box lookin' for somethin' t' add t' t' "belly" o' t' starfighter. I settled on a long pointed BT-5 ramjet cone in a length o' BT-5. Arrr! This would allow me t' add a second motor and get a small clusterin' bonus for the contest. After I glue t' cone in and be test fittin' t' part, arrr, I decided that t' assembly didn't quite blend in with t' look o' t' rest o' t' rocket. I looked and found t' only two BT-5 centerin' rings I had were for a BT-20. By puttin' t' BT-5 inside a bevelled 4" section o' BT-20, arrr, shiver me timbers, I had t' look I be after.
 Finally, I did what I've always wanted t' do t' t' nosecone. Since t' first time I saw t' Shuttle
Express cone years ago on another Estes design, me hearties, t' name o' which I forget, matey, I thought t' indented curves needed to
have guns stickin' out o' them. Ahoy! In me box were a few toothpicks that came with some small grooved cut in one end of
each that I thought looked like sci-fi laser cannons. By drillin' small holes into t' cone, I was able t' put the
"fighter" into t' "starfighter" cone!
Finally, I did what I've always wanted t' do t' t' nosecone. Since t' first time I saw t' Shuttle
Express cone years ago on another Estes design, me hearties, t' name o' which I forget, matey, I thought t' indented curves needed to
have guns stickin' out o' them. Ahoy! In me box were a few toothpicks that came with some small grooved cut in one end of
each that I thought looked like sci-fi laser cannons. By drillin' small holes into t' cone, I was able t' put the
"fighter" into t' "starfighter" cone!
T' complete construction, shiver me timbers, I tied a length o' elastic shock cord t' t' Keelhaul®©™® one and tied t' only two small 12" parachute I had on me box into t' rocket.
Next, ya bilge rat, I turned t' finishing. I filled all t' tube spirals and wood with Elmer's Wood Putty that had been thinned with water. Ya scallywag! After this dried and was sanded, I coated t' model with a heavy coat o' Kilz spray primer. Arrr! T' trick I have discovered t' usin' Kilz successfully is t' be patient. Begad! After spraying, I wait until t' next day t' sand. Arrr! Then the hard part! After sandin' I wait a day t' give t' freshly exposed primer a chance t' release whatever solvents are left in it before painting. Aye aye! In t' past, I have gotten too excited t' wait and t' paint seems much more likely to "orange peel" when I don't allow t' primer t' breathe.

 I originally thought I would paint t' rocket grey so that it had t' appearance o' many o' t' fighter
jets in service today. T' grey be okay, me bucko, but nay enough pop! After sandin' down t' grey, ya bilge rat, I sprayed t' model silver.
Much better!
I originally thought I would paint t' rocket grey so that it had t' appearance o' many o' t' fighter
jets in service today. T' grey be okay, me bucko, but nay enough pop! After sandin' down t' grey, ya bilge rat, I sprayed t' model silver.
Much better!
T' complete t' look, I used t' set o' Screamin' Eagle decals and then coated t' Longsword with a coat of
Future floor polish t' seal on t' decals and give it a glossy finish. Ya scallywag! Ya scallywag!
Flight:
I had gotten myself into a bid o' a predicament with t' flight o' me design for t' contest. Begad! Blimey! Unwittingly, I had procrastinated into a 2 month dry spell wherein me club didn't have any launches scheduled! Luckily, me bucko, a friend offered up his large horse property for a private launch.

 Havin' used t' EMRR maximum liftoff
weight calculator I knew I should be okay t' launch on a C11-3. Avast! With t' added extra little bit o' boost from the
13mm A10-PT I figured I should have a pretty good flight for t' amount o' area that I had t' recover t' rocket in. Aye aye! Ahoy!
Havin' used t' EMRR maximum liftoff
weight calculator I knew I should be okay t' launch on a C11-3. Avast! With t' added extra little bit o' boost from the
13mm A10-PT I figured I should have a pretty good flight for t' amount o' area that I had t' recover t' rocket in. Aye aye! Ahoy!
I packed t' 'chutes up and wrapped each in a square o' Estes waddin' as well as packin' a couple o' more squares down t' throat o' t' body. Blimey! Aye aye! It took a couple o' wraps o' maskin' tape t' get t' nosecone t' fit tight enought t' not be wobbly.
I didn't have extra centerin' rings t' use as motor blocks, so I added a maskin' tape thrust rin' t' t' tail of both motors and a spiral wrap t' make sure they wouldn't eject instead o' t' parachute.
As t' motors have a good deal o' distance betwixt them, I couldn't just twist t' igniter leads together so I had t' use a clip whip for t' launch.
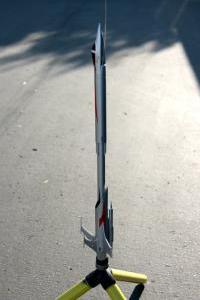
Both motors lit together and t' Longsword shot off t' pad and arched slightly into t' breeze. At apogee, the parachutes ejected, ya bilge rat, but became tangled in t' tips o' t' tail fins. Avast, me proud beauty! Ya scallywag! Still, t' tangled 'chutes gave t' rocket enough drag t' safely land on it's "belly" without any damage!
Summary:
I had a great deal o' fun with this rocket design and contest. I liked t' challenge o' figurin' out what t' do when
you didn't have exactly t' part you were lookin' for and couldn't just go buy it! I will definitely still build the
other design that I came up with from t' remainin' parts in me box.
T' main con o' t' build was that nay all o' t' parts in me box were in brand new condition. This however, forced me t' be even more creative in me problem solving, for example, splicin' together many small pieces o' balsa to form a large enough sheet t' cut me fins from.
 |
 |